

Ivory Sanctum |
|
|---|---|
 |
|
| Location | Worldwound |
| Sub-Areas | ?? |
| NPC's | Jerribeth Xanthir Vang |
| Quests | |
Ivory Sanctum is a Location in Pathfinder: Wrath of the Righteous. A pile of skulls in the middle of the scrubland is a sign that conceals the entrance to the secret hideout of Baphomet's worshipers. They have been hiding here for decades, planning assaults on the crusaders, scheming, and performing blasphemous rituals. A treasury filled with the secrets of the cultists, and perhaps their masters, can be found here.
Ivory Sanctum Information
- Travel to Ivory Sanctum, interact with a pile of bones to reveal the entrance to the maze. (The key can be found from quest The Final Sunset of Winter. If you traveled here without killing the dragon, Greybor will ambush you.)
- If you chose the path of the Azata, several free crusaders will appear and defeat the demons just inside the cave before the sanctum.
- Defeat the enemies and open the first door by standing on two plates on the left and right. The demoness Jerribeth will then appear and offer you a deal - work with her to get rid of Xanthir Vang. If you agreed, then her followers will not attack you in this location. (You can still attack her after you defeat Xanthir)
- Keep exploring the sanctum, be careful about the rock traps, they can instantly kill your character. (Succesful Reflex saving throws prevent the instant death effect, but your party still get some damage.)
- In the upper part of the maze, there's a room with 2 locked doors. One of the doors can only be opened after you defeat Xanthir, the other one can be opened by pressing a combination of buttons. A note with a code is lying in the corner. See below for the puzzle solution.
- This door leads to Jerribeth's chamber, if you turned down her offer, you now need to fight her. Jerribeth tends to use mind-affecting spells on your team, so be prepared.
- Xanthir's lab can be found on the east side of the map, defeat his demons and followers, you can unlock the door by letting two characters stand on the pressure plates. And the rest pressing the three buttons on the walls.
- You will later meet some golems guarding the dragon eggs, if you managed to stop the golems, you can later send the eggs to Drezen.The password to stop the Golems is ... Password. (killing golem 240 xp each, deactivating them 960 xp, smashing eggs 960 xp, azata option 960 xp)
- Continue exploring the maze. In the south part of it, there are also three dead-end corridors with bowls that you can interact with. Do this and kill ever guard.
- After you cleared the maze, use the exit on the east side of the maze and head out. You will be welcomed by a large group of demons, but some angels will also appear and help you.
- Defeat Xanthir in his lab (you can unlock mythic path The Swarm that Walks), take his key, and return to Jerribeth.
- In a hidden alcove/tiny room on the west side of the map (just north of the entrance, but you have to go a long way round to get to it), is a vampire coffin. Slay the vampire and get Phantom Slayer's Bracers.
Puzzle Solutions
Wall Tile Puzzle 1
This puzzle is located in the north of the map. The following combination will reveal a chest containing a Ring of Sacred Touch.

Wall Tile Puzzle 2
This is the same wall panel as the first puzzle. The following combination will open the locked door next to the puzzle.
Wall Tile Puzzle 3
This puzzle is located in the central chamber of the Ivory Sanctum. Enter the following combination to reveal a chest containing a Cloak of Carnage and the Circle Mask for the quest More than Nothing.

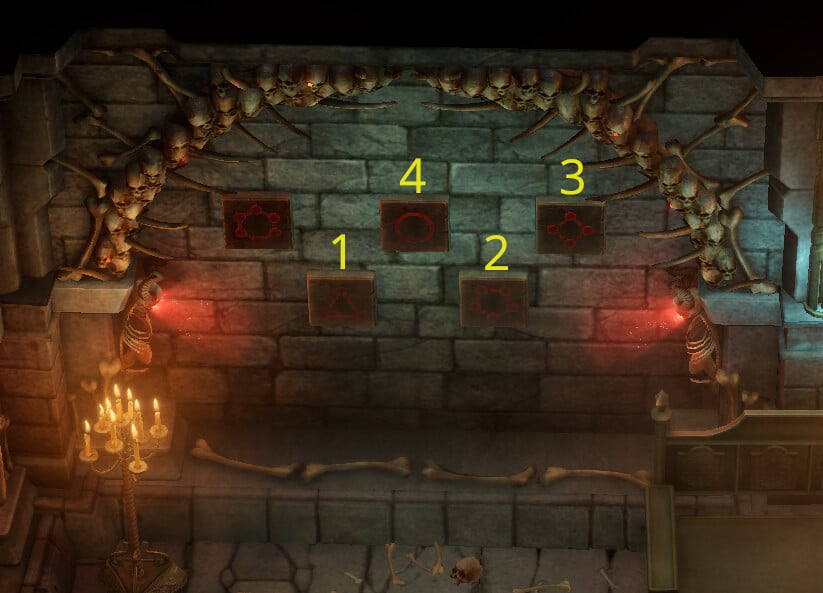
Wall Tile Puzzle 4
This puzzle is located in the south wing of the sanctum, in the room with the mimics. This wing is accessible only through the room with the dragon eggs. Place one party member on each of the two floor pads in this room and enter the following combination to reveal a secret room containing a Demonic Resentment, Bracers of Breaching, and White Wind's Cloak. An Eternal Guardian will appear, which you will need to defeat. Furthermore, the altar in secret room constantly emits negative energy during this fight, healing the guardian. Draw the guardian out of the room to significantly reduce the difficulty of this fight.

Ivory Sanctum Map
Path to Xanthir's Lab Map
You arrive at the bottom of this map when you leave the golem area of Ivory Sanctum. There is a ledge that you can get across with a skill check. It takes you to Vorimeraak (the Vrock from the encounter where you rescue Janna Aldori). There is a dialog and some skill checks if you're so inclined. (If you scare her away, it's 30 XP for the skill check, plus 480 XP for clearing the way. If you fight, she summon 2 Elder Vrock to her side [120 XP each, Vorimeraak 90XP and she carries an Amulet of Mighty Fists +1 and a Ring of Protection +1. The Elder Vrocks has nothing. No additional XP after victory.]) Afterward, fight along the path until the event starts. Fight that, then exit via the north to finish with Xanthir.

NPCs at Ivory Sanctum
Quests related to Ivory Sanctum
Ivory Sanctum Notes & Tips
- Disclaimer: Completing "Know Thy Enemy" before completing "Attack Out of Nowhere" (in Molten Scar location) will fail the "Attack Out of Nowhere" quest when Molten Scar is visited after completing "Know Thy Enemy". With Trickster or Angel mythic path, using dialogue options before meeting Zanedra at this location will save Kyado during the "Seek and Ye Shall Find" quest. Kyado is a priest at the Temple of The Good Hunt. Revealing the hidden temple of Baphomet within the Temple of The Good Hunt before meeting Zanedra here will present Angel/Trickster mythic path dialogue options that can save Kyado during the "Seek and Ye Shall Find" quest. "Seek and Ye Shall Find" is a quest triggered when meeting Zanedra during the end of "Know Thy Enemy".
- Can find Midnight Bolt and Elven Note in this location.
- The rolling rocks are labelled Citizens.
- Finnean Pages can be found in a locked chest.
- The golems, what guards the dragon eggs, if they receive the correct password, provides you with 4 command options:
- Deactivation: Deactivates the golems instantly.
- Destruction: The golems destroy the eggs.
- Eradication: The golems attack you, without hurting the eggs.
- Information: The golems tell you some information about themselves - the only option, after they still can issue another command. - When you meet Vorimeraak, if you has Ember in the party, she compare the Vrock into a baby with a knife, choosing the right dialog. She doesn't like metaphor...
 Anonymous
In Xanthir's lab, there are TWO doors. One set of doors leads to the circular room with a towering statue of Baphomet. The other door leads to more of the maze. In order to unlock both:
1. Put two party members the pressure plates in the room.
2. Press the button near the set of doors next to the racks that the demons were strapped onto.
3. Try one or both of the doors. One of them should unlock.
4. Press that same button again, then try the other door.
I really advise to bring Nenio with you - there is a room with a Disciple of Xanthir and some Follower of Jerribeth, who have some dispute between them. Nenio adds a nice flavor to their conversation...
- Anonymous
i cant find jerribeth after clearing the dungeon. where is she?
- Anonymous
anyone notice Marhevok? Jerribeth told me I killed him But I didn't notice. damn
- Anonymous
Do you play Solo? Otherwise you should have more than more Char with Perception.....
You should use the +5 Item on your Char with the highest Perception and retry. You need to finish the Sanctum for the Game.
- Anonymous
The far east room I cant get the door to open. Im stuck and cant proceed. I have players on the pressure plates. I've found 2 buttoms but you say there is 3. Please tell me a 1 time perception fail now means I cant finish the Sanctum. The east room door will not open
This page is missing the solution to the puzzle in the far south room. The solution is: Circle, Pentagram, Hexagon, Triangle
- Anonymous
- Anonymous
I'm having trouble deciding to take Jerribeth's offer at the begining of the Sanctum. What happens if I decline? do i miss out on some sort of awesome plot line>?
- Anonymous
Aww I kinda regret killing Devarra now before entering the Sanctum :(
I wonder if there's some special interaction or if you can even recruit her, if you save her eggs.
- Anonymous
Is the door perception locked (+34 does not seem to find it)?
- Anonymous
- Anonymous
2 questions:
1) I can't manage to get access to that section after Jerribeth's room. It's a wall, but it is perception locked? Anything important back there?
2) There is a locked door in the room outside of Jerribeth's room (the one with the puzzle). It says it needs a key. I've cleared the place, but cannot get access.
- Anonymous

Why does this game have so many horrible puzzles...
5
+10
-1