More than Nothing |
|
|---|---|
 |
|
| Location | Ineluctable Prison |
| Reward | New Nahyndrian Crystal |
| Companion Quest | Nenio |
More than Nothing is a Quest in Pathfinder: Wrath of the Righteous. Quests can provide unique adventuring experience, as well as powerful gears and treasures. Some quests are time-limited and some can only be completed with certain companions.
Objectives
Talk to Nenio
- The great - by her own assessment - researcher Nenio has agreed to take on a new companion. It is impossible to say where this acquaintance will lead, but it is clear that the first experiment will hardly be the last.
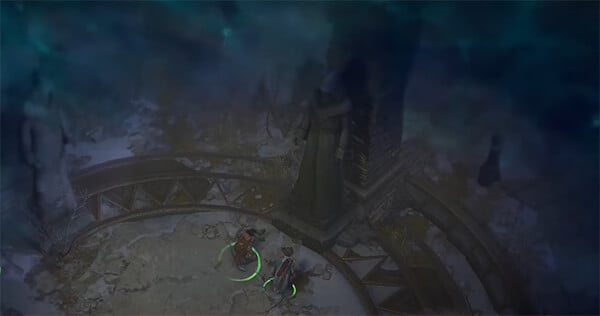
Visit the Nameless Ruins with Nenio
- Nameless Ruins. The name itself hints that there is nothing of interest in this place. But not for Nenio, who claims that her nose for an intriguing mystery has never failed her.
Solve the riddles of the Nameless Ruins
- Four statues posed their riddles to Nenio and the Commander. Solving these riddles will allow them to meet the owner of the mysterious voice who seems to know the answers to all the questions of the universe. This mysterious stranger may be dangerous, but Nenio is willing to take that risk.
Help Nenio unravel the mystery of the Enigma
- The place Nenio was so determined to reach turned out to be a mysterious Abyssal plane called the Enigma. Despite everything, Nenio wants to explore this plane, but why? Simple morbid curiosity or something more?
Unravel the mystery of the Enigma
- Nenio boldly forged ahead with her intentions to uncover the secrets of the Enigma on her own. If the Commander is interested in her fate or the Enigma's mysteries, he will have to keep going.
Strike down Areshkagal
- Areshkagal's nihilistic sophistry did not seem to impress the Commander, and now Areshkagal intends to wow him using more conventional methods.
Talk to "Nenio"
- The Scientist's mask is off, revealing the gaping hole of emptiness that acquired consciousness and decided it could be something greater than what it was. A conversation with the Commander will put things into perspective.
Walkthrough
More Than Nothing is an extremely long quest, spanning most of the game and encompassing multiple dungeons and puzzles. The quest is acquired by recruiting Nenio in Act 1, after encountering her in a random encounter in Kenabres. At some point after recruiting her, speak to her in the Defender's Heart. She will ask you to accompany her to the Nameless Ruins. This stage of the quest cannot be completed until after Act 1.
After Act 1 concludes and you complete The Beginning of a Long Road, you will have access to the world map. Go to the Nameless Ruins with Nenio in your party. The Nameless Ruins are located not far north of Kenabres on the world map. Battle through the plague bears and gargoyles on the steps leading down to the statues. Once you have arrived at the bottom, interact with the statue to start a cutscene. Afterward, Nenio will ask you to help her solve the puzzle presented during the cutscene.
To solve the puzzle, there are four statues that will each need a specific mask placed into their inventories in the Nameless Ruins. You will not be able to acquire these masks until later in the game.
These masks are the:
- Circle Mask (Found in the Ivory Sanctum, Act 3)
- Summit Mask (Found in Pulura's Fall, Act 3 or 5 depending on your mythic path)
- Darkness Mask (Found in the Heart of Mystery, Act 3)
- Question Mask (Found in the Ineluctable Prison, Act 5)
Once all four masks have been collected, return to the Nameless Ruins and place the masks on the statues. The mask and statue pairings are:
| Statue Description | Mask |
| "I am the impetus to act" | Question Mask |
| "I am the void and the emptiness" | Circle Mask |
| "I am the end of the road" | Summit Mask |
| "I am the unknown" | Darkness Mask |
If you are successful, a portal will open to a large dungeon, The Enigma. (Note: you may need to place all of the masks correctly, and then take all of them off for the portal to appear)
The Enigma
Before you enter the portal, get ready for a long haul. This is one of the longest dungeons in the game. Also, if possible, consider preparing Dimension Door (makes a few things easier) and Protection from Energy (Communal). Bring some big Bags of Holding - the location has a lot of loot. There are also many enemies that cast Phantasmal Putrefaction in this area, so immunity to fear and ability score damage is highly recommended.
- To face Areshkagal, you need to solve the puzzles in the Enigma. Puzzle answer pictures are shown facing north unless otherwise noted.
- To enter the Enigma pyramid, you need to kill a guardian golem and loot Blue Binding Source (BBS) from him, then put it into the dried-up magic spring (DUMS) you passed on the way to the golem. Then hit the switch attached to it and the door will open.
- Once you enter, you will find yourself in an area with four DUMS. Ignore them for now, and in fact, do not put anything in them until you've explored further - once placed in this room, the BBS can't be removed.
- Head north, past a green-red puzzle, to a room with a statue. Interact with the statue and it will give you a riddle. Follow Nenio's advice, otherwise you'll get a debuff.
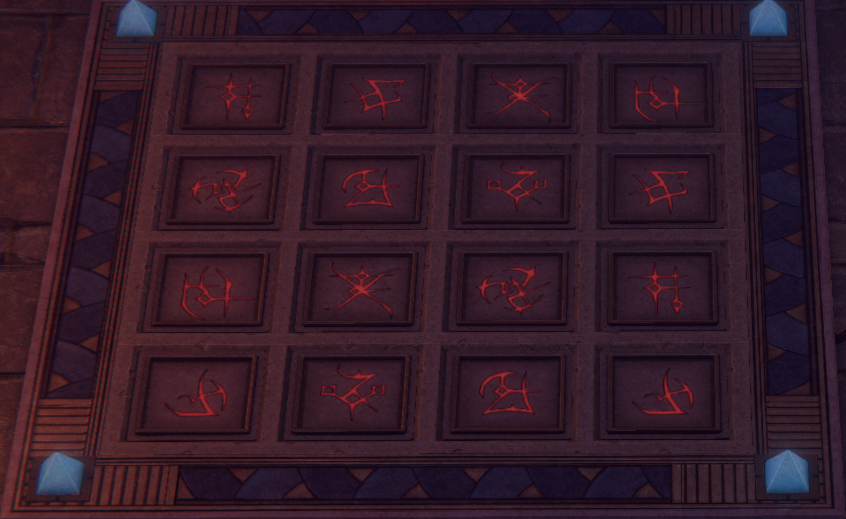
- A door will open. Behind it and through a couple rooms is a room with a match puzzle. (Along the way you'll encounter a rotating statue that casts irresistable Waves of Exhaustion. This is the first of several, so get used to dodging it or have some means of curing Exhaustion.) The key is pictured below, but this is pretty straightforward: any time you reveal a match, it stays revealed, and any time you reveal a non-match, all tiles are hidden again. It's a memory game, basically.
- Top right wing puzzle (click the matching symbols):
- The solved puzzle will open two doors. Proceed through these doors into a room with some stronger guards. Loot the BBS from the pillar.
- Turn back around and head down to the Pyramid Depths (using the door in the match puzzle room).
- The mini-boss of this area will infinitely spawn normal mummies, so ignore them (switch off turn-based mode if needed) and collect three BBS from the area, then kill the mini-boss and exit the Pyramid Depths via the other stairs.
- You are now in the southern area of the pyramid map. You will find another BBS to the south.
- There is also a room where it might seem like you're stopped by some statues. If you have the Dimension Door (Mass), you can bypass them. Otherwise, fill up both the local DUMS with BBS until and activate the constructs, then defeat them and the way will be clear.
- Take another BBS from the room you accessed this way, then collect any BBS you used in this area and return to the beginning of the pyramid via Pyramid Depths once again.
- You now have enough BBS, so fill the four DUMS in the entry room with them, then push the button in the middle three times to unlock the door.
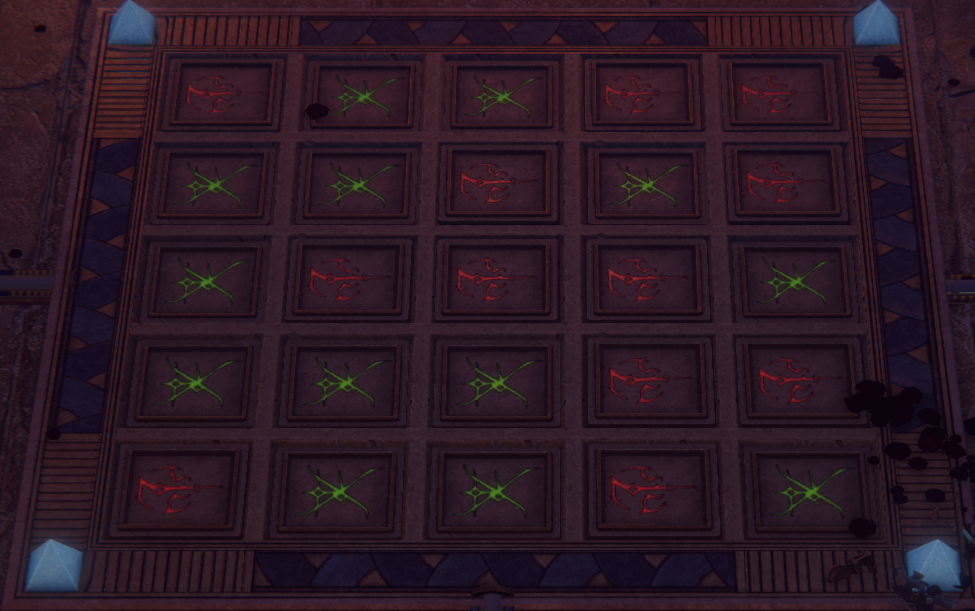
- Press the button once more to make the light face north, then go north and fill the two DUMS with BBS (this will activate more golems to fight). Solve the green-red puzzle according to the picure below, then push the button that was lit by the solved puzzle.
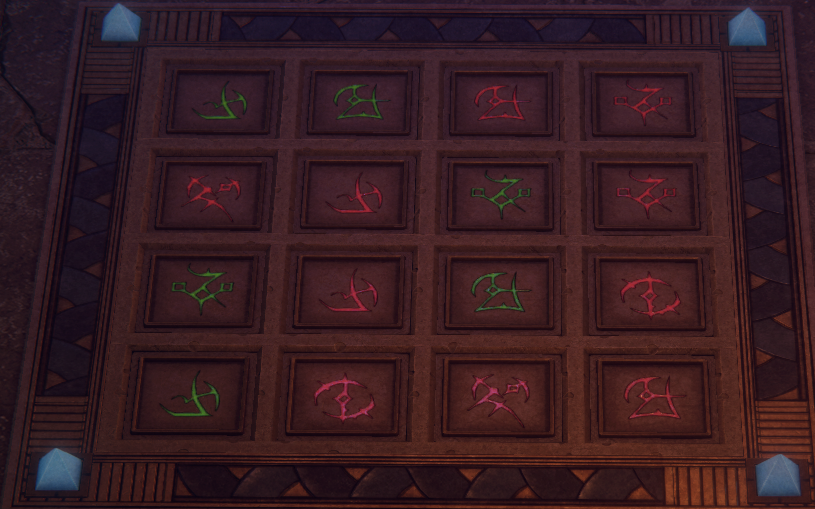
- Enter the room that opened and loot another BBS. There is an illusury wall in this room. Go through it and you will find another match puzzle, this time with two colors. The key is below. Note that differently colored versions of the same symbol are not a match. Complete the puzzle to loot Robe of Water.
- Go back to the first green-red puzzle and retrieve the two BBS you put in the DUMS there to activate it.
- Return to the room with four filled DUMS and head west through the unlocked door, through a big room several DUMS - ignore them for now. Head south from here to be questioned by a voice. Listen to Nenio's advice again and answer the questions appropriately ("Nothing will change," "No one," and "I don't know"), then proceed to the Ruined Passages door.
- In the northeast, you will find a BBS, and in the center room a Green Binding Source (GBS) and a mini-boss. Pass a Strength check on the scorpion body to loot Scorpion Sting. To the west you can pass an Athletics check to get some loot and a chance to cleanse yourself of corruption (there's also an interesting expedition diary). Leave the Ruined Passages.
- (Optional) At this point, you can return to the four DUMS you lit up earlier and push the button until the glowing line points south. Head south to the arrow puzzle in this area and fill the two DUMS necessary to activate the puzzle, then solve as in the picture below, then fill another DUMS to the south and push the button. All of this will only reveal some potions and a Cruel Living Bane Sickle +5, however, so feel free to skip this whole step if you're getting bored. Retrieve the three BBS used here once you're done.
- Southern arrow puzzle solution (picture taken facing west; align using the power lines at the edges):
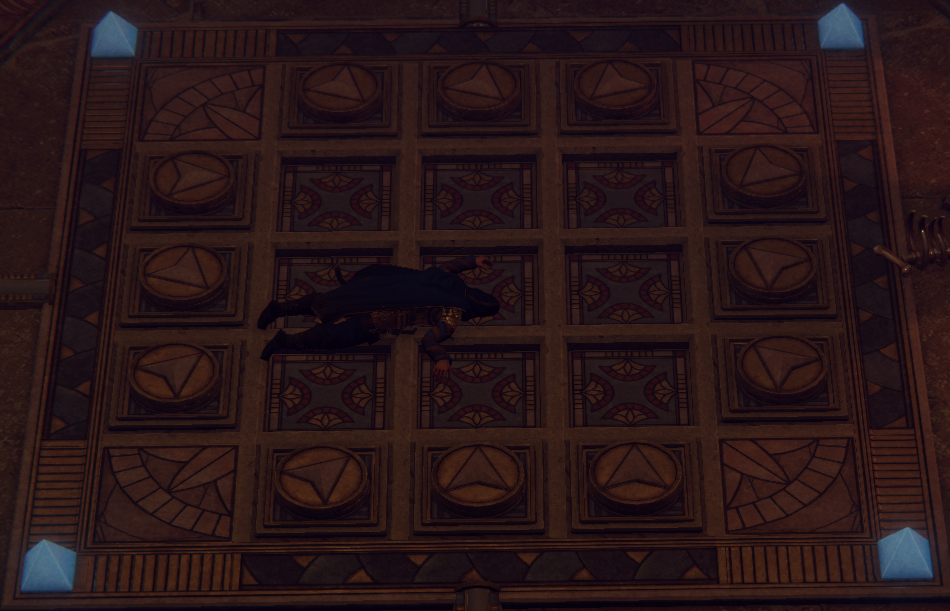
- Go back to the big circular room with many unfilled DUMS and head north to the Forbidden Chamber.
- In the Forbidden Chamber, you'll find one BBS, a Robe of Air, and two buttons (one east, one west) that you need to press to open the central door.
- Behind the freshly opened door is a mid-level boss fight which has one huge danger: Mass Icy Prison. Do anything you can to prevent him casting it on you. Especially keep your spell casters out of his range, since presumably they have a low STR stat and so would never break out of it.
- If this happens, you can try casting Protection from Energy - Cold, or just rest and you should wake up free from the Icy Prison.
- In any case, you will find a GBS and a Quicken Metamagic Rod in the central room.
- Leave the Forbidden Chamber and head back to the big circular room, then as far west as you can. There is another space with 4 DUMS. Fill them up with BBS, then press the middle button three times and defeat the golems to the west. You will find another BBS west of the golems. Then press the button again until the line north is lit up. Head north.
- Talk to the Strangers, then repeat what they said in front of the statue - if you don't remember, see below:
- Areshkagal Statue Riddle: "I reject..." "I shall forget..." "Oh, great Areshkagal!" "I shall become..." "Pour your meaning..." "I am nothing ..." then pass the Will or Lore (Religion) check.
- Proceed forward, head north, and put a BBS into the DUMS you come across (it's partly hidden by the illusory treasure). Do not click on any loot in this sector of the pyramid yet - it'll just turn to sand and curse you. Just find one BBS, then an arrow puzzle that will need some DUMS filled to activate. Do so, then solve it (key below, facing north). Defeat the golems and press the button nearby. There is a newly revealed room with a BBS. Pick it up, then clear out all three BBS you used to fill the DUMS in this sector.
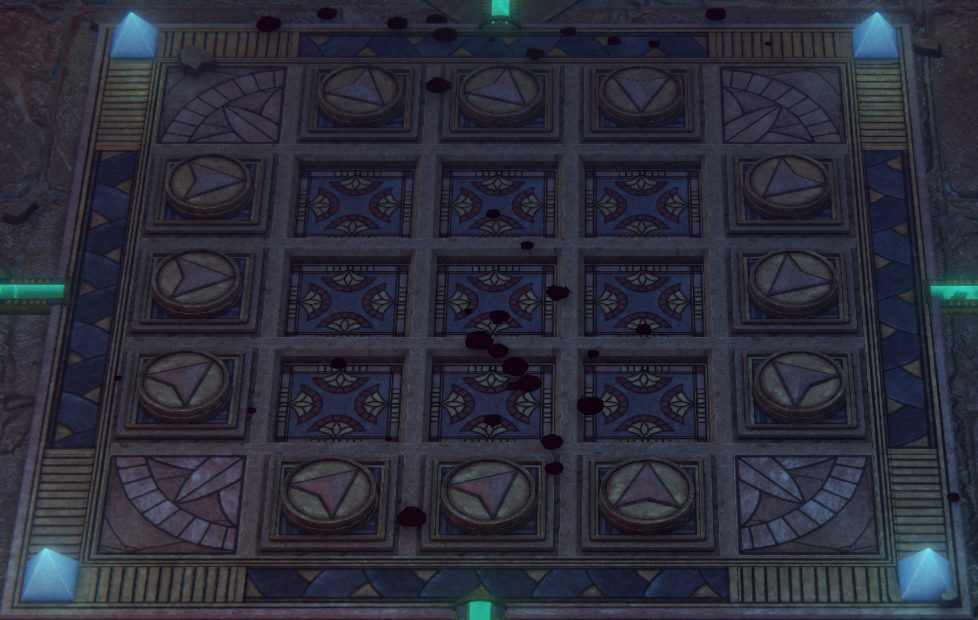
- There is also another match puzzle in this sector with a BBS in its room. Grab the BBS. Puzzle key below. Completing the puzzle opens the door to a mini-boss Marilith. Fight the mini-boss and grab a GBS here. Once the mini-boss is dead, you can safely loot this sector of the pyramid without being cursed (many of the urns and chests in this area are full of sand regardless, but there's some okay loot to be found).
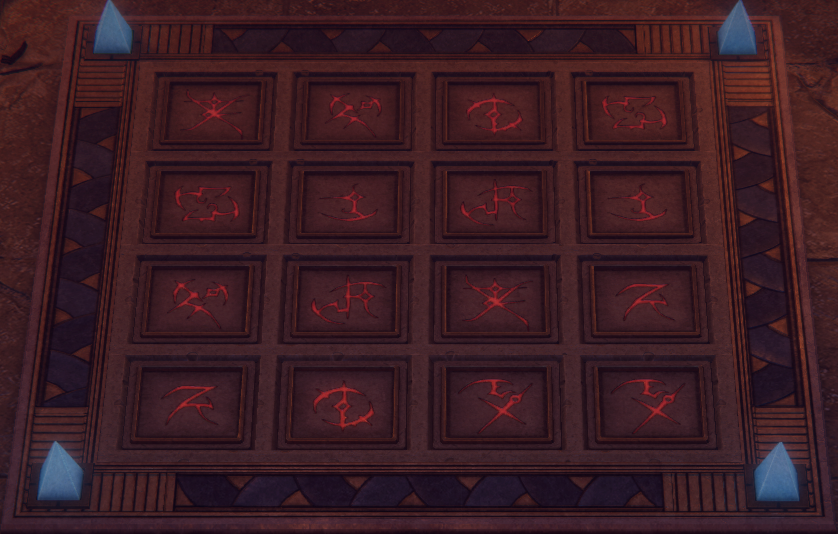
- Return south, to the western room with 4 DUMS. Make sure the line south is lit up. Now head south and keep in mind that the two puzzles in this sector are not mandatory. You do need to pick up the 2x BBS and 1x GBS, but the loot for solving the puzzles is just Bracers of Armor +8 and thus is skippable.
- In the room with the first DUMS there is an illusory wall with a Minotaur behind it. Defeat the Minotaur to loot Death Pact.
- Place BBS in every DUMS you find, until you connect it to a green-red puzzle.
- There is another matching puzzle nearby, this time three colored. Key below, and again, different colors don't create a match. Solving it unlocks a door that has a DUMS behind it.
- Three-color puzzle solution (image is facing west):
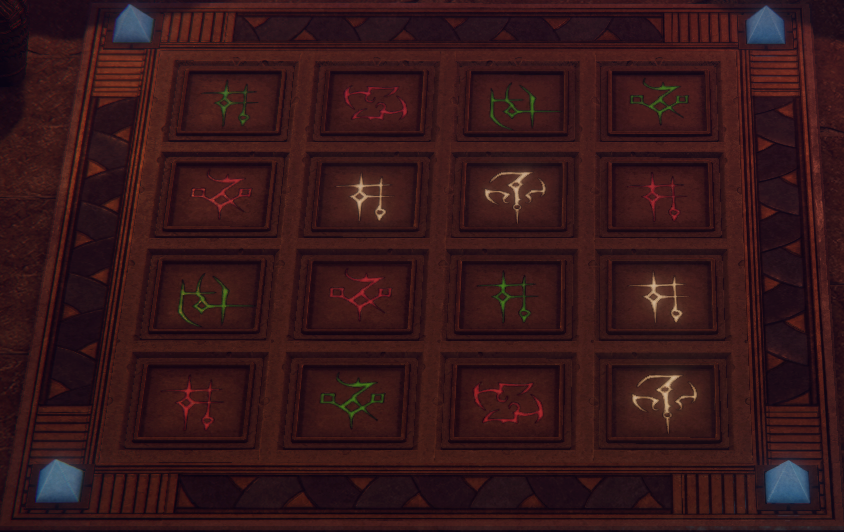
- Head to the southwest-most room and you'll find a BBS and a GBS. Pick up both - now you can fill that DUMS that was revealed by the matching puzzle.
- Solve the now activated green-red puzzle (picture below - bottom left wing). Just west of the puzzle is an illusory wall behind which you will find another BBS.
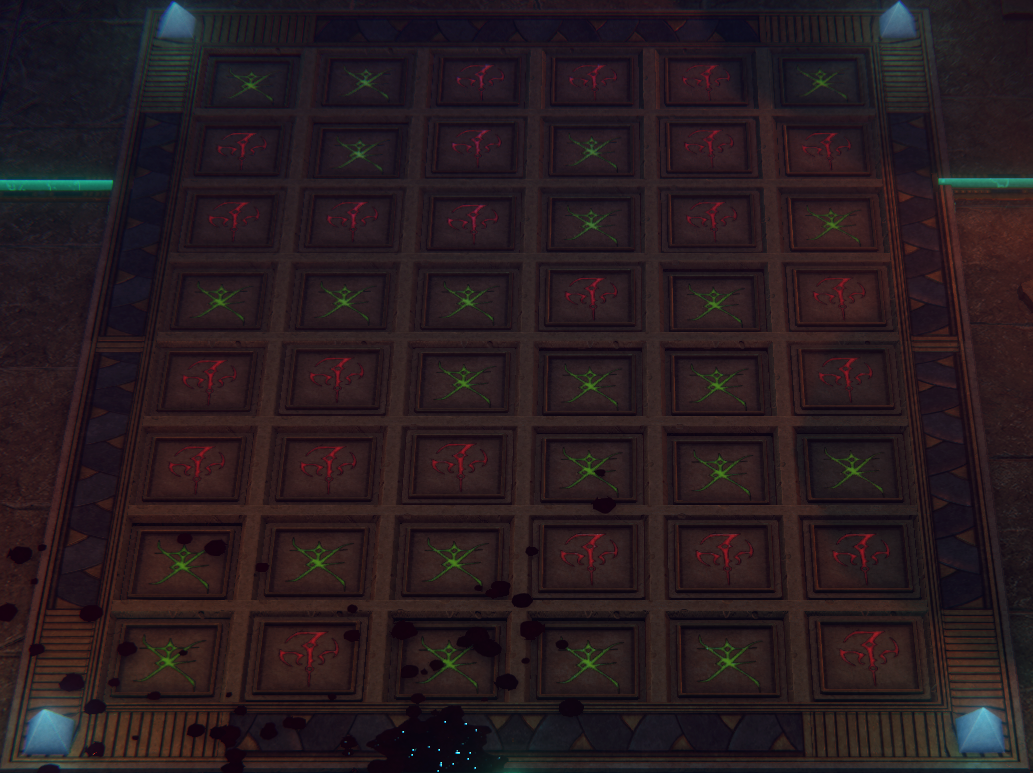
- Now you can fill the remaining DUMS along the way with BBS and press the button to get the Bracers of Armor +8.
- Retrieve all the BBS you used in this sector.
- Head back to the large central room with many DUMS and get ready for the finale. First, ensure that the beams from both rooms with the 4 DUMS are directed toward the large central room.
- Enigma large central room puzzle: put Green Binding Sources on the outer ring Dried-Up Magic Springs and Blue Binding Sources on the inner Dried-Up Magic Springs. The symbols on the edges will begin to glow. Beginning from the northwest corner, step on the last (clockwise-most) symbol of each row, continuing clockwise (you will step on 4 symbols total). After that, interact with the device in the center to summon Areshkagal's projection. Follow Nenio's advice once more in the dialogue, then fight the projection and proceed to the Pyramid's Summit.
- Note: Do not waste a Midnight Bolt on the projection of Areshkagal. While fighting Areshkagal at the summit, use Midnight Bolt on her to gain a New Nahyndrian Crystal (important for secret ending). It's fine to use it on any of the clones. You'll need to pick the crystal up off the ground yourself after the fight.
- Also, if you put the BBS on the outer ring and the GBS on the inner ring and step on the second symbol from the left on each row, a Mysterious Portal will open, where you can loot Goggles of Mind Control.
Important NPCs
Tips & Tricks
- This quest is related to The Secrets of Creation
- If you consider skipping it/quitting in the middle because it's so long, consider a) there is a very important character revelation about Nenio at the end and b) there is a LOT of loot (it can yield almost 1,5 million (!) when sold).
 Anonymous
Alternatively use toybox to spawn the sources in and teleport around, and skip the stupid puzzles

 Anonymous
Fair warning: this guide has multiple steps out of order, but the puzzle answers are correct. Just be careful and keep an eye out for the blue crystals everywhere. If you try to follow this guide step-by-step, you will not have the crystals you need and you may go crazier than all the strangers in this cursed dungeon.

 Anonymous
The large center enigma-puzzle is totally unclear. "Symbols will start to glow" "you have to step on 4" well, all of them glow and it's total unclear where to stand on or what to do exactly.
There's this magnifience glass, at the center, which will make your camera zoom out and show you the "whole" puzzle, but still no clue what to do. There are 0 hints.
I only know there are some symbols placed on the walls somewhere in this whole mess, I'm going to search for those now, but other than that, I can just guess here...
 Anonymous
 Anonymous
Southern arrow puzzle solution (picture taken facing west; align using the power lines at the edges):
THATS EAST
 Anonymous
 Anonymous
 Anonymous
Even with a guide/walkthrough this dungeon will take an ENTIRE REAL LIFE DAY of clicking stupid puzzles

 Anonymous
All this confusion is distinctly NOT what I signed up for. Most people did not pay upward of $60 to be made to feel stupid. (plus another $60 if you buy the DLC singularly - or $40 if you're like me and think there's no point to playing low level/low power characters when the impetus of this game was scaling power and "epic" from Kingmaker in general) Personally, I HATE puzzle mechanics in RPG's as it's usually just a way for a dev to prove they think they're clever. Good for you. You designed the game. You already know the answer. It's usually easier than most people will make it out to be in their heads, which only compounds feeling dumb when it's done. It is NEVER a good idea to overcomplicate a quest line in the first place. Backtracking is just pure sleight of hand, and shouldn't be allowed since it does break the flow of a story. Going to FOUR different places to get the items to solve another it looks like five freaking puzzles; JUST TO AVOID already stupidly high skill checks that will lock you out of getting the secret ending if you're going for that... No. I could be a LOT more graphic, but I'll leave it with a quote from Varric "Why don't you just get a big sign, and write the word NO!, then you can hit people with it." We mostly play RPG's for the ability of power scaling, character growth and better story telling. The exhaustion/fatigue/corruption AND the freaking HOMM game bolted into WoTR are beyond frustrating. They are like YOU failed the puzzle mechanic of "Game Design." Most DM's will not include any of that if they do mention Camp sections in their settings, BECAUSE they do too much to screw the players over and everyone can get a bad roll at any point. The whole point of adding a camp section to the campaign is involving the players in their own characters, and giving a group that might not have been overly social to start with, a chance to express themselves within the "shield" of their character. To practice social skills, where they can be assured they won't be judged as "geeks" or "nerds" for liking fantastical concepts and otherwise being able to pronounce the word. If there IS a third game - EPIC Desitnies. That's all I'm saying. You boiled it into the arch of the storyline, sure... but it exists as a D&D handbook. I used to own it. What's there as one of the better options: DEMIGOD. You could even continue on from Wrath thinking the secret end was canonical and craft a run as new gods, seeking to prove your right to be one, and secure your domain/portfolio. Heck call back to Baldur's Gate and let the dark gods if players want to go that route, have consorts where as a trump card they'll sire like a hundred progeny just to call themselves back to life. Could even play that off as a joke for the chance in actual Hell it would work the way the god wanted... but at least it'd be one way to flesh out a darker potential "romance" path. Just a thought. I do know that I'm not going to invest nearly a hundred dollars again, for a game that I can barely play because TIME LIMITS. In an RPG. You went from a month in Kingmaker, to screw new players from the start, to 3 freaking days. Who the hell came up with that???

 Anonymous
So apparently you can hard-lock the quest by rolling a one on lockpicking the chest in Puluras fall, meaning that the chest is jammed and the mask will break if you bash it. And then you'll only realize that hours later! Real good game design there Owlcat!

 Anonymous
That text in the mysterious portal area that mentions Nyarlathotep makes me wish we could get a Lovecraft themed pathfinder game by Owlcat one day.

 Anonymous
What are the rules of the arrow puzzles? the hint on the wall about hidden numbers doesn't explain anything. I followed the walkthrough and it worked but I cannot tell at all how I was supposed to figure it out.

 Anonymous
There's an inscription on the wall in the top-left-most room that reads "True treasures are always kept in darkness." This means that any container in the top-left section that does not have a light next to it contains actual loot, not sand, and is safe to loot. All the other ones detonate when looted. Also, a high perception can make the dangerous containers disappear when approached.

 Anonymous
 Anonymous
How are you supposed to get the New Nahyndrian Crystal?
I saved before fighting it, first I totally wrecked the enemies, but I didn't get it. (The Bolts actually "missed" according to the log, though they are supposed to not being able to miss).
Then I redid it, trying to shot different Areshkagals, and almost died trying. Again no crystal.
Read somewhere else it works during the Elemental Phase, so I tried shooting every elemental Areshkagal with a different midnight bolt, again, almost died, don't know why it was so much easier first try.... and again, no crystal.
 Anonymous
I'm either to dumb for this, or it's bugged.
I'm at the enigma, and I can't do the puzzles.
I place the orbs in the sockets, some power up something, some don't.
there at least two puzzles I can't do because I think they have no power. But again, I put blue stones in every socket lining up with said puzzles, but still can't do anything...
 Anonymous
 Anonymous
So the author of this article understands that the center is circular, thus there is no top-left? Also, all of their pictures are in whatever direction they cared to face at the time, and never clarified.

 Anonymous
 Anonymous
The question mask is in Ineluctable Prison. you need to solve one of the wall puzzles to get the chest that has the mask in it. the puzzle solution is on the Ineluctable Prison page.

 Anonymous
 Anonymous
 Anonymous

BBS abd DUMS sums this entite dungron perfectley.
Basically you need to use Blue BullShit all over the place and feel like a complete DUMbasS once you realized you have wasted your time with this nonsense.
7
+10
-1