The Enigma |
|
|---|---|
 |
|
| Location | Worldwound |
| Sub-Areas | Pyramid's Depth |
| NPC's | -- |
| Merchants | -- |
| Quests | More than Nothing |
The Enigma is a Location in Pathfinder: Wrath of the Righteous. The Enigma can be found at through Heart of Mystery.
The Enigma Information
- You need to collect 4 masks to solve the puzzle and open the portal to Enigma: Circle Mask (Found in Ivory Sanctum), Summit Mask (Found in Pulura's Falls, need to solve the puzzle to unlock the chamber), Darkness Mask (Found in Heart of Mystery), Question Mask (Found in Ineluctable Prison, in the room with Baphomet's Chosen).
- I am the void and emptiness – Circle Mask, I am the end of the road – Summit Mask, I am the Unknown – Darkness Mask, Impetus to Act – Question Mask
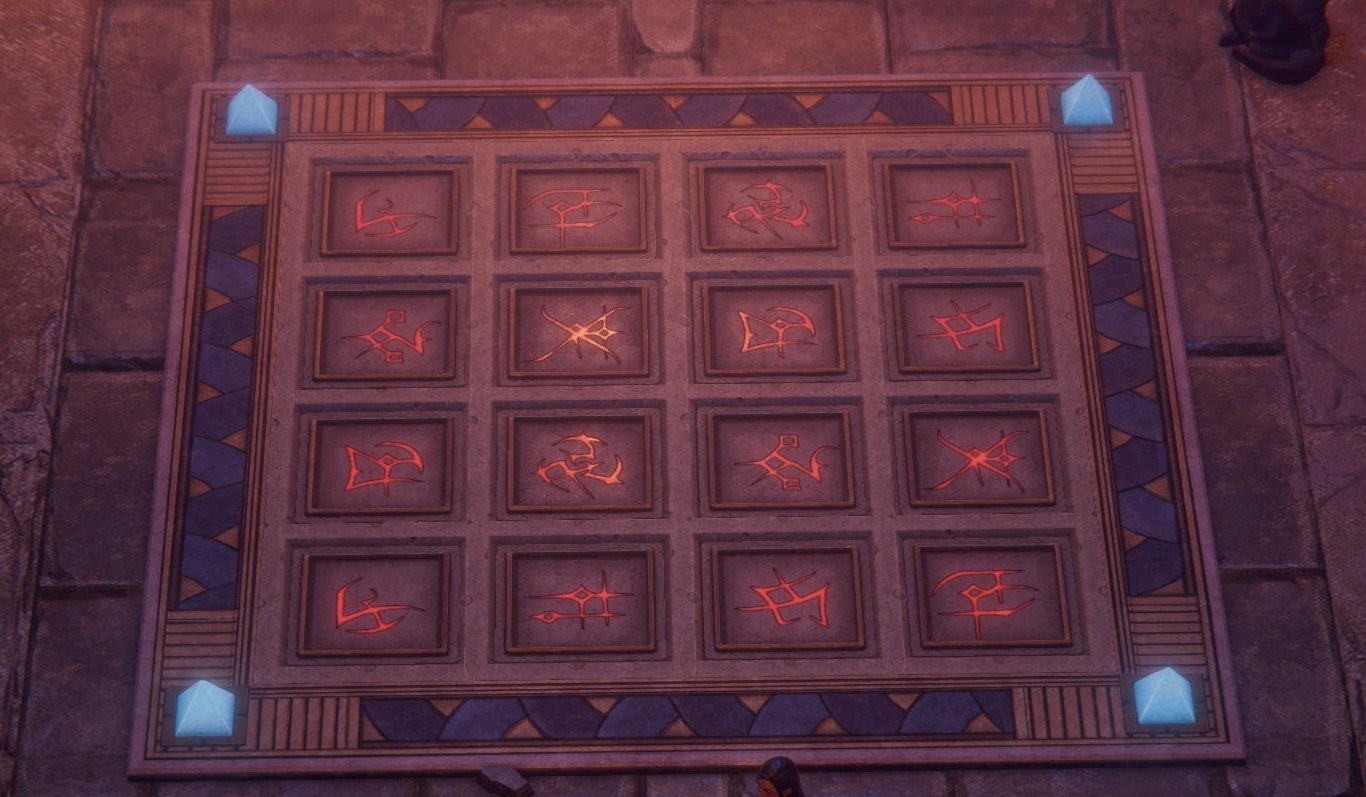
- Top right wing puzzle (click the same symbols):
- Put Blue Binding Source on Dried-Up Magic Spring to unlock doors. (can be removed after the door is opened)
- Fill the Dried-Up Magic Springs, then press the 2 buttons in Forbidden Chamber to unlock the middle door in this chamber. (get Green Binding Source)
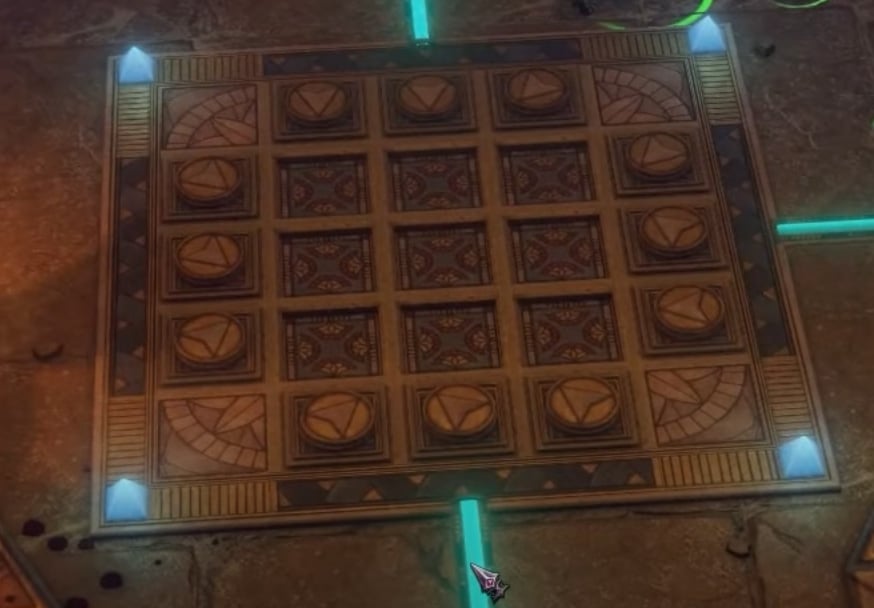
- Bottom right wing arrow puzzle:
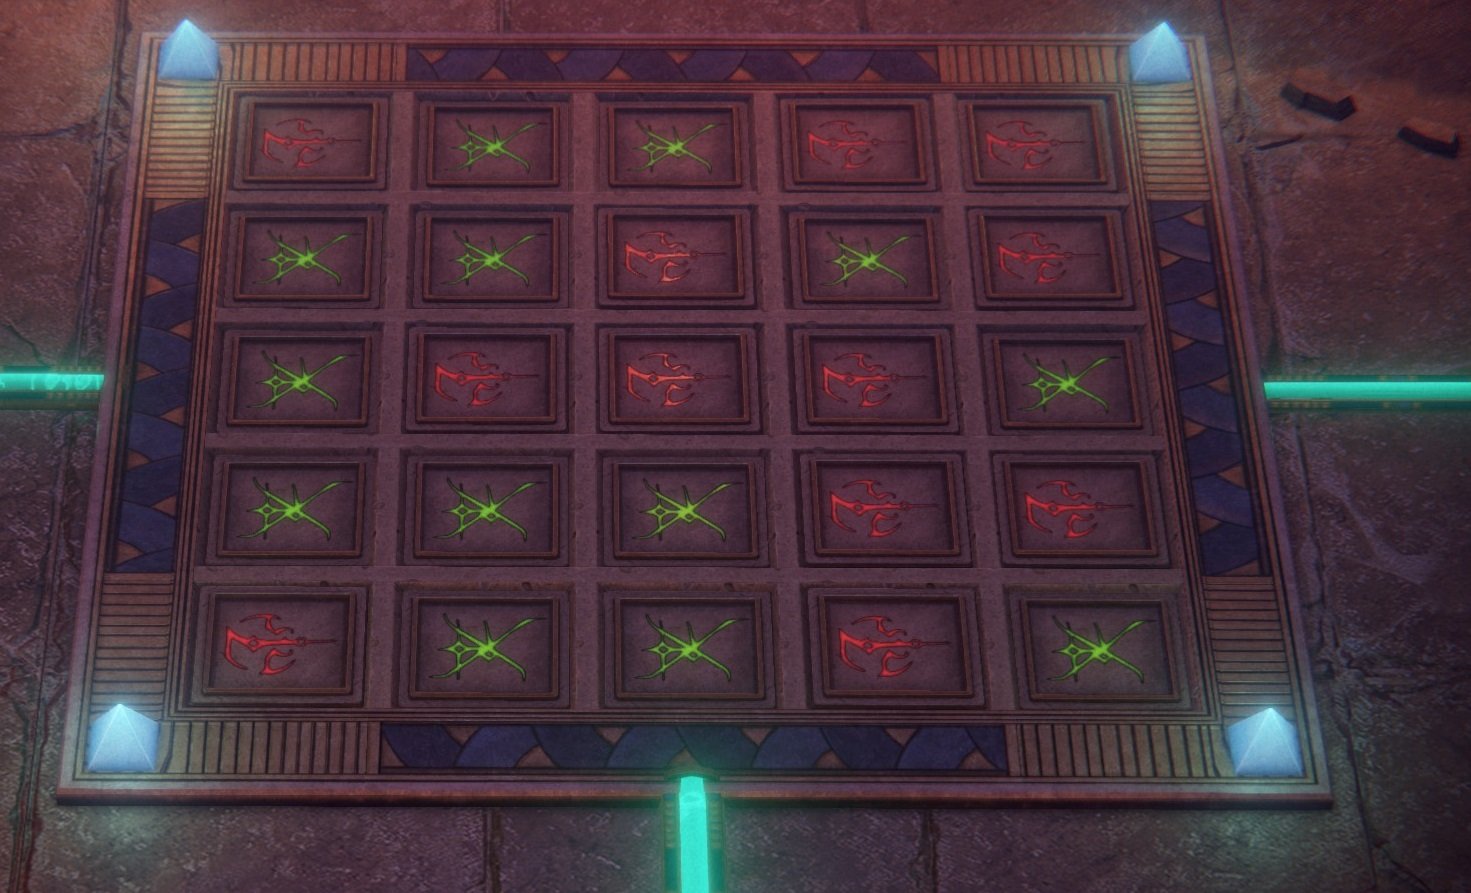
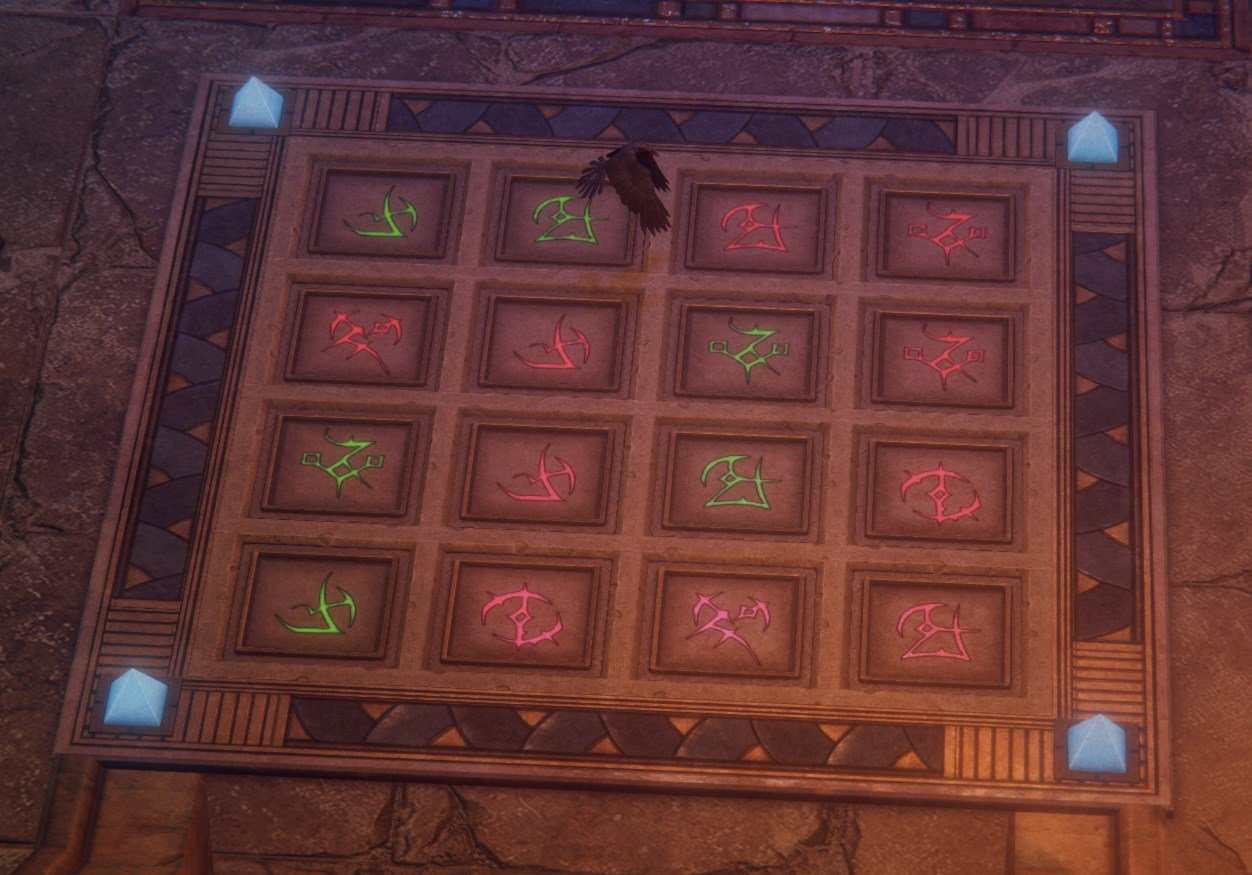
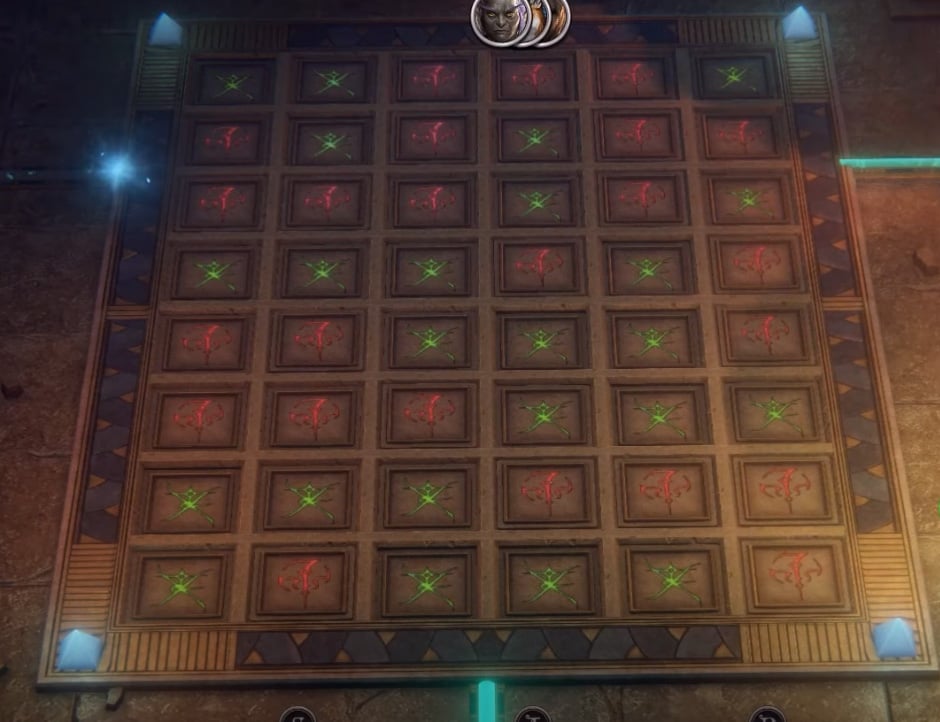
- Green/Red symbols puzzle:
- Top right wing second same symbol puzzle:
- Areshkagal statue Riddle: "I reject ..." "I shall forget ..." "Oh, great Areshkagal!" "I shall become..." "Put your meaning..." "I am nothing ..." then pass the Will or Lore (Religion) check.
- Bottom left wing same symbol puzzle:
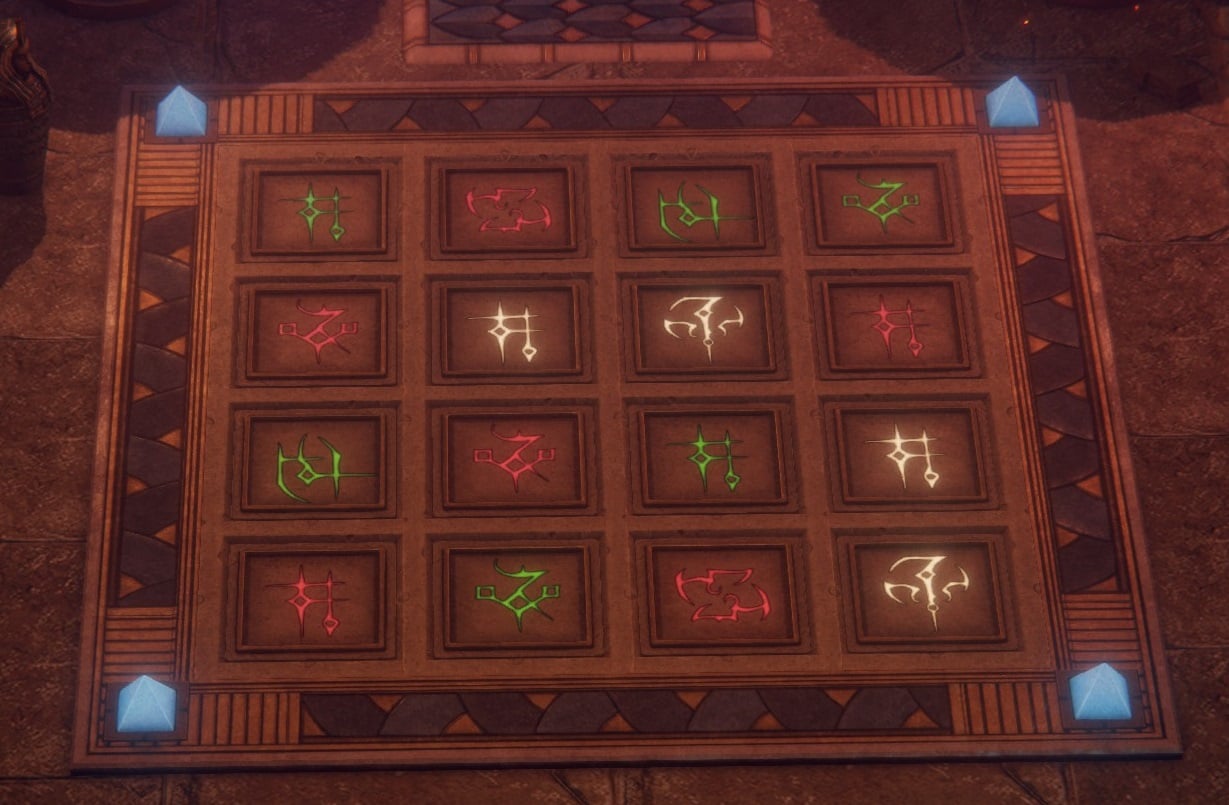
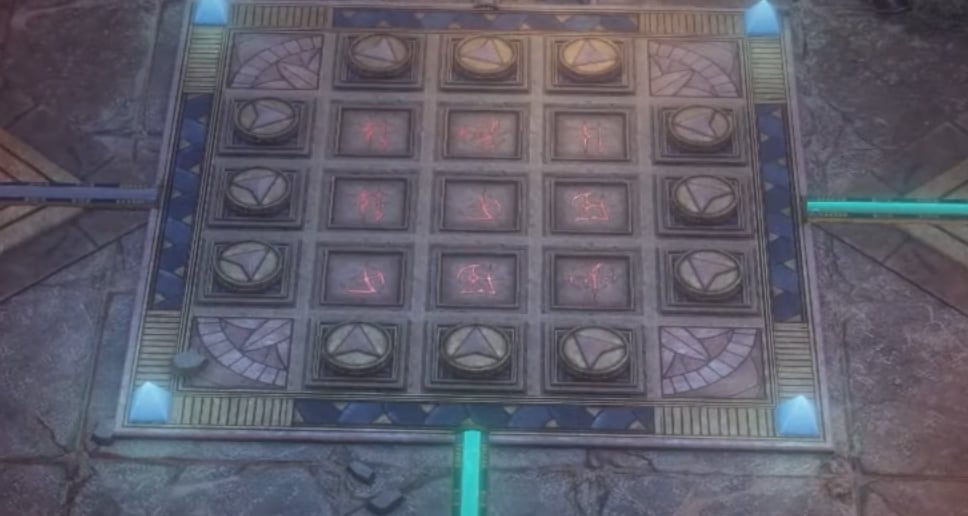
- Top Left wing arrow puzzle:
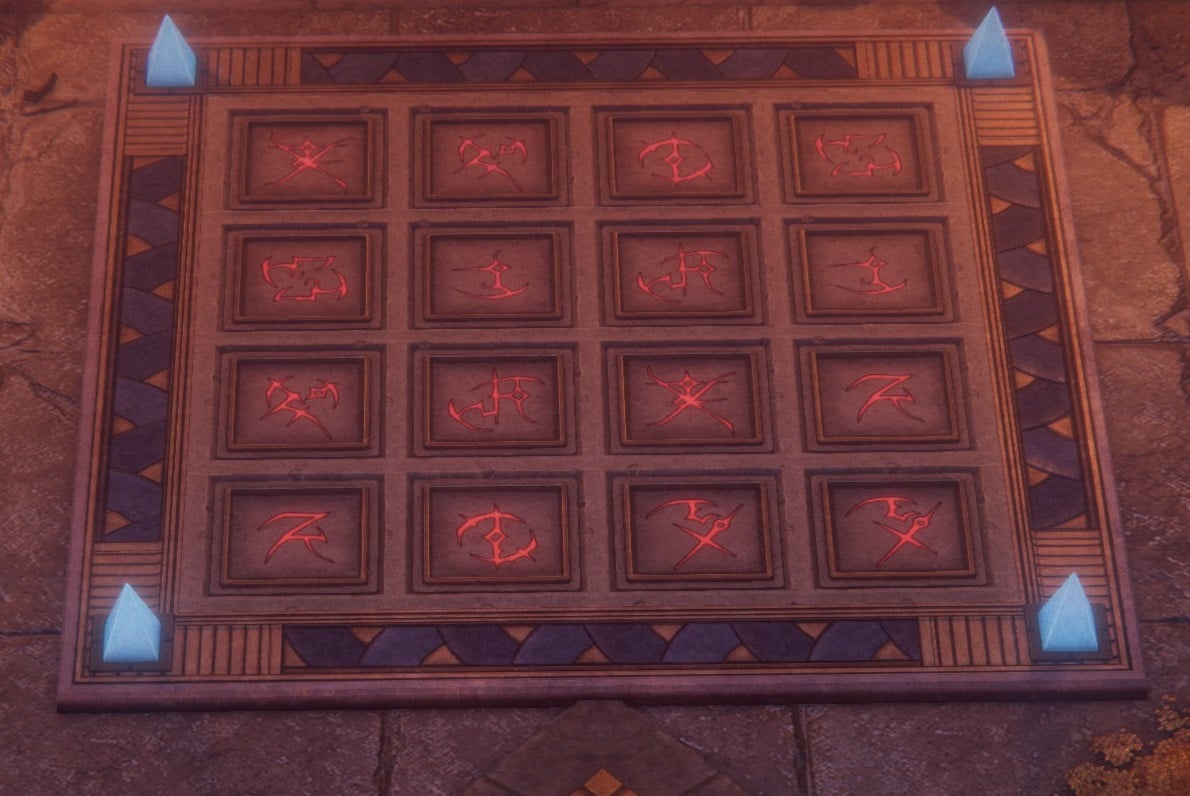
- Top Left wing same symbol puzzle:
- Bottom Left wing Green/Red symbols puzzle:
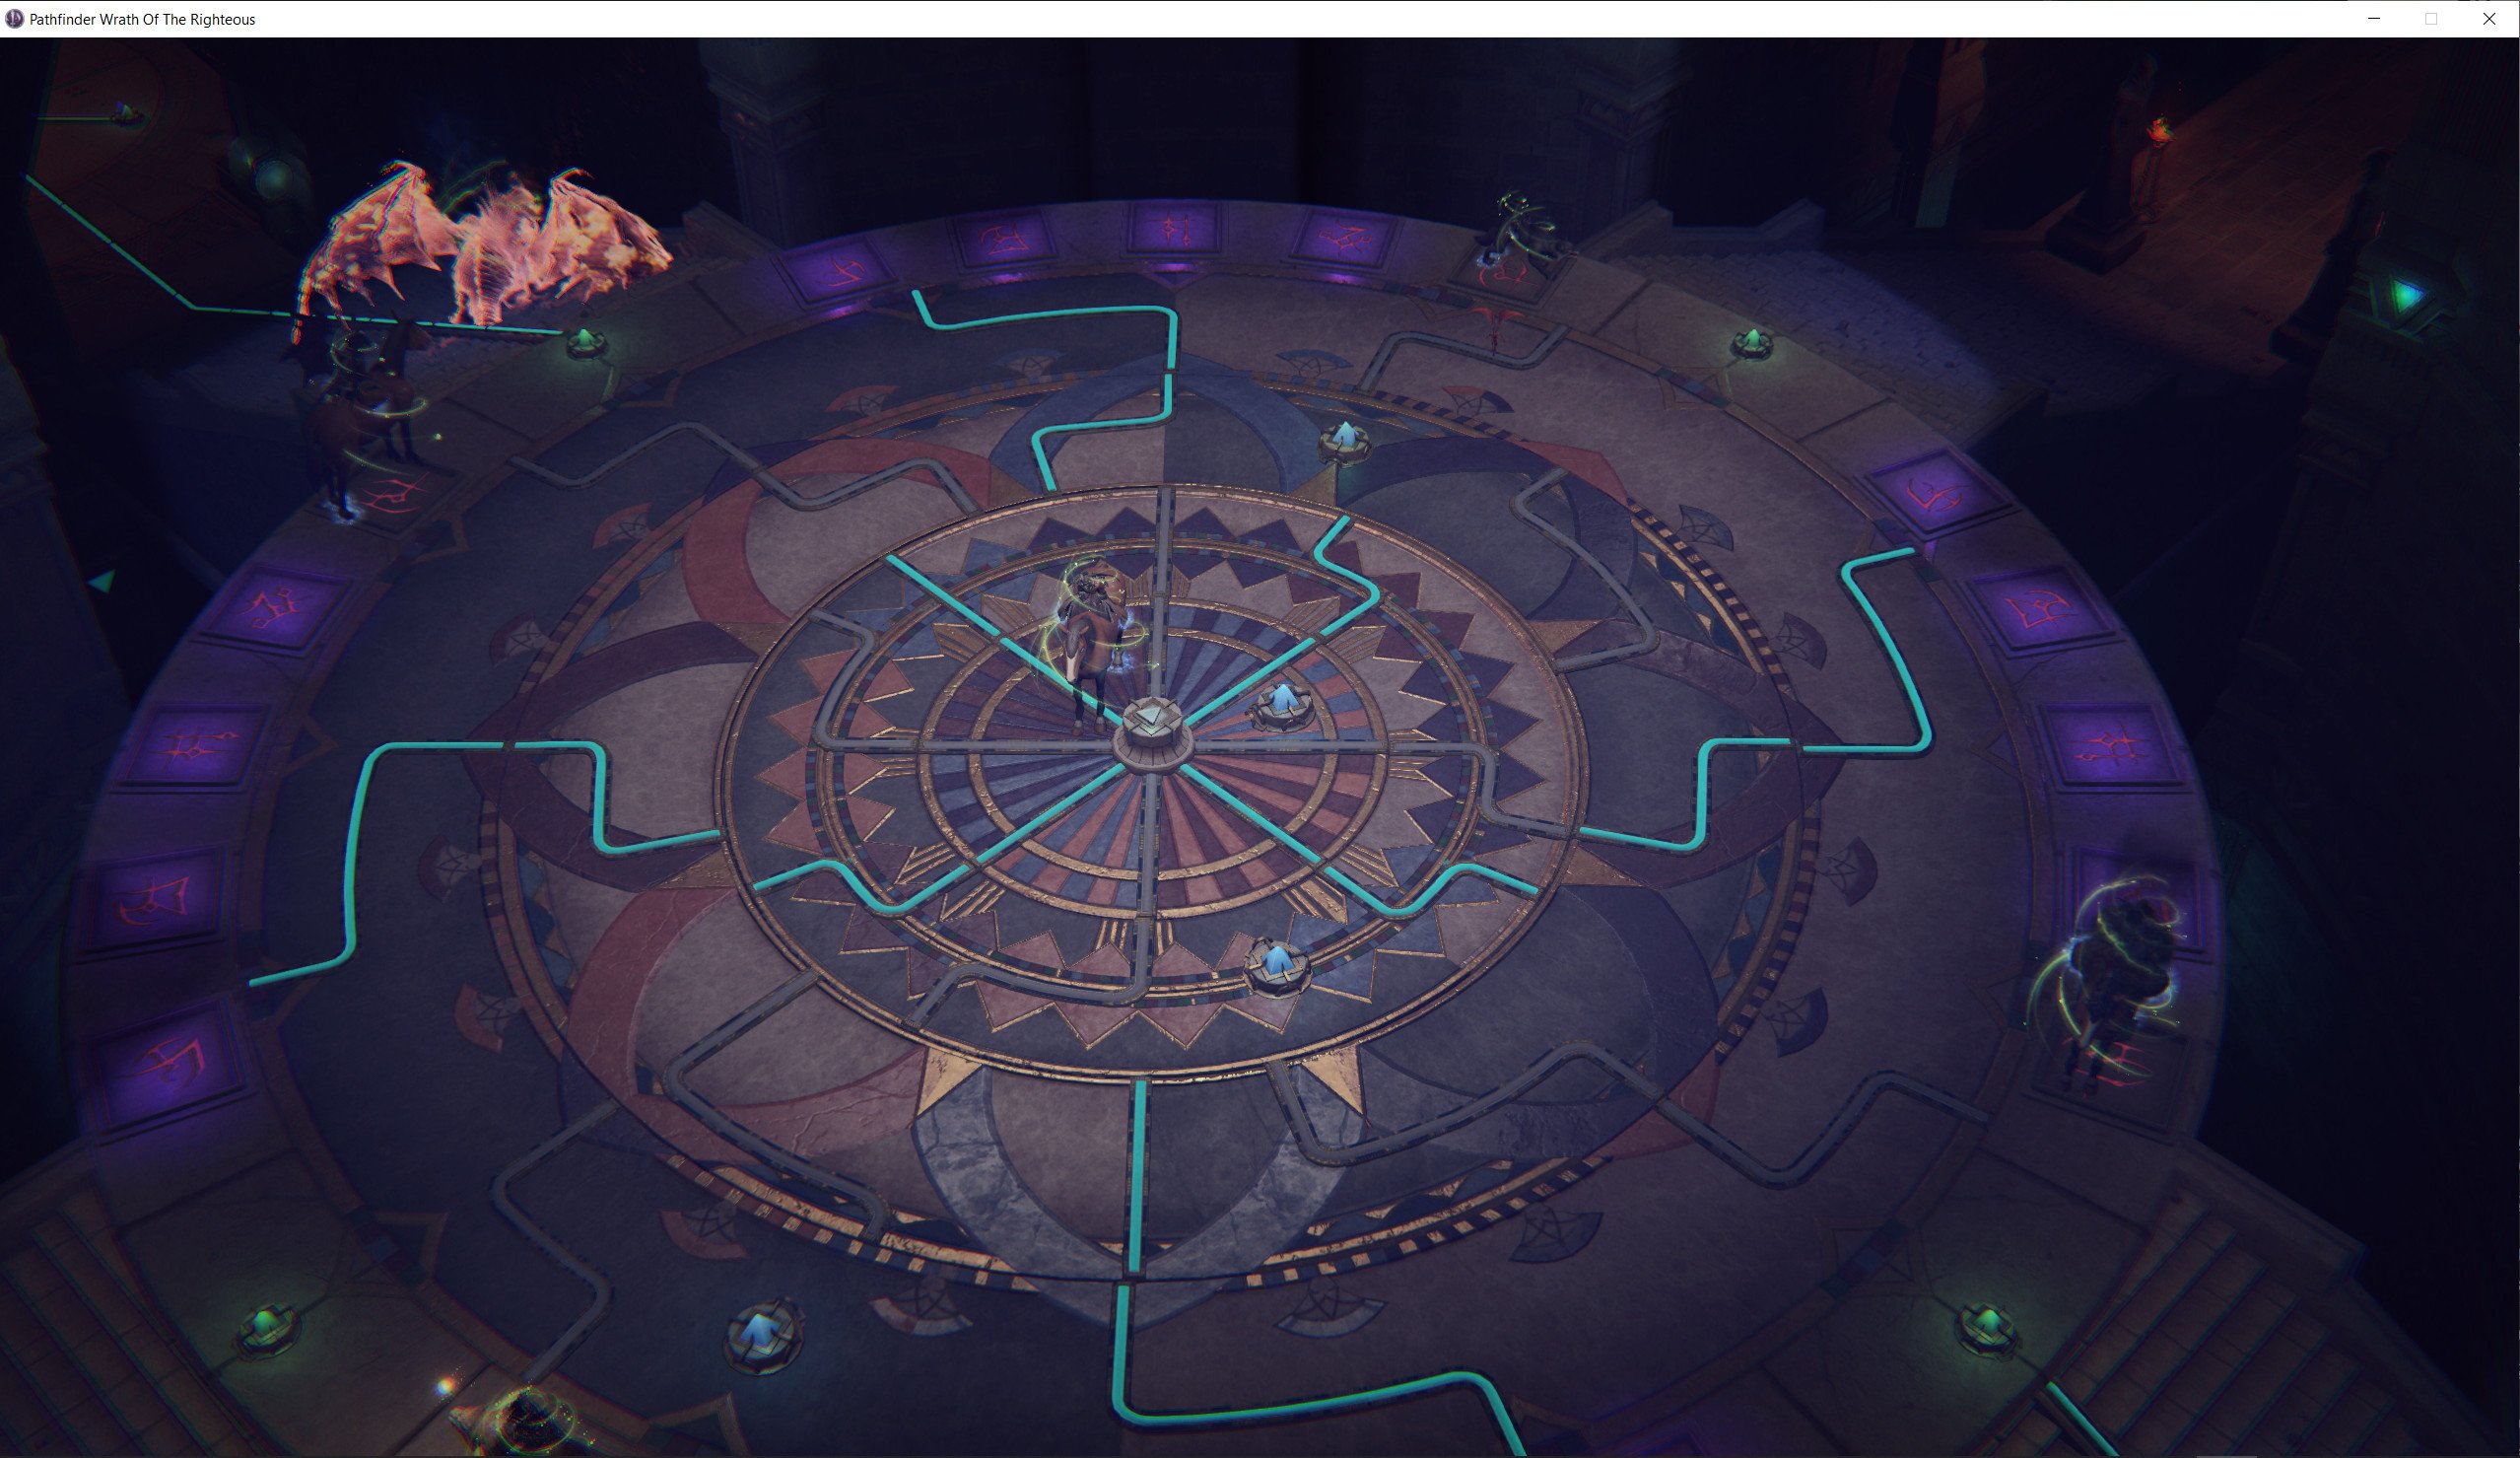
- Enigma centre puzzle, put green binding source on outer ring Dried-Up Magic Springs. Blue binding source on inner Dried-Up Magic Springs. Then step on the last symbol of each section of symbols (clockwise). After that, interact with the device in the center to summon a projection of Areshkegal and open the door to her arena.
- While fighting Areshkagal, use Midnight Bolt on her to gain a Fresh Nahyndrian Crystal. (Important for secret ending)
- Center puzzle to reach Areshkegal (green crystals outside, blue crystals inside, step on the last glyph in each section):
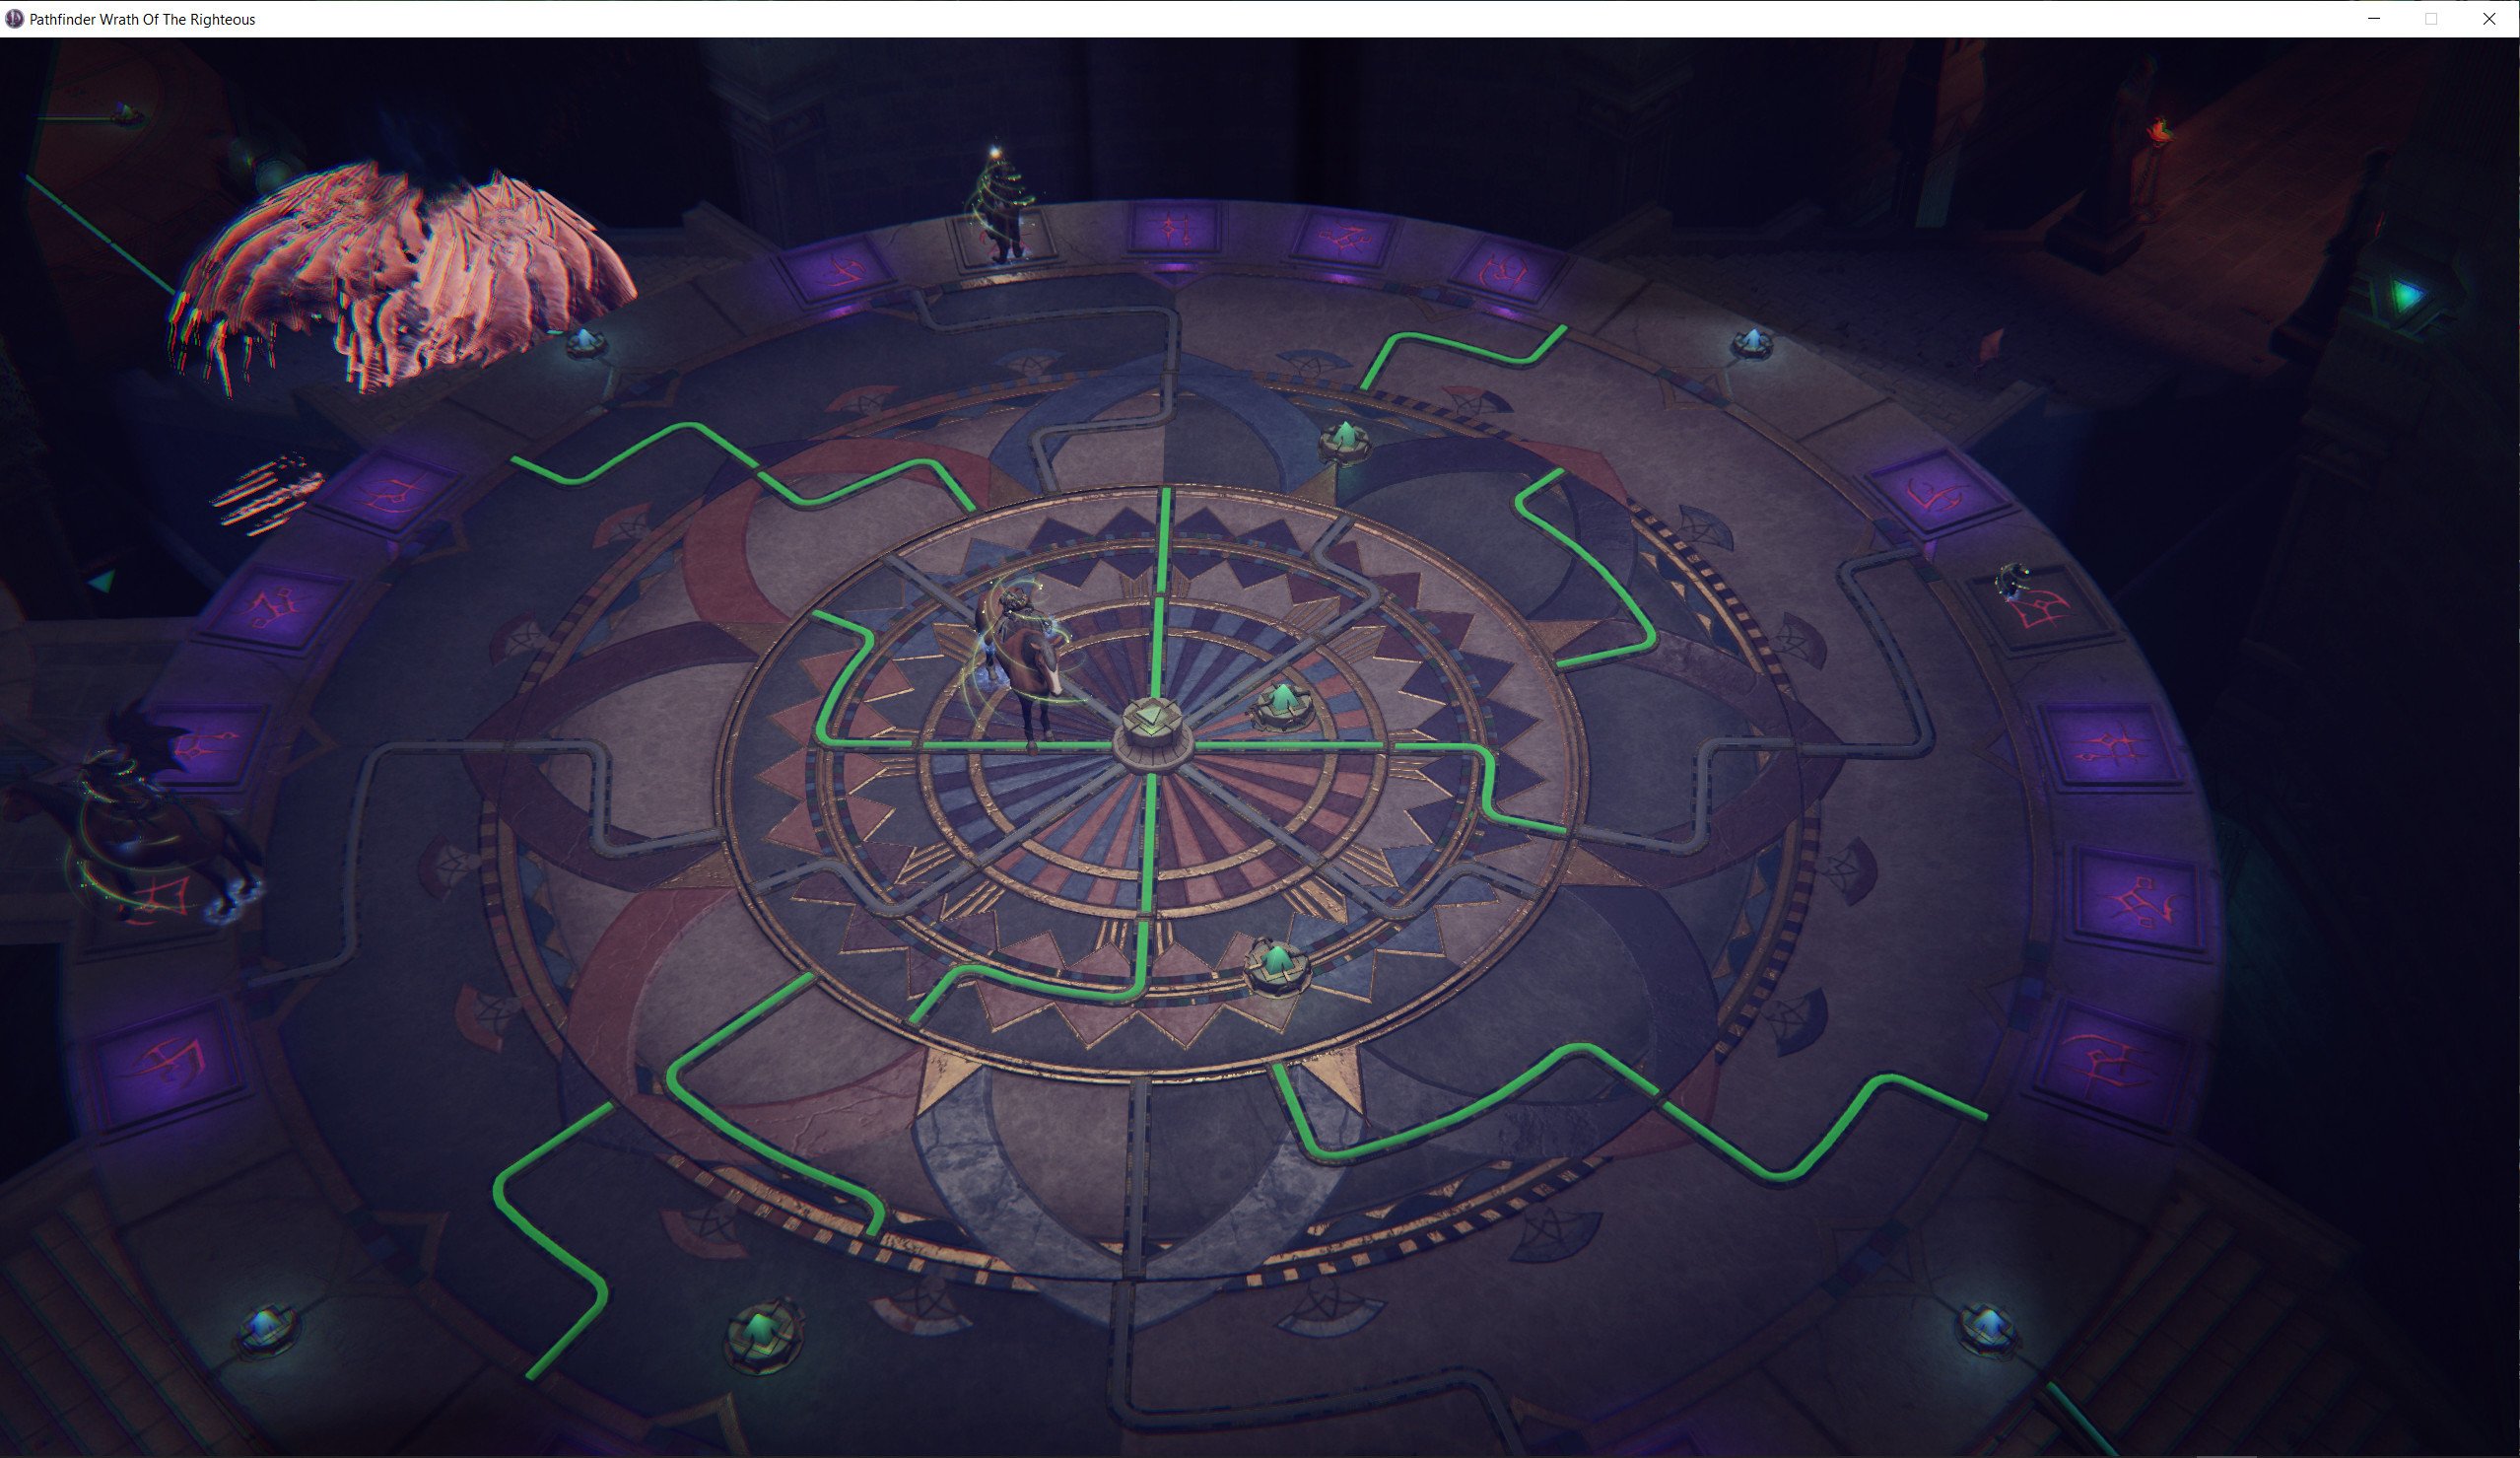
- Center puzzle to reach the Goggles of Mind Control (blue crystals outside, green inside, step on the second glyph in each section):
NPCs at The Enigma
- ???
Quests related to The Enigma
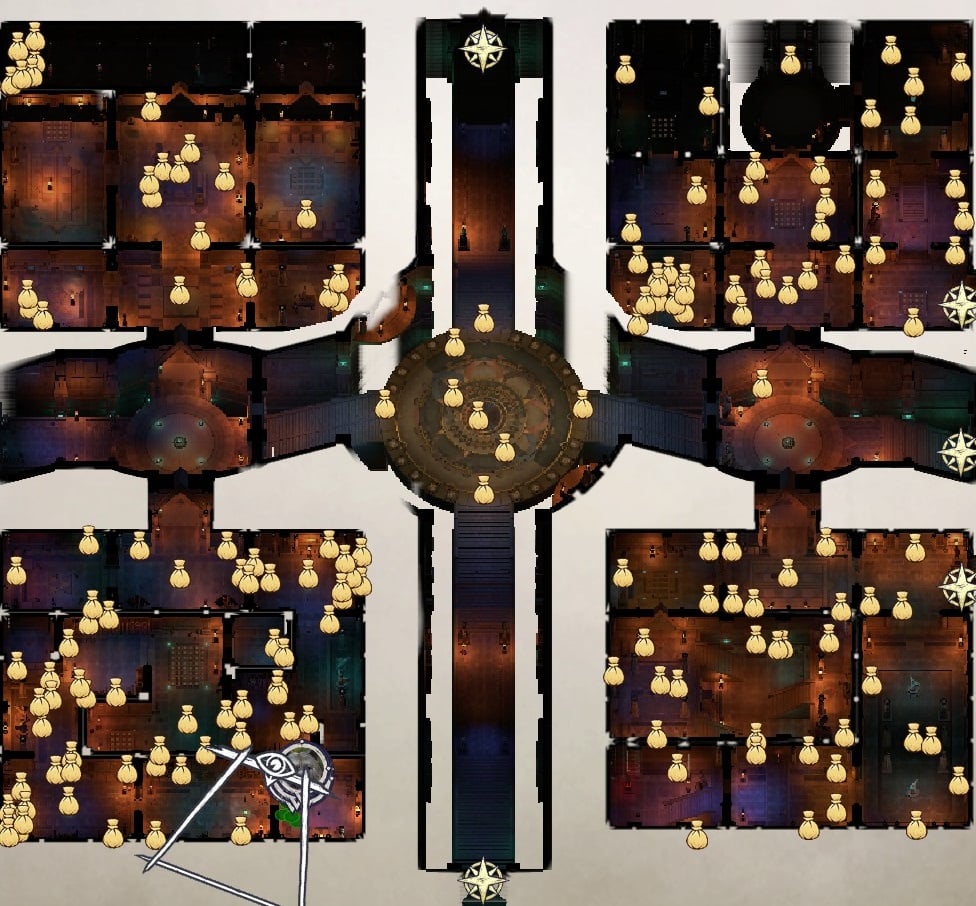
The Enigma Map
The Enigma Notes & Tips
- Puzzle 1 - Memory Game - You have to match the correct pieces with each other. It's a bit buggy, so it only flips after you look at 3 tiles, rather than when you flip the second one and it isn't a match. Attached image shows all of the pieces.
- Other notes...
 Anonymous
Man this game's puzzle designers are utterly stupid! You dont just randomly put symbols and let ppl figure sh.t out. Good puzzles have well explained rules and then complexity.
Here, I scribled some symbols, arrows etc. and put down a solution in my mind! What is My solution? YOU ARE A MORON, That is the solution!
 Anonymous
 Anonymous
 Anonymous
Thank you so much for your help with these puzzles! Good job!!!

 Anonymous
For the bridge that leads to The Ruined Passages, the answers are Nothing will Change, No One, and I don't know.
Choosing anything else will net you a stack of the area debuff. Not that it matters too much, but I did notice a distinct lack of info on this particular riddle here. Hesitant to change/update anything on this page.
 Anonymous
The guide I found was just dead wrong about which symbols are which numbers in the arrow puzzles so here. This is with North pointing up
Southeast:
4 5 1
6 1 3
1 2 1
Northwest:
1 4 4
2 1 7
0 2 4
 Anonymous
"Nenio" died to a Rift spell the moment the fight ended, died, and I can't heal her, revive her, resurrect, or even interact with her to finish the quest.
Infinite and boundless agony.
 Anonymous
this place sucks more cock than i would have ever thought humanly possible

 Anonymous
 Anonymous
End end result of this quest is really cool. I enjoyed the final fight (as long as Ember wasn't perma-stuck in a rift). However every puzzle in the entirety of this quest, from start to finish, can go to hell. Nenio it's been fun but I'm not doing that a second time

 Anonymous
Honestly, when you guys say "start top-left and work clockwise" that means absolutely nothing when the camera can be facing any orientation. Why you don't use cardinal directions is an enigma more complex than this dungeon.

 Anonymous
I wish there was just a little more in-game hinting at what the logic is for some of this.
Specifically for the big central puzzle since it's the main goal; there are so many ways to interpret the purpose of the 5 purple runes being repeated 4 times.
Because of their orientation, I thought each of the 4 sets had something to do with the 4 corners of the dungeon. I was looking for hints in each corner and trying to apply some different logic to each one, but no, it's just a way to quadruple-check that you're certain about your answer.
Fair enough, I guess, but when all the mini-puzzles have their own internal logic it just feels arbitrary for the central puzzle to be interpreted one way and not another, unless there's some hint I missed somewhere about it. I get that the 5th symbol represents the (fifth) crusade, and that's us, so it's the answer I press 4 times... it's the sorta thing that just makes sense in hindsight rather than being workable from the ground up.
At the very least, making the other runes in a corner dim after pressing one of them would signal to the player that the answer involves pressing *one* rune in each corner, which would've been a good nudge toward the logic they're looking for without giving too much away.
And it doesn't inspire much confidence when the solutions online are all the same copy-pasted answers-without-explanations that were probably just datamined the day came out.
^What 4 hours in The Enigma does to a mf
 Anonymous
Nenio died during the quest and she was "kidnapped". My quest log says "Nenio fell in battle and was spirited away by the forces of the Enigma. Perhaps she can still be saved." I'm not sure if this is scripted or if it can happen to any character. It's as if Nenio is no longer in my party, her portrait isn't at the bottom, I can't access her equipment, nothing. Is this supposed to happen, how do I save her?

 Anonymous
So, for those wonder *why* the solutions are those things/just want hints to solve it themselves:
Red/Green puzzle: No row, column, or diagonal can have more than 3 symbols of the same color *In a row.* i.e. a row can have 4 reds as long as there is a green between them so it's RRGRR or RGRRR and not RRRR.
Arrow puzzle: You might have read a "Count the # of times that symbol shows up to this point" hint. That is WRONG. The real hint/solution is that every symbol has an inspectable version of it somewhere in the maze with a riddle to it, like "I am the source and the universe, the undivided absolute." or "I am the marilith that brings evil with every hand." Each of these riddles has a number you can infer from it (Hint #1, yes Areshkagal could and would absolutely make one of the hints only make sense for PC and/or require some level of metagaming, it is totally something she would do. Hint #2, Areshkagal's own symbol is 0.) and THAT tells you how many arrows need to be pointing at each symbol.
 Anonymous
Request to whoever's been uploading these pictures here: I really appreciate the work you've done, but it would be helpful if you could make sure north is always up when you take your screenshot (F1 to auto-adjust) or at least mention somewhere how you've rotated your camera. Kind of annoying when you start flipping switches only to realize the screenshot is rotated.

 Anonymous
In the final secret area (where you find the goggles) there's a text on the wall, translating it to R'lyehian means: Praise is to Nyarlathotep master of powers. Praise is to Areshkagal, is'ehye'drn of nildh'rishuggogg (the second part uses unkown words)

 Anonymous
for the center puzzle if you put green in the outer and blue in the inner nodes and the step on the 2nd symbol of each group, you get a path to the mind control goggles. +2 to Caster level and +2 to DC for any mind-affecting spells the wearer casts.

 Anonymous
If you refuse to play along during the riddle dialogs, you get a stacking "Enigma Rejection" debuff (don't know the actual effect). If you have 4 stacks (at least that's how many I've got) you get to reverse the whole "I am but a grain of sand" BS back at Areshkegal - she gets quite upset and you still have to fight her, but you get an achievement for that, don't know if the fight is any different.

I don't get what the *hints* are to these puzzles. Like, how is someone supposed to intuit some of these patterns?

 Anonymous
Not a fan of puzzles but I thought "Hey, lets try this for Nenio..." NAH wont do that part in my second playthru


화면을 북쪽으로 돌려놓고 스크린샷을 찍었어야 할 거 아냐
0
+10
-1