

Middle City is a Location in Pathfinder: Wrath of the Righteous. Middle City can be found at Alushinyrra.
Middle City Information
- Like Lower City and Upper City, you need to rotate the camera to a certain angle to move certain bridges and buildings. (Alternatively, use Dimension Door (Mass) for fast travel or exploring rooftops.)
- The first time you enter this location, you will be ambushed by some demons, who want to take you for their experiments. After the fight the Echo of Deskari will appear, but he's not here to attack you, this time.
- If you chose the Trickster mythic path, you can find Socothbenoth on top of a roof accessible from the Fleshmarkets (Mobility check required.)
- There are multiple slave traders in the Fleshmarkets. You can free some Golarian Slaves from Raggy, buy weapons/gladiator slaves from Wirlong Black Mask. Suture can be found among Sarzaksys' slaves, you can free him by killing the slavers, or pay 30000 gold. (Freeing him earns you favour from Areelu, which helps unlock the secret ending.) Krebus can sell you some scrolls. (If you buy the Mephit, it will escape. The slaver will give you a Ring of Nahyndrian Courage.)
- If you killed Wirlong Black Mask, you can acquire the portal key to the Fleshmarkets. (But he won't drop the stuff he sells.)
- If you have high Athletics/Mobility skills, you can climb all the way to Upper City through a series of rooftops to the north.
- To enter the Ten Thousand Delights, you will need to pass an Athletics, Trickery, or Bluff check. If you bring Arueshalae with you, she will be bothered by an Incubus here. Pass the Intimidation check to help her.
- East of Ten Thousand Delights, you can find a Thanatotic Titan's Minor Rune on a Demodand Mob Leader. This item is required to visit the Hidden Abode secret area and unlock the Abyssal Conspiracy achievement and obtain the Tome of Leadership and Influence +2. See the Hidden Abode page for more details on this area.

- Below the Harem of Ardent Dreams, there's a small puzzle. You need to rotate the bridge to get to a secret chest. (+5 Armor Welcome Respite) The simplest way to solve this puzzle is by pressing the left button, then the right and repeating this until the puzzle is solved. When a platform is in the correct position, send a single companion to stand on the platform to stop it from rotating.
Another of the solutions is as follows: Right, Right, Left, Right, Right, Left, Left, Left, Right, Right, Right, Left, send one companion on first platform, Left, Left, Right, Right, Left, Left, Left, Right, Right, Right, Right, Left, Left, Right. Send companions on second and third platforms. Left, Left, Right, Left, Send compaion on fourth platform. Left, Right, go get the chest. - You can use Dimension Door (Mass) to reach the rooftop of the Aasimar's house. There's a Pathetic Quasit here. Buff your team before talking to it, which will start a difficult fight with multiple phases.
- The entrance to Shadow Demon's Lair is to the east of Ten Thousand Delights. You need to pass some portals to reach there. (Quest Shadow Dance)
Locations
Assassins' Guild
- The Assassin's Guild is hiding in Middle City (Quest A Matter of Reputation), located southwest of the Ten Thousand Delights, just before you use the portal to go up (turn the camera so the door reveals itself).


Harem of Ardent Dreams
- The Harem of Ardent Dreams is located on a floating isle to the east of the Fleshmarkets. You need to wait until it connects the market to reach there. (Quest The Art of Making Friends)
Fleshmarkets
- The Fleshmarkets is located at the middle bottom of the map and contains the portal you use to travel between Lower, Middle, and Upper City.
NPCs at Middle City
Notable
- Wirlong Black Mask
- Demodand Mob Leader
- Dyunk the Slave Trader
- Early Sunset
- Echo of Deskari
- Hand of the Inheritor
- Hepzamirah
- Kerz
- Krebus
- Latverk
- Raggy
- Ramisa the Slave Trader
- Sarzaksys
- Sarzaksys' Interpreter
- Shamira the Addent Dream
- Socothbenoth
- Suture
- Venture-Captain Gristoff (leaves if you kill Sarzaksys)
- Wirlong
- Zerieks
Other
- Aasimar
- Alushinyrra Guest
- Citizen
- Coloxus
- Commoner
- Derakni
- Elite Labyrinth Minotaur
- Incubus Butcher
- Guard
- Labyrinth Minotaur
- Labyrinth Minotaur Divine Seer
- Lilitu
- Mandragora
- Oolioddroo
- Pleasure Slave
- Senior Guard
- Skilled Gladiator
- Slave
- Slave Trader
- Stringy Demodand
- Succubus
- Tarry Demodand
- Watchful Conspirator
Quests related to Middle City
- A Matter of Reputation
- Experiencing the Bliss
- Grudges to Settle
- Mercy (Quest)
- Prisoner of the Abyss
- Shadow Dance
- Third Wheel
- Traces of Shadows
- What is Your Heart's Desire
- Where's My Dragon?
Middle City Map
Click here if you want the map with location names (Spoiler)
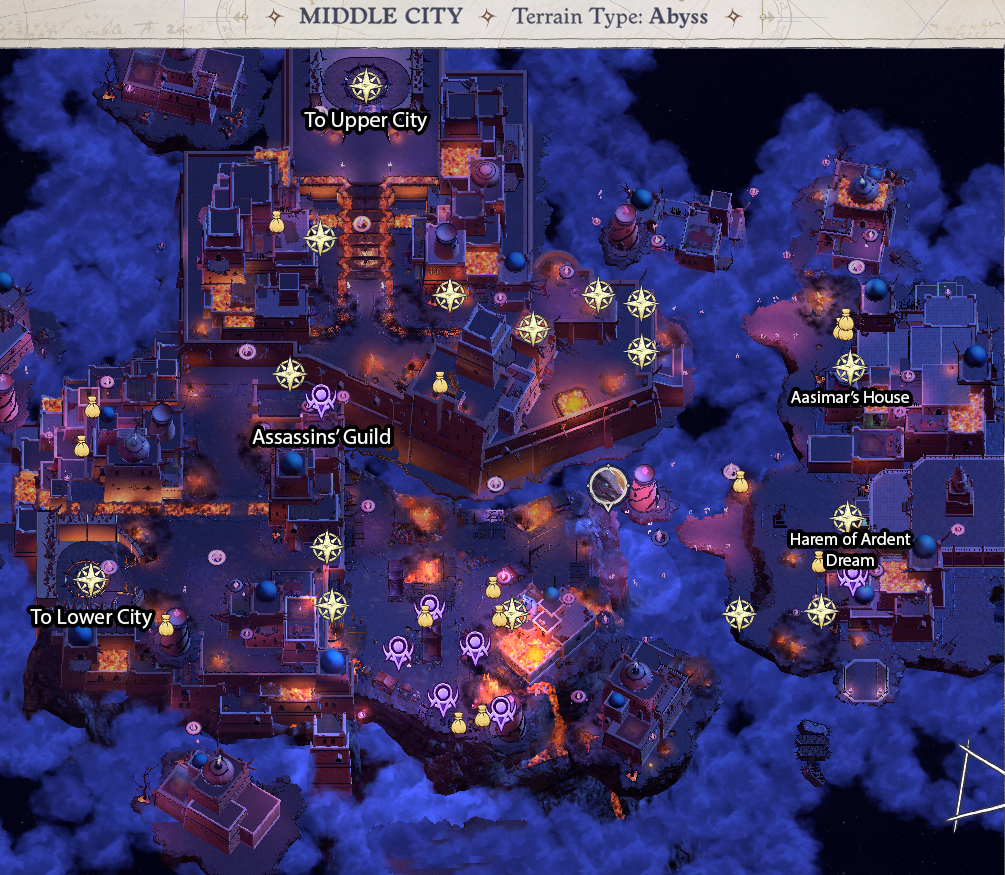

Middle City Notes & Tips
- Note and tips go here...
- Other notes...
 Anonymous
I hate having to rotate the camera to move things. I would have prefered a 10 second timer or something like that which would pause when you enter battle or start a conversation or how about just by moving your characters to certain locations.
Really annoying constantly turning camera to make things move.
- Anonymous
The description on Suture is wrong. I was able to purchase and free him for 30,000 gold.
Unsure on the ramifications so far, but he seems grateful
- Anonymous
Would it have been so hard to just mark the stuff on a map instead of describing where everything is?
- Anonymous
Load more
Whoever wrote this article up is a bit of an idiot. The puzzle thing is all wrong and so is the Suture part.
The solution to the puzzle is to rotate them until the closest one is flat, move a party member onto it, then rotate the next until it's flat, and continue this until you can make your way to the chest. It has nothing to do with a certain pattern.
6
+11
-1