Walkthrough for Pathfinder: Wrath of the Righteous is a 100% detailed written guide that focuses on the Main Quests or Main Campaign of the game, the walkthrough provided features much information regarding puzzles, relevant loot, important decisions or objectives, significant NPCs, Companions, and many more. If you need more detailed information about Races, Classes, certain Quests, or Locations. Please check our other pages that are linked.
In Pathfinder: Wrath of the Righteous, you will join the struggle against the Worldwound, the epic war between Golarion and the Abyss that has raged for more than a hundred years. Up to now, the crusader armies have barely managed to curb the overwhelming enemy forces, but not for much longer - the demon lords are preparing to strike a decisive blow. You will have to harness mythic powers, take command of the Fifth Crusade, and lead it against the demonic hordes.
In the meantime, since our Walkthrough is currently under a work in progress, if you need to find guides or information for a specific quest, you can find a list of all the available Quests that are featured in the game which are listed below.
Pathfinder: WOTR List of Quests
Quick Search of All Quests
Act 1
- Day of the City
- Devoured by Darkness
- Gwerm Family Secrets
- The Final Dagger
- The Burning City
- A Common Cause
- A Stay of Execution
- Feud of the Faithful
- Starward Gaze
- The League of the Inspiring Cart
- More than Nothing
- Out of Parole
- No Better Time for a Banquet
- The Divided City
- Restoring a Broken Gold Buckle
- Notes for the Storyteller
- In Pursuit of the Past
- Spies Amidst Our Ranks
- Cold Waters
- A Friend in Need is a Friend Indeed
- Stolen Moon
- The Outcast
Act 2
- Banner over the Citadel
- A Veil of Silence
- The Music of the Abyss
- The Queen, Incognito
- A Farewell
- The Beginning of a Long Road
- By Hell's Ordinance
- A Strike from the Sky
- While the World Burns
Act 3
- Know Thy Enemy
- Attack out of Nowhere
- Demon's Heresy
- The Dragon Hunt
- Crescent of the Abyss
- Back to Roots
- The Wayward
- An Invitation to a council meeting
- A Repeat Invitation to a council meeting
- Unsounded Alarm
- The Price of Knowledge
- A Noble Intent
- Seeking Forgiveness
- Till Death do Us Part
- The Secrets of Creation
- The Last Gift of a Brilliant Mind
- Seek and Ye Shall Find
- The Final Sunset of Winter
- Battered Spirit
- Vengeance of Sarkoris
- From a Dead Woman's Hands
- Night Gamblers
- Nenio Needs Alcohol
- The Imposter
- The Fool King
- Deep-Rooted Derangement
- On the Cusp of Abyss
- Borrowed Dreams
- Watch Your Step
- Visit Arueshalae in Prison
- Finnean's Awakening
- The Dragon's Fate
Act 4
- Treading on Corpses
- The Art of Making Friends
- The Conquest of Alushinyrra
- Demonic Hide-and-Seek
- Minagho's Desperation
- The Wicked
- Experiencing the Bliss
- Third Wheel
- Rapture of Rupture
- Grudges to Settle
- Mercy (Quest)
- Dangerous Knowledge
- Strike Back
- Fulsome Queen's Request
- Fulsome Queen's Order
- A Conversation with Lann
- A Conversation with Arueshalae
- A Conversation with Camellia
- A Conversation with Woljif
- A Conversation with Greybor
- Bad Blood
- Dreams in Ruin
- What is Your Heart's Desire
- A Matter of Reputation
- Prisoner of the Abyss
- Dark Moon Rising
- Time to Think
- Shadow Dance
Crusade Quests
Pathfinder: Wrath of the Righteous Walkthrough
ACT 1
Day of the City
Kenabres is a city poised on the border between two worlds: on the one side, the ordinary world inhabited by ordinary people, and on the other, the Worldwound, the demon's foothold on Golarion. Heroes from across the world flock to Kenabres to aid the crusader cause. The protracted war offers little cause for celebration, but today is the anniversary of the city's founding. For today, the city's main square has been cleared of marching troops and given over to performers and carnival games. The townsfolk deserve the chance to forget about the bloodshed, if only for a day.
General Details
- ACT I
- Location: Kenabres
Relevant Characters
- Deskari
- Hulrum
- Terendelev
Bosses
- n/a
Items
Consumables and Other Items
- n/a
Equipment & Upgrades
- n/a
Enemies
- n/a
Day of the City Walkthrough
Day of the City Objectives
You've got to take a break from fighting some time! The square is packed with numerous entertainments — time to set aside thoughts of war and enjoy.
- Sample the special festival drink.
- Throw the dart at the target.
- Hit the mannequin.
- Sample the special festival drink.
The Festivities
Before your adventure starts, it is important to create your characters. A well-build character can make your crusade against demons of Worldwound much easier. See our Character Creation more information. It will help you decide which Races and Classes suit your fantasy best. If you are not familiar with Pathfinder settings or CRPG in general, you can check our Builds page for some suggestions. Note: If you want to see what's the class/races of your companions, please see our Companions page.
Once the game starts, you are treated to a cutscene during a festival. Your character is brought along wounded to the festival. You learn that you were found barely alive outside the walls of Kenabres. Hulrum orders the guards to take your Weapons away, because they are not permitted during the festival. After that, he attempts to heal you, but realizes that his powers aren't enough and ask for Terendelev.
Hulrum proceeds to interrogate you about your origins. Terendelev shows up and interrupts Hulrum's interrogation, before she heals you and talks to you about your situation and her status as a Dragon. She will ask you to meet her at the Cathedral tomorrow, to find a way to fully cure you.
- The dart stand can be found at the left of the big tent. Interact to start the game. To complete the Throw a dart at the target objective.
- You will find a small drinking stand on the right side of the big tent. It has a few bar stools, interact with the bartender to try the special drink. There is also a practice dummy there.
Eventually, the fun ends and the festival gets interrupted since a demon army will appear and slaughter the defenders. This sequence triggers after you try a drink from the bar. Terendelev will transform into her Dragon form as Deskari, the Lord of Locusts jumps into the festival. The demon will cut off the dragon's head using his giant scythe.
After that scene, you will be hiding behind a broken table. A guard will approach you, prompting you to choose between fleeing or staying to fight. If you ask for the weapon, the guard will give you a Light Crossbow Whatever you choose, Deskari will swing his scythe to the ground, causing you to fall into it and start the next quest Devoured by Darkness
Trivia & Notes:
Trivia and notes go here
Devoured by Darkness
The silver dragon Terendelev, the defender of Kenabres, fell in battle - hardly suprising, as she had to fight the demon lord Deskari himself. He willed the land to part and swallow all who dared to stand in his way, but the war was still far from over. The festival organized to raise the spirits of the city has ended in death and destruction. Those lucky enough to survive ended up in the ancient catacombs beneath Kenabres, catacombs in which, so the rumors say, live a brood of bloodthirsty humanoid creatures.
General Details
- ACT I
- Location: Underground Caves of Kenabres
Relevant Characters
Bosses
- n/a
Items
Consumables and Other Items
Equipment & Upgrades
- Flow of Water Ring
- Bracers of Armor +1
- Ring of Protection +1
- Crypt Raider's Armour
- Cloak of Resistance +1
- Wand of Cure Light Wounds
- Amulet of Natural Armor +1
Enemies
- Giant Fly
- Giant Spider
- Monitor Lizard
- Small Earth Elemental
- Young Giant Centipede
- Spitting Giant Centipede
Devoured by Darkness Walkthrough
Devoured by Darkness Objectives
Find other survivors
- One strike of the demon lord's titanic scythe and the merriment turned to terror, and toasts of celebration turned to moans of the dying. For those lucky enough to survive the calamity, it makes sense to seek out fellow travelers in this misfortune.
Find the way up
- Even at the best of times, the caves beneath Kenabres have always been considered a deadly trap, but now that earth tremors have collapsed many of the passages, it will take a miracle for those swallowed by the darkness to find their way back to the light.
- Rest in the Hut
- Storm the Shield Maze
- Return to Kenabres
Look for Survivors
You'll find yourself in the Underground Caves of Kenabres, just ahead, you'll find Anevia who is pinned on the ground and is being helped by . You'll gain 125 EXP for this sequence. Seelah will then ask you to help in trying to get Anevia under the boulders. You'll need to pass a skill check of 12 Athletics, Knowledge (World), or Diplomacy in order to successfully rescue her and to avoid becoming fatigued which if it happens, applies penalties. If you pass the Evil dialogue skill check, you'll gain 9 EXP and 200 Gold - after helping Anevia, Seelah joins your party as a Companion and you'll also be prompted a guide on how the party system works.
After helping Anevia, continue forward and just a few steps, look to your left, and you'll find a loot chest containing some items such as the Cloak of Resistance +1. Swap out your gear if you want to but don't forget to equip a torch so that you can light up the path you're going through. Continue forward and you'll find a Terendelev's Scale on the ground, keep pushing forward and you'll bump into another survivor, Camellia, who will join the party right after speaking to her. This dialogue sequence yields 125 EXP, apart from that, you'll be prompted a guide on how to use abilities - after speaking to Camellia, loot the body that was near her to find a Masterwork Dagger.
You should have access to the Light Spell, so you can swap out your torch and conjure the Light spell to use as your source of light and then continue to the next section of the area where you'll first encounter enemies along the way such as Young Giant Centipede, Spitting Giant Centipede, Monitor Lizard, and Giant Fly. Make sure to check the far east side of the map to find a Bracers of Armor +1 from a body and then head to the west side to trigger another dialogue sequence where you'll find Lann and Wenduag. Ask them of course what their agenda is for being in the caves and you'll learn that they are looking for a holy sword, they won't really reward you with anything but you can have them join your party and they'll offer to help you find a way out of the caves, just give them a hand in finding the holy sword.
In the tomb section, there are some loot that you can find such as Grinding Stone, simply check the north end side of the tomb and interact with the rubble to reveal the Holy Sword. After finding the sword, you'll switch to a sequence where your character will see a vision. Your choices won't matter here since you'll still end up with receiving 125 EXP and the Angel Mythic Path, but take note that this is not the game's section where you will get to select your Mythic Path - shortly after, your character will be back to the tomb where you found the sword, along with your Companions.
Escape the Caves
Lann and Wenduag will then automatically lead you to a path where you need to pass a Mobility check in order to jump across. You'll also be given a prompt on how rolling dice works. Jump across to reach the other side and continue forward where you'll encounter x2 Giant Spider. Kill the enemies, continue forward and then pass the second Mobility check so that you can get across. You'll then encounter enemies such as the Small Earth Elemental. and just pass that, loot the skeleton at the end of the tunnel path to find a Wand of Cure Light Wounds.
Next, head back to the previous area, and this time, go east, and keep moving forward until Wenduag speaks to you and asks you not to show the Light of Heaven to Sull. You can then ask her questions such as the plan of saving the kids who are lost in the maze and to question her about her judgement regarding the mongrels being great warriors. From here, interact with the exit that's nearby, leave the caves and head over to Neathholm.
Neathholm
You've now managed to escape the caves and have arrived at the Mongrel camp. Head north and you'll find Chief Sull who will ask you about the Light of Heaven. Note that if you reveal the angelic sword in Mongrel tribe, Wenduag will leave the team the second day. And if you lie about it, Lann won't like it and he'll leave instead.
Once you've made your decision, go to the southeast side of the camp to find Horgus Gwerm who will offer a business proposition to help him reach to the surface and to lead him back to the city in exchange of paying you with 1000, but if you pass the Diplomacy Check, you can bargain for 2000 gold. Regardless if you either pass or fail, you'll still get money from it, simply close the deal and you'll acquire the quest Gwerm Family Secrets. Just take note that he won't pay you yet upfront.
After speaking to Horgus, go to the east side of the camp to find a merchant named Dyra. Here, you can and sell goods if you need to. Next up, simply rest at the hut and afterwards, head north to the Lake where you will proceed to the Shield Maze which is marked on your map.
Storm the Shield Maze
Head east until you come across a doorway that you can squeeze through. On the other side, open the next door and then loot the two chests, be prepared since you will fight against the Baphomet Cultists and Neophyte Wizards. Head right towards the hallway and disarm the trap here, and then take another right where you'll find a room that has a Lore: Religion skill check. From there, proceed north that will take you to a larger room that has a dining table in the center of it - make sure you explore it before going east which will lead to the flooded basement.
Next, go north and eliminate the Hand of Hosilla and Neophyte Fighter. You'll also find Hosilla's orders that will help you by acquiring a tip regarding the maze. Make sure to check the locked door by using a torch as a lever. This reveals a back room that has the Crypt Raider's Armour. Still at the basement section, before continuing forward, make sure to buff your team and then head south, followed by east where you'll encounter a battle against a Large Water Elemental. After you defeat the elemental enemy., check the west corner to find a crate which requires a skill check of 10 Perception, inside it you'll find the Flow of Water Ring and the Amulet of Natural Armor +1.
If you go southwest of the map, you'll find a Corrupted Mongrel Brute, kill the enemy and loot the body to find a Ring of Protection +1. Now in the northwest room where you'll see some dining tables, you'll find an Inspection check that will reveal a torch which is actually a switch. Interact with it and check the back room, and then go west into the long hall. Once you've found the cultists, open the door in the corner with another torch lever.
Now, in the next room, eliminate another Hand of Hosilla and then loot them to find Hosilla's Key. Next, go east and make sure to prepare and buff your party if needed since you will encounter a Medium Earth Elemental. Simply defeat the enemy and inside the room with the statue of the horned demon Baphomet, interact with the torch-switch to find a Half-Plate. From here, enter the west room, defeat the Cambions and solve the puzzle which is at the corner of the room.
Move towards the northeast, past the room that has a pentagram in the center, then unlock the door that's in the large room which is at the north side of the room with the beds and then head up the steps. As you head up, make sure you prepare and buff your team since you'll fight against the demon Savamelekh and his followers. At this point, if you've previously sided with Wenduag, Lann will appear and assist you but he won't return to your party, on the other hand if you have Lann in your party, Wenduag shows up and helps - simply defeat Hostilla and the rest of the enemies.
After the battle, you'll learn that both Lann and Wenduag are actually servants of Savamelekh and you will need to make a choice of who you want to join your party. It is recommended that you go with Lann since he has better stats and at a later part of the game, you'll still be able to recruit Wenduag. Anevia and Horgus Gwerm then shows up and you'll receive the Cultist's Dispatch which is a helpful item that can track down the cultists (this unlocks the quest, Spies Amidst Our Ranks). From here, your next task is to return to Kenabres where you can also complete one of the side quests, Gwerm Family Secrets - simply head up the stairs and then you'll find Irabeth there, speak to her to progress.
Shield Maze Puzzle
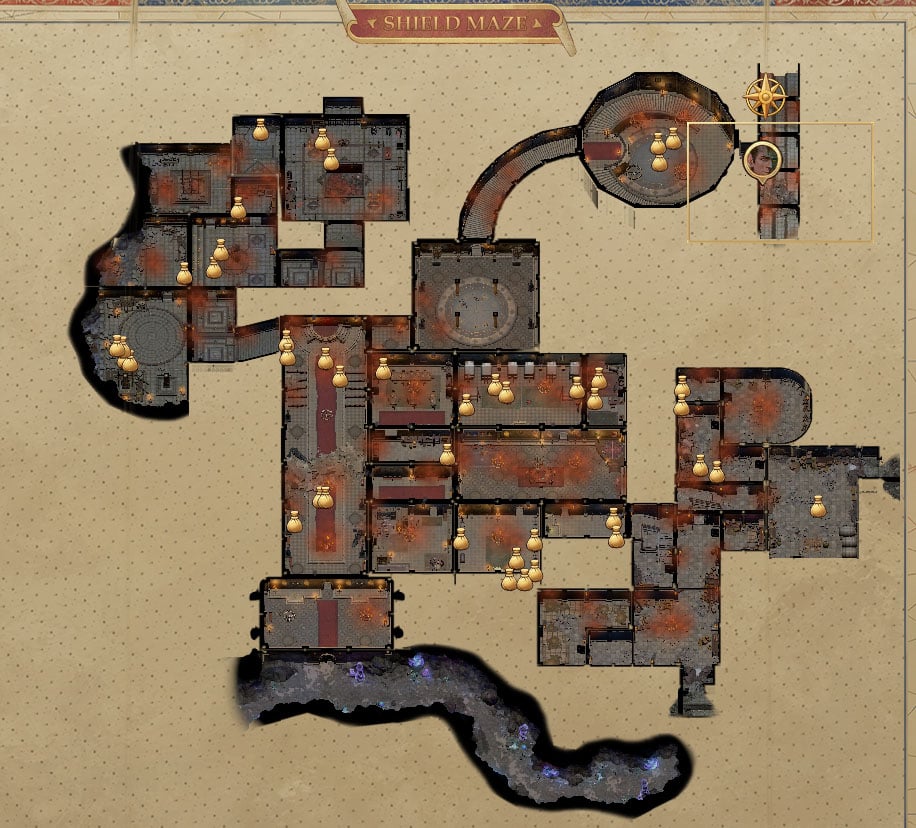
There's a puzzle in the torture chamber. In order to open the door, you need to activate the sigils in the following order: Yellow, Blue, Red, Yellow. And behind that door you can find Radiance, a Masterwork, Cold Iron long sword. Click on the image below to enlarge the map.
Trivia & Notes:
Trivia and notes go here
The Wardstone Legacy
The Wardstone Legacy - While the survivors wander the dungeons, the battle on the surface rages on. The warriors of Kenabres are trying to defend the Wardstone, but their strength is flagging. Their resistance is valiant, yet it will all be in vain if no one rises up to turn the tide.
General Details
- ACT I
- Location: Kenabres
Relevant Characters
- Irabeth
- Minagho
Bosses
- n/a
Items
Consumables and Other Items
- n/a
Equipment & Upgrades
- n/a
Enemies
- n/a
The Wardstone Legacy Walkthrough
The Wardstone Legacy Objectives
- Meet up with Irabeth
- Fight Minagho
To the Surface
After the encounter with Savamelekh and his followers, head up to the second floor and you'll find Irabeth. Speak to her and she will tell you about the importance of the Wardstone, shortly after, she will join the party to help eliminate the cultists in the area. All the side doors here will be unavailable to access, so before following her, make sure you buff up and prepare since you will be fighting your way through the cultists and eventually leading up to a demon called Minagho.
When you are facing Minagho, kill out the other enemies first, and after the battle, you will need to pass the Mobiity check which is at the end of the room to reach Minango and the cultists, as well as the Ardstone. Now, during the dialogue section after the battle, if you choose the evil line and if you fail the Will save, your character will enter a rage state and attack Staunton. If this happens, make sure to speak to him about this later on during Defender's Heart and you'll obtain the Cloak of Unbending. Regardless of whatever dialogue option you choose, Minango knocks you out and she resumes her plan of using the Wardstone, you'll then be awaken by Irabeth and you'll find yourself in a room - from here you will unlock or progress some quests such as Gwerm Family Secrets, The Burning City, Spies Amidst Our Ranks, A Common Cause, and A Friend in Need is a Friend Indeed, also make sure you exhaust all dialogue options when speaking with Irabeth.
Things to Do Upon Waking Up
- Head outside of the room and speak to Anevia to acquire the quest, The Divided City.
- Speak to Staunton who is where Anevia is so that he can tell you about the Blackwing Library.
- Horgus can be found at the bar, make sure to speak to him to collect your reward for helping him reach the surface.
- Also at the bar, make sure to speak to the bartender so that he tells you about visiting Pitaxian Wine Cellar. You can also buy some unique items such as the Dark Omen ring, Spicy Pastry recipe, and the Gloves of the Neophyte.
- Speaking to Jernaugh who's also at the bar will tell you the direction to where Chilly Creek is.
- And if you go down the lower level, you can find Wojif. If you want to recruit him, make sure to mention him to Irabeth and by doing this, you earn XP. discover the hideout of the thieflings, and acquire the Stolen Moon quest.
Gwerm Family Secrets
Upon reaching the surface, travel to ravel to Gwerm's Mansion where he awaits and asks you to take out the cultists in the mansion. Your tasks are to:
- Clear a path to the surface for Horgus
- Go to Horgus' mansion
- Make sure the mansion is safe.
There are several cultists in the mansion, wipe them out and loot the valuables. At the first level, you can find Sickle of Falter (+1, Fitness Wielding) and Silver Robe (+1 saving throws against fear). At the second level, there is a short bow of code. Once you clear the enemies, signal Gwerm at the study's window. He will open the secret door and ask you to follow him. After you learn the secret from Gwerm, decide what to do with his secret, and claim your rewards. (Your decision may affect your relationship with Camellia.)
The Burning City
This quest is located at Gray Garrison. When you follow Irabeth clearing the cultists, its a good idea to use ranged attacks and let her tank for your team. Be sure to loot all valuables in your path in Grey Garrison, once you reached the third level, the road will collapse, forbids you to return. You will find the demoness in front of the Wardstone. If you succeed in persuasion checks, you may turn some cultists to your side. However, the battle itself is unwinnable, once your whole team been put down, a cutscene will happen and 8 hours later you wake up in Defender's Heart.
The secret entrance to the Grey Garrison can be found at Market Square, near some tieflings. The Storyteller can be found at Blackwing Library, if you have high perception skill and Lore (Religion) Skill, you can find that the crusaders there are imposters. You can use high Athletic skills to knock out one enemy before the fight begins. If you meet the requirements, you can also use the Mythic Trickster choice to send the cultists to the Grey Garrison, avoiding a fight entirely. After you deal with the traitors, talk to storyteller and escort him back to Defender's heart.
Talk to storyteller again at Defender's heart, then speak with Irabeth. If you have gathered all allies (quest A Common Cause) and are confident to attack Gray Garrison, tell Irabeth it is time to strike now. Depends on how many allies you gathered in A Common Cause, there may be several crusaders and tieflings show up in Gray Garrison to help you. The first floor of Gray Garrison is now filled with demons and cultists now, try to lure them out one by one using doors, and always watch for traps. There's succubus at the center of this level, if you have the detect magic skill and high persuasion, you can turn some of the charmed recruits to your side.
After you defeat all the enemies, examine the statues located along the walls. There are three statues of people and three statues of angels. In the hands of statues can be a staff, a hammer, only a sword or a shield with a sword. Then, examine the altar, on which lies a book with a prayer. This is the key to solving the puzzle. Read the prayer carefully to understand the sequence of interaction with the statues. There are both people and angels in prayer. You also need to know who and what weapon used. You can solve the statue puzzle by the following order:
- Statue of a human with sword and shield
- Angel statue with shield and sword
- Angel statue with sword
- Angel statue with a hammer
- Statue of a human with a staff
- Statue of a human with a sword
On the second floor, you can loot Amulet of Natural Armor +2, Cloak of Resistance +2, and Scythe +2 from Jeslyn. To reach the third floor, you need to use the top right stair at the 1st floor first to reach the right side of the 2nd floor. A giant minotaur guards the stair of the third floor, you can loot Blocker (+1 Greataxe) from him. Once you reached the Wardstone, you will have to decide what to do with it. But before you make any decisions, buff your team, and get ready for a fight. Minagho will then appear with lots of demons to attack you.After the demoness been defeated, Staunton Vhane will appear and rescue her. In the book event, decide what to do with the angels trapped inside the Wardstone. You will gain a Mythic Hero class.
Spies Amidst Our Ranks
To formally start this quest, travel south to the Tower of Estrod and fight the Vision of Yaniel, where after the battle, Greybor will appear and tell you to climb up to where he is. When you are on the upper section, you'll see a group who are plotting about destroying Defender's Heart. During this sequence you will have to fight the group. After winning the battle, make sure to loot the rubble that's at the right colimn to find a Buckler +1 which requires a skill check of Perception 16, also a Heavy Mace of Fire that can be looted off one of the bodies.
Next, head to the basement and you'll find Telmer, now, if you save him, you'll acquire the Masticated Letter, but if he dies, it partially becomes destroued and you'll instead obtain a "Largely Destroyed Letter". Make sure you also loot the area and check for the rooms to find items such as the Grace of Peace, Entrapping Longbow, Magic Essence, and Lady Callandra's Chainshirt. If you head to the back side of the east room, you can find Teldon, convince him to hand over the keys or kill him to obtain it. After that's done, head back to Irabeth to complete the quest.
A Stay of Execution
This quest is located at Defender's Heart. NOTE: Defeating the enemies during Spies Amidst Our Ranks will make the battle easier as there will be fewer waves of enemies. Also, if you lose the fight, the game won't end, but your fight for the Wardstone will be much harder now as you've lost half your fighters and had your gear raided.
Make sure you are well prepared for this quest since you will be fighting here. You receive this quest shortly after awakening in Defenders heart from Avenia, who is worried that you leaving on a task for Irabeth leaves them vulnerable. After around 2-3 rests, a random encounter will trigger on the world map involving a messenger under attack from demons. rescue him, and he will inform you of an imminent attack on Defenders heart. You can choose to ignore him, go with him, or make your own way. (Don't take too long, or the quest will fail)
After arriving at Defenders Heart, speak to Irabeth to trigger the battle. You must defeat waves of enemies, while trying to minimise the damage taken by the Inn from fire throwing cultists. The final wave will consist of a Minotaur crashing through the southern gate. Defeat it and any other cultists to complete the quest.
Trivia & Notes:
Trivia and notes go here
ACT 2
Banner Over the Citadel
The fight for Kenabres marked the beginning of the Fifth Crusade. The next objective is Drezen: once the capital of the crusader movement, and now a demon citadel. Who will win? It is an equation with an infinite number of unknowns. The finest military minds failed to bring an end to this war, but a new leader now stands in command, one different from all the others. And perhaps this new variable will produce a different result.
General Details
- ACT II
- Location: Drezen
Relevant Characters
Bosses
- ???
Items
Consumables and Other Items
- ???
Equipment & Upgrades
- ???
Enemies
- ???
Banner Over the Citadel Walkthrough
Banner Over the Citadel Objectives
- Complete By Hell's Ordinance
- Complete A Strike from the Sky
- Make it to Drezen
- Battle through to the Citadel
- Find the Sword of Valor
- Hang the Sword of Valor
- Take the Citadel
- Leave the Citadel
By Hell's Ordinance
Objectives
- Go to help the Hellknights
- Push through the cave
- Talk to Paralictor Regill
In order to reach Reliable Redoubt, first, you need to defeat the gargoyle fort blocking the path. (Be sure you have an army with a strength of 4 or higher. Gargoyles have damage reduction.) The map is filled with Gargoyles, they can drop from skies to attack your casters and can cast smite good, so try pushing slowly while protecting your casters. At the center of this map, you can help a wounded crusader and gets Bastard Sword of Hope.
Look for the cave located on the east side of the camp. Inside the cave, you can work with hell knights to deal with incoming gargoyles, or you can fight them alone. After the battle, you can decide to transfer the command of Sunrise Sword order to Hell knights or to yourself. You can also recruit Regill afterward. If you pass the mobility check, you can reach another part of the cave and find a ring called Demonic Heart.
If you let Hell Knights join your crusade, you can recruit Hell Knights for your army. They cost 150 finances and 8 resources each. If you helped the Hell Knights, they can provide an additional route to storm Drezen later.
To The Lost Chapel
Objectives
- Survive the night attack
- Go to the Lost Chapel
- Rescue the prisoners
- Kill Nulkineth
- Talk to Anevia
When your army approaches Drezen, a random encounter may occur when you enter the war camp The camp is under attack by Gargoyles, you need to wipe them out while finding your other teammates. Lann will join you in the commander's tent, Camellia and Seelah can be found at the war camp. (With high perception skill, you can catch Nurah involved in some suspicious activity.) Woljif will temporarily leave the party, you may later find him in the quest Crescent of the Abyss.
The crusaders can help you a lot when fighting Gargoyles, if your character is a caster with low HP. Use these crusaders to tank the Gargoyles, while youn use spells from a safe distance. The leader of the Gargoyles will take Irabeth and your other companions as prisoners at Lost Chapel. A little north from the crusader's camp at Lost Chapel, you can find Ember and Daeran, who just managed to escape from their captors.
If you spared Yaker at Reliable Redoubt, and let Hell Knights join the crusader. You will meet him at the top side of this map, helping crusaders to escape. Sosiel is at the top right of the map, finding him progress his personal quest A Veil of Silence. Not far from Sosiel, you will meet a wounded crusader and some ghouls pretending to be corpses trying to ambush you. Prepare to attack, not warn them, so you can save that crusader.
Further down the road, Regill is fighting some gargoyles with his units. You can let him join your team or send him to the foot of the mountain. Keep moving forward, you can save a crusader from the pile of bodies if you passed the mobility check. The gate of the lost chapel is guarded by ghouls, cultists, and succubus. Inside, you will find the ghouls are trying to execute the prisoners. Defeat them and loot for Amulet of Mighty Fist +2 and a Light Shield +2. (if you pass the Intimidation or Diplomacy check, you can prevent one prisoner from converting)
In the basement of the Lost Chapel, you will meet Zacharius, a legendary hero of the crusade. However, he turns out to be a lich forced into the crusade, if you refuse to return his wand to him, you will need to fight him. (It's a very difficult battle. However, as a Lich, he is vulnerable to positive energy. Use protection from evil and protection from chaos on your team, and use the summoned creatures to tank for you. Once defeated, Zacharius drops Dried hand of Martyr, CHA+2 headband, Natural Armor +1, Amulet of Protection +1, Ring of Protection +1, and a Cloak of Resistance +1)
If you give back the wand to him, he will be freed with the promise to meet you again in the future. Note that this is an Evil action. (This is required for the Lich Mythic Path). Captured crusaders can be found across the Lost Chapel, if you managed to pass the Stealth check and kill the ghoul tormentors you can free them. In case you don't manage to pass the check, the crusaders will be killed.
Irabeth is in one of the rooms in the chapel, free her to progress the quest. (If Queen Galfrey joined the crusade, she can also be found in the chapel, and can help you clear Enemies.) Prepare your team before venturing forth, Nulkineth waits right next to Irabeth's cell. Once you take down this enemy (loot: Flail of False Hope, Belt of Mighty Constitution, Cloak of Resistance +2), you will unlock the second level of Mythic Hero class.
Once you have cleared the enemies inside the chapel, you can descend to the mountain foot using the path through the graveyard. There are lots of ghouls and Gargoyles wandering in this area, but you will also find lots of valuable loot, namely a +2 DR3/pierce chain shirt in a cave. Return to the Crusader's camp and talk to Anevia to complete the quest. If you found suspicious perfume in Nurah's tent, and caught her set fire, you can challenge her now. She will be revealed as a spy of demonic army, however, if you pick trickster Mythic Path, you can try to recruit her.
Retake Drezen
After you clear the demons in Lost Chapel, it is time to retake the Drezen. If Queen Galfrey joined the crusader, she will lead the charge. The Hell Knights, eagle watch, and Nurah all propose a plan to the commander. However, Nurah's plan turns out to be a trap. If you follow her advice, you will found yourself in the Drezen prison with lots of cultists and Minotaurs.
If you agreed Hell Knight's plan, you will appear at the west corner of the map. You also lose 10 morale. Regil needs to be in your party if you choose this route. In case you kept a sample of the slime that attracted the vescvaor swarm you can choose to do it now. You will lose 5% of one of your army units nearest to Drezen and 10 morale. You can take rests while sieging the fort, however, this may corrupt your characters. (Debuff, 15 spell fail chance, -2 Wis and Int, -3 CMD/CMB)
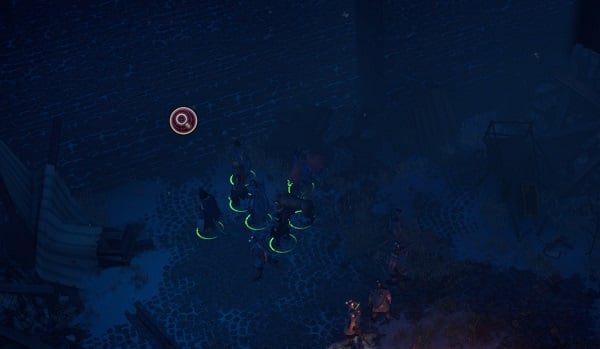
There are three hidden key holes (on top right of inner wall) to unlock the last gate before the balor and avoid having to fight the waves that come when you batter it down. The keys can be found on enemies in Prison, in tarven, and in temple. While inside the fort, you are also affected by Demonic Murmurs. (Every ten minutes you need to succeed a 14 Will check or suffer Charisma damage.) In order to remove the debuff, you need to find the torture chamber on the right side of the fort, then activate murals on the wall. (Need to pass Knowledge World 20, Knowledge Arcane 25, Lore Religion 30. Fail the checks will summon a group of enemies.)
To the south of murals room, there are several undead enemies. Once you defeat them you can pass a Athletic check to reveal a hidden room, there's a vampire sleep in a coffin, kill it to get a +2 rapier. If you have radiance (the long sword you found in Shield Maze.), the dwarf blacksmith Vhane at the furnace will upgrade it to a +2 cold iron long sword.
Drezen Fortress Puzzle
There are two Sword of Valor banners in the Drezen fort, the real one and a fake one. The one in the west hall is the fake one, touch it will only trigger the trap, and summons fireballs and a large group of demons. The real banner is hidden in a room in the south. To reach there you need to fight your way through a large pool of corpses, and use the secret passage revealed by "Yaniel".
One of the solutions to Drezen Fortress puzzle: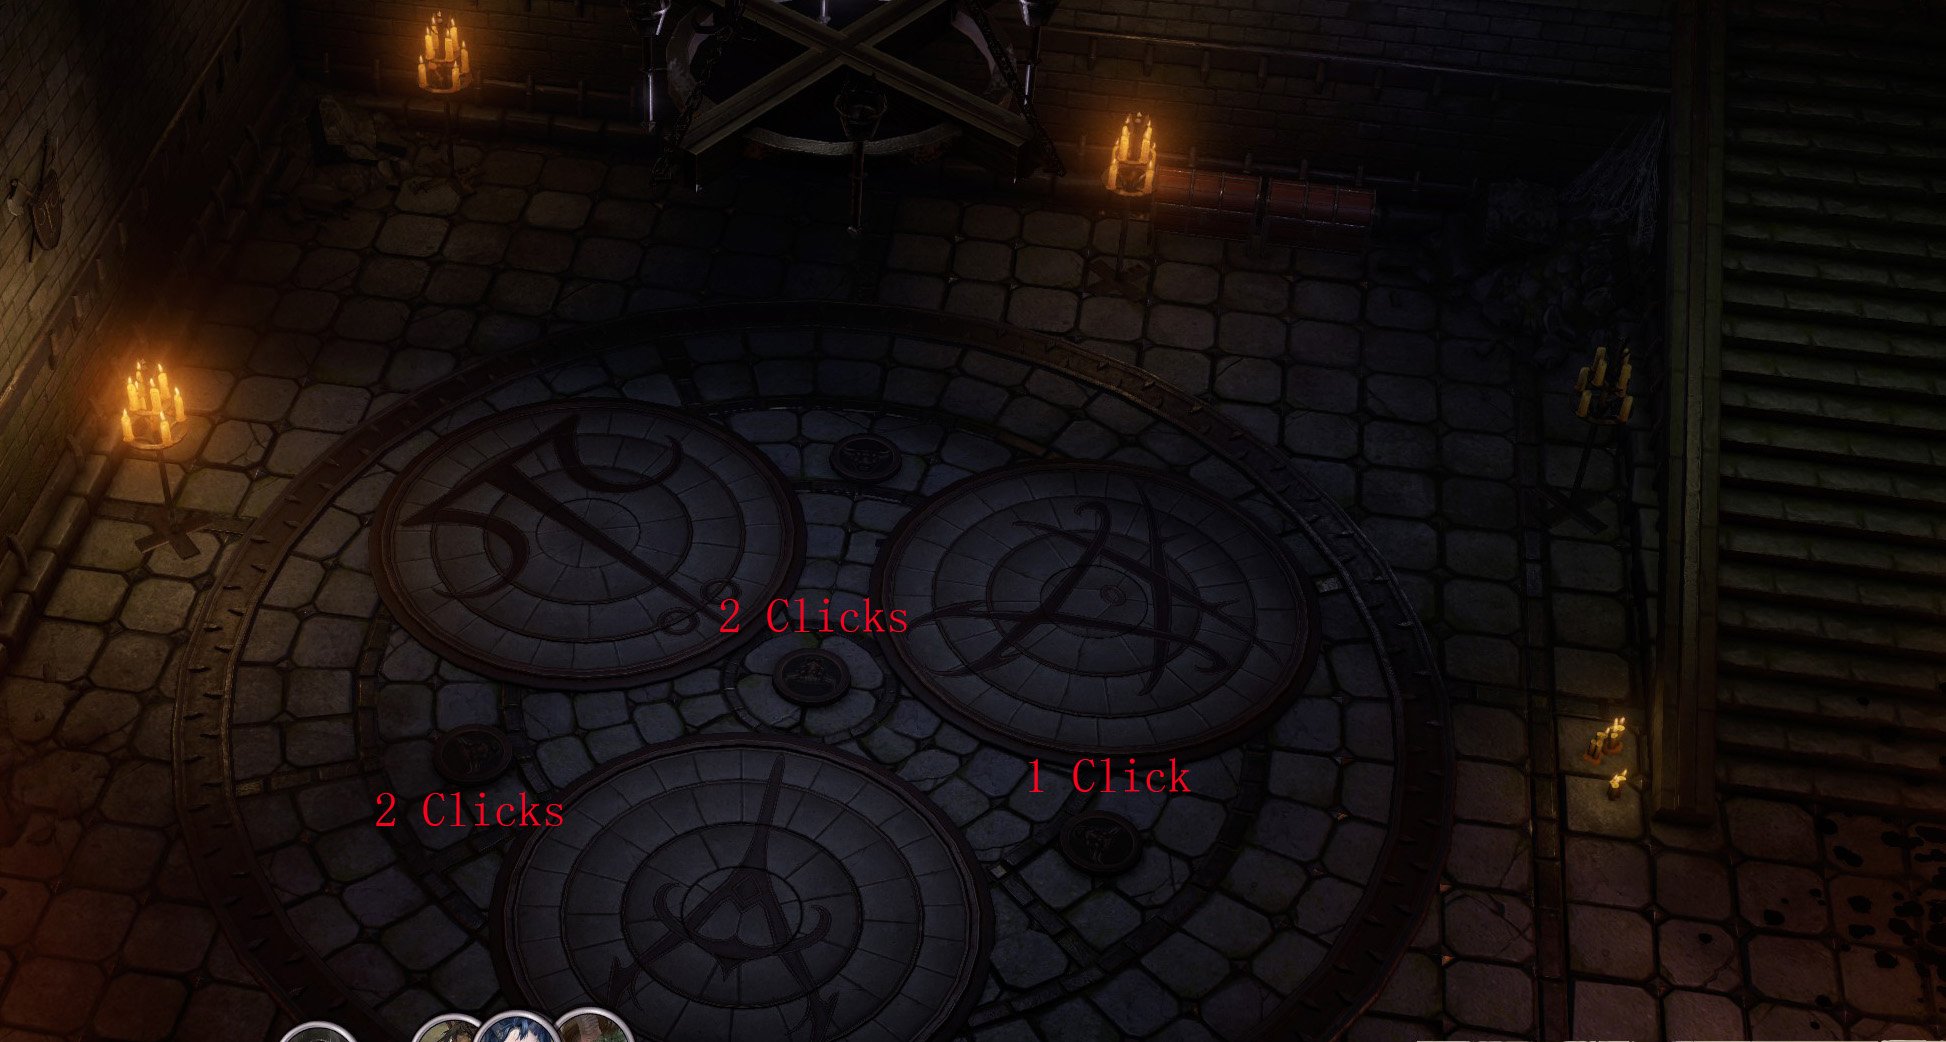
(You need to rotate the sigils to deactivate the traps, be careful once traps are deactivated three demons will appear to attack you.)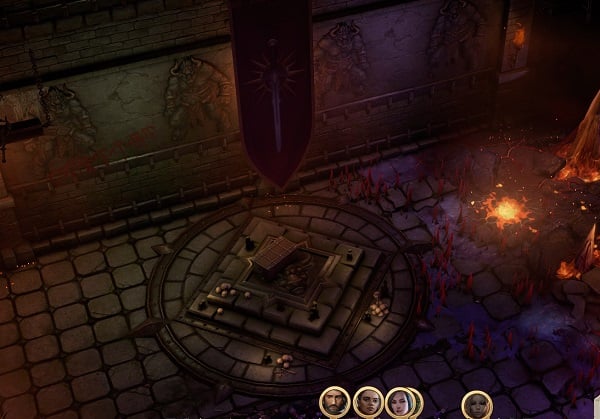
(The real banner, right after the puzzle)
Once you put the Valor of Sword Banner on the wall, you will unlock the third Mythic Level. This time, you need to decide which Mythic Path you set foot on. (Advanced paths, like Swarm-that-walks, Gold Dragon, Legendary and Devil can only be unlocked later.) If you pick Trickster path, and found her betray before attack Drezen. You can ask her to side with you during the siege, as a mockery to her former master. You may later set her free (Recruit?)
Trivia & Notes:
Trivia and notes go here
ACT 3
Know Thy Enemy
The war between crusaders and demons has been raging for a century, and each side has at times managed to find and apply fundamentally new powers or tactics. It seems a similar shift has happened again — extremely powerful demons are appearing in the territory around Drezen, and their abilities are far different to those of any demons the crusaders have encountered before. Knowledge is the key to victory. That means the Commander must learn the secret behind these unusual demons.
General Details
- ACT III
- Location: Ivory Sanctum
Relevant Characters
Bosses
- ???
Items
Consumables and Other Items
- ???
Equipment & Upgrades
- ???
Enemies
- ???
Know Thy Enemy Walkthrough
Know Thy Enemy Objectives
- Search for traces of unusual demon activity
- Explore the Ivory Sanctum
- Slay Xanthir Vang
- Return to Jerribeth
You get the quest right after you have retake the Drezen. However, you need to learn the location of the Ivory Sanctum from quest Demon's Heresy. And acquired the key from quest The Final Sunset of Winter. Travel to Ivory Sanctum, interact with a pile of bones to reveal the entrance to the maze. Defeat the enemies and open the first door by standing on two plates on the left and right. The demoness Jerribeth will then appear and offer you a deal - work with her to get rid of Xanthir Vang. If you agreed, then her followers will not attack you in this location. (You can still attack her after you defeat Xanthir)
Keep exploring the sanctum, be careful about the rock traps, they can instantly kill your characters. The button puzzle in the main hall can be solved in follower order: triangle, hexagon, pentagon, square. Solving the puzzle grants you a hidden chest with a Mask for quest More than Nothing and a cloak. In the upper part of the maze, there's a room with 2 locked doors. One of the door can only be opened after you defeat Xanthir, the other one can be opened with a combination. A note with a code is lying in the corner. There are five buttons on the wall in another corner. Click on them in the following order: square, triangle, circle, hexagon will reveal a hidden chest. Press the button in this order: triangle, pentagon, square, circle will unlock the door.
This door leads to Jerribeth's chamber, if you turned down her offer, you now need to fight her. Jerribeth tends to use mind-affecting spells on your team, so be prepared. Xanthir's lab can be found on the east side of the map, defeat his demons and followers, you can unlock the door by letting two characters stand on the pressure plates. And the rest pressing the three buttons on the walls. You will later meet some golems guarding the dragon eggs, if you managed to stop the golems, you can later send the eggs to Drezen.
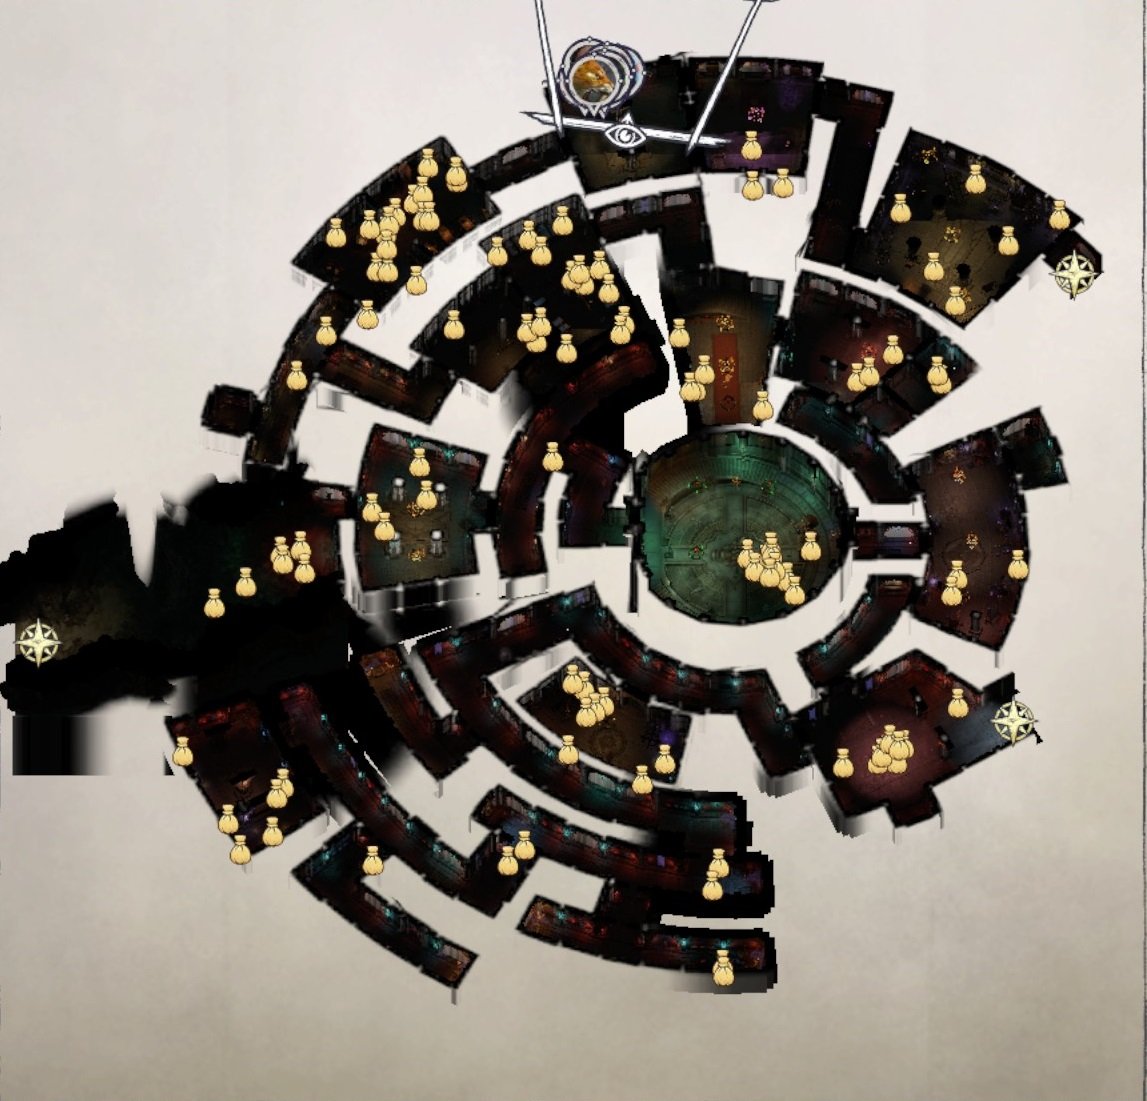
Continue exploring the maze. TIn the south part of it, there are also three dead-end corridors with bowls that you can interact with. Do this and kill ever guard. In one of the rooms with multiple chests, there's a puzzle, (note can be found in one of the chests) Here's a solution for you:
- Circle
- Pentagon
- Hexagon
- Triangle
After you cleared the maze, use the door on the Southeast side of the maze and head out. You will be welcomed by a large group of demons, but some angles will also appear and help you. Defeat Xanthir in his lab, if you answered his question correctly (his lab was in Drezen, due to rich crystal there. ) he will reveal more info about himself, as well as the portal beneath drezen. Loot his body and find the note, (you can unlock mythic path The Swarm that Walks), take his key, and return to Jerribeth.
The Dragon Hunt
Objectives
- Talk to the bounty hunter in the tavern
- Hire Greybor
- Travel with Greybor to the Grimwood and set up an ambush for the dragon
- Track down the dragon
- Kill the dragon in her lair
- Track down and kill the dragon in the Ivory Sanctum
- Inform Irabeth of the victory
After you take Drezen, go to the tavern in the upper right corner of Drezen and find the dwarf Greybor. The same one you met in the Estrod tower. Hire him to hunt the dragon. You have to pay him 2500 gold. He will appear among your Companions. Travel west with Greybor. On the way to Grimwood, you will be attacked by a dragon. Defeat her. Get to Grimwood, talk to Greybor and ambush the dragon.
She will flee, leaving a trail of blood behind her. Leave the location. On the right, under Drezen, a location will appear, which is called the Blood Trail. Once you reach there, you need to pass a few checks to realize that the dragon has gone south. Note that if you fail the first two checks there won't be major consequences, but failing the third one, (Athletics 31), will spawn the party in front of the dragon, making it an easy target for her fire. Go down from blood trail to Artisan's Tower. You need to pass several more checks before you finally reach the tower, you can let Greybor do them for you.
The dragon can be found with the Storyteller, if you stay there long enough you can hear the Storyteller telling the stories of Pathfinder: Kingmaker. Ambush the dragon, do not let her flee. She will fly to the second-floor. Focus your whole party on her to prevent her fleeing. If she manages to escape, she will burn the Storyteller's books and the Quest will fail. You can find some scrolls in the tower, and some Mandragora below the ruin's basement. Important loot includes Bracers of Abrupt Onslaught and a Half of the Pair Amulet. To progress the quest, you need to find the Elven Notes
You can recruit Greybor permanently as a party member. To do so, you have to pay him 12500 Gold coins. Head to Drezen's Citadel and meet up with the Storyteller. Hand the Elven Notes to him to learn more about his past. If you have Terendelev's Claw you can give it to him, leading him to reveal Terendelev's Lair, an important place if you want to unlock the Dragon Mythic Path.
The Secrets of Creation
Objectives
- Go to the Heart of Mystery
- Solve Four puzzles
- Solve the last puzzle
- Claim the reward
This quest is unlocked after you solved the puzzle at Conundrum Unsolved. The solution is pictured below.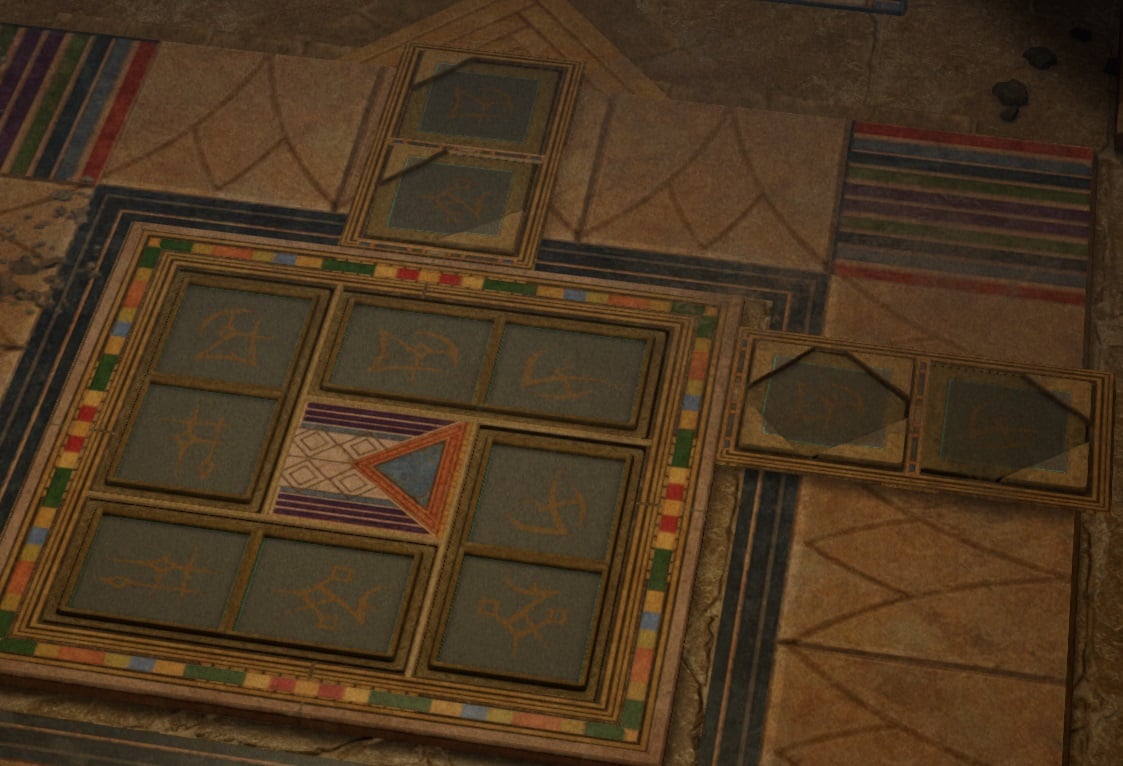
In a random encounter, you will meet an ancient spirit, answer his question (Lore: Nature checks) and he will reward you the key to Legacy of the Ancients. Later, you can meet that spirit again in various different random encounters, each time you answered his question correctly, you will get some high-level scrolls, and he will reveal one of the locations (Forgotten Secrets, Final Veil, Core of Riddle) related to the quest. You can find slabs in Ravaged Long House, Shrine of Sacrilege, Bone Hills, and Place of Execution.
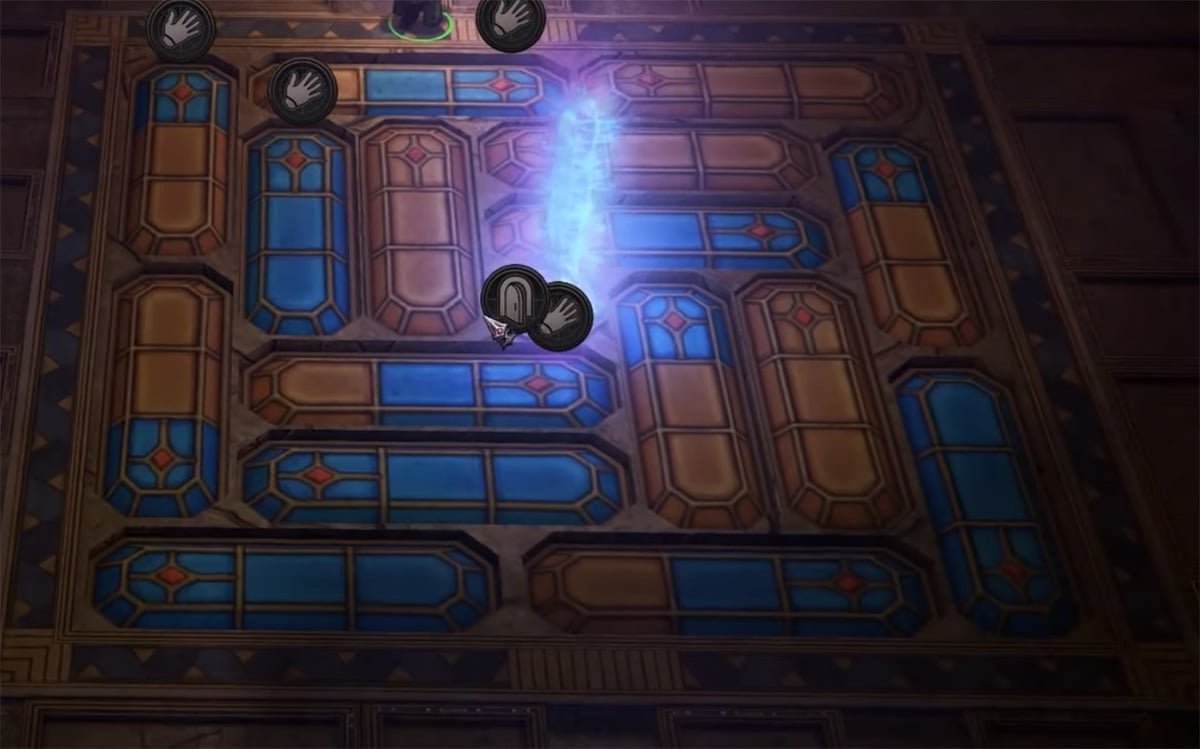
Solutions to puzzles can be deduced from the tiles places around the outside. They indicated which symbols must be used in the corresponding row, but not how many. One symbol means only that symbol in that row. You can work out the pattern from there, using the outer tiles to help you build the final picture. (Solutions can be found on the location pages). Once you finished puzzles at Forgotten Secrets (slabs at Shrine of Sacrilege), Final Veil (slabs at Bone Hills), Core of Riddle (slabs at Ravaged Long House) and Legacy of the Ancients (slabs at Place of Execution), return to Heart of Mistery (slabs at Laughing Caverns) and enter the Enigma.
Puzzle Solutions
Forgotten Secrets puzzle: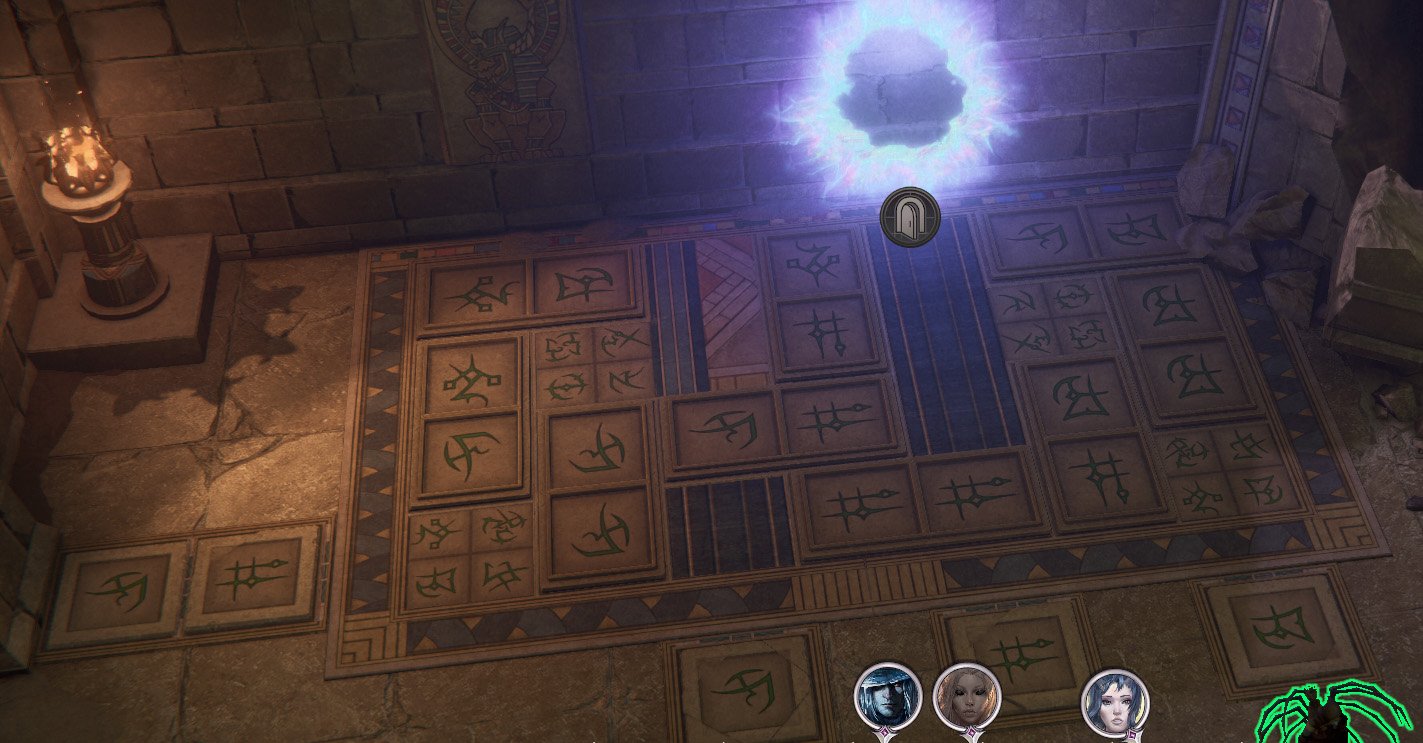
Core of the Riddle puzzle: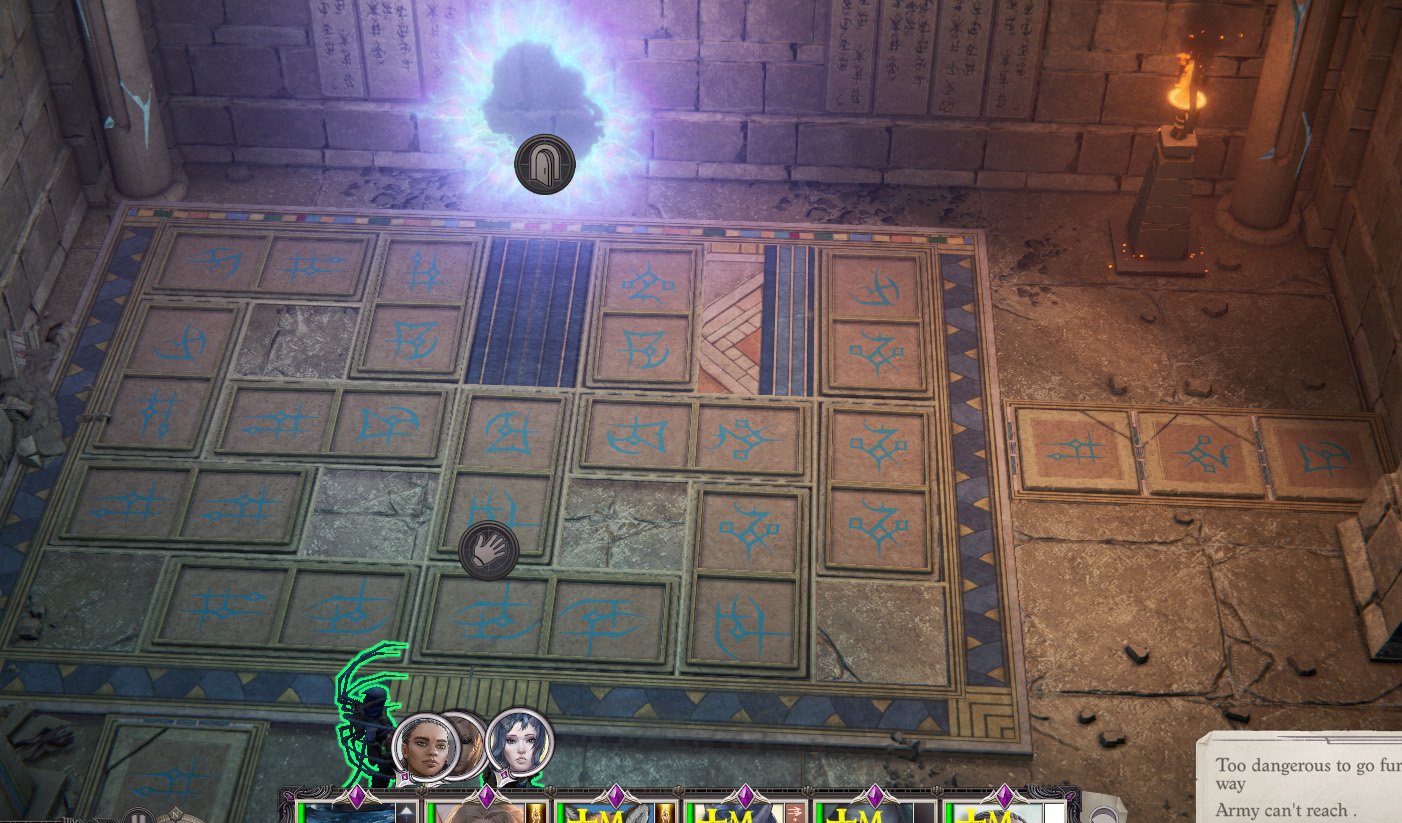
Final Veil puzzle: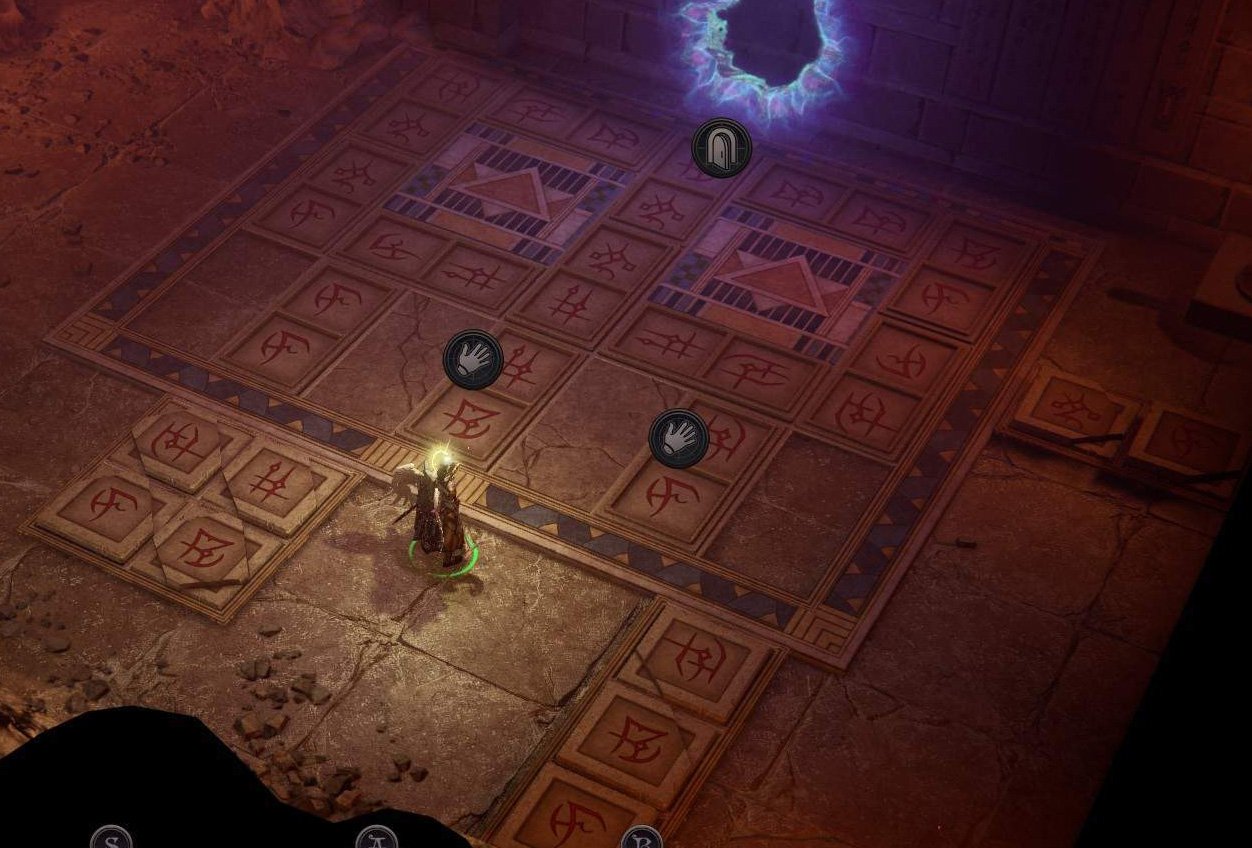
Legacy of the Ancients puzzle: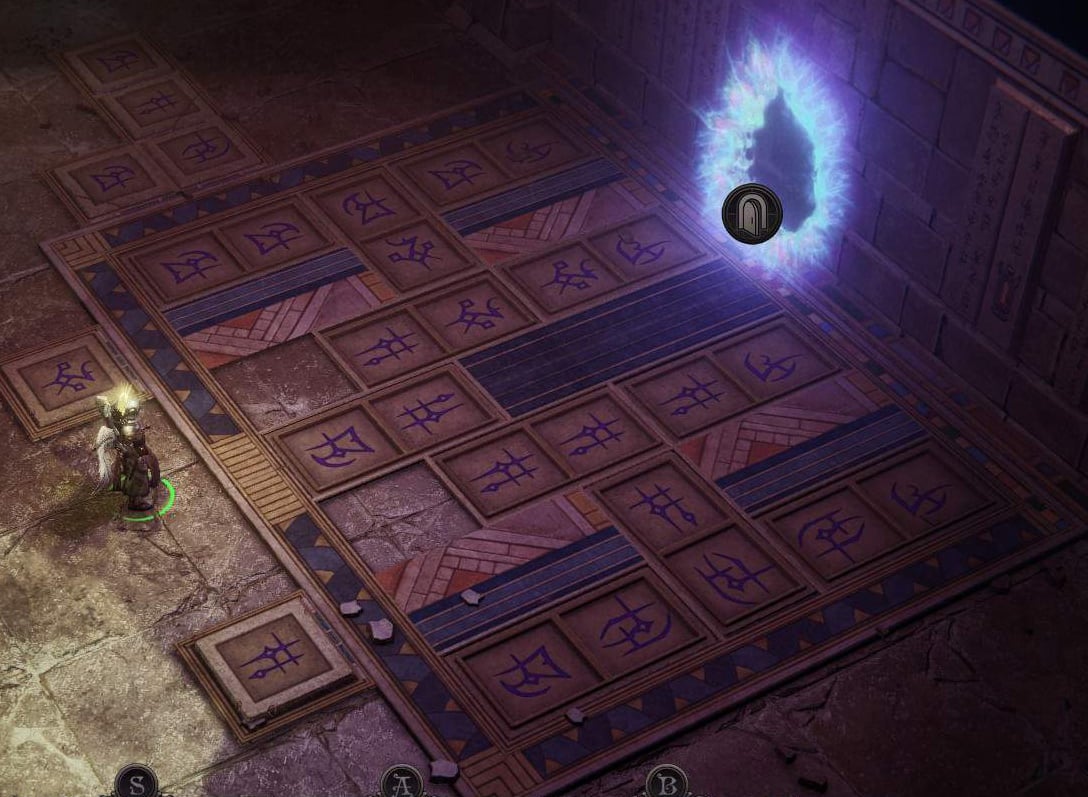
Trivia & Notes:
Trivia and notes go here
ACT 4
Treading on Corpses
The Midnight Isles, Lady Nocticula's realm, is a dark place even amidst the grim madness of the Abyss. Everyone who sets foot on this land is treading on the corpses of those who once opposed the Lady in Shadow - for the islands were created out of the bodies of her slain enemies. In this place, cunning, self-interest, boldness, and eternal midnight reign supreme. Those responsible for mining Nahyndrian crystals and shipping them to Golarion are lurking somewhere in this place. Their efforts are transforming the demonic legions into a wave of chaos capable of obliterating everyithing in its path. The Commander has left his homeworld and descended to the Abyss on a mission - to find and out a stop to them.
General Details
- ACT IV
- Location: Alushinyrra
Relevant Characters
- ???
Bosses
- ???
Items
Consumables and Other Items
- ???
Equipment & Upgrades
- ???
Enemies
- ???
Treading on Corpses Walkthrough
Treading on Corpses Objectives
- Explore the mines around the Nexus
- Go through the portal
- Try to secure an audience with the city's rulers
- Go to Colyphyr
- Talk to Nocticula
- Attend the audience in Nocticula's palace
- Attend the audience in Nocticula's palace
Explore Nexus. (There are 2 portal keys in the cave, one near Suture, one above the succubi.) In order to secure an audience with Nocticula, you need to complete quest The Art of Making Friends. Speaking with Areelu and Nocticula, learn what really happened to you. You will gain another mythic level whether or not you decide to take the power Areelu gives you, however if you cooperate with Areelu you want secret ending.
You can find the second part of Lexicon of paradox in House of Silken Shadows (on a bookshelf in small lab). You can give it to Nocticula for reward, or keep it for yourself. (you need 2 parts of lexicon for secret ending.) If you already collected 2 parts of Lexicon, you can try to decipher it. You need to pass all knowledge/lore/perception checks in order to find out its content. You will gain large amount of XP of finding out its content. (You can show it to the council, they won't take it away.)
If you decide to work with Nocticula, she will open a portal for you and provide you a ship, so you can hunt down Baphomet's daughter Hepzamirah. Otherwise, you need to find a ship by self, you can try talk to the captains in Fleshmarkets and Bad Luck Tavern. Note, once you left Alushinyrra, there's no turning back, so finish the quests here before you leave. If you work with Nocticula, you can ask her to send some troops to protect Nexus. Before you leave, make sure you have completed all the quests in Abyss, otherwise they will fail. The journey to Colyphyr Mines is represented in descriptive event, you need to pass multiple checks to reach there safely.
The Art of Making Friends
Objectives
- Learn more about Alushinyrra's leaders
- Secure an audience at the Harem of Ardent Dreams
- Find Ziforian
- Get inside the Mage's Tower in the Upper City
- Find a Nahyndrian crystal
- Talk to Shamira
Go to the Bad Luck Tavern, the owner there can share some rumors about the Alushinyrra's leaders with you. The Harem of Ardent Dreams is located on a floating isle to the east of fleshmarkets, you need to wait until it connects the market to reach there. You can gain access by complete the quest Rapture of Rapture.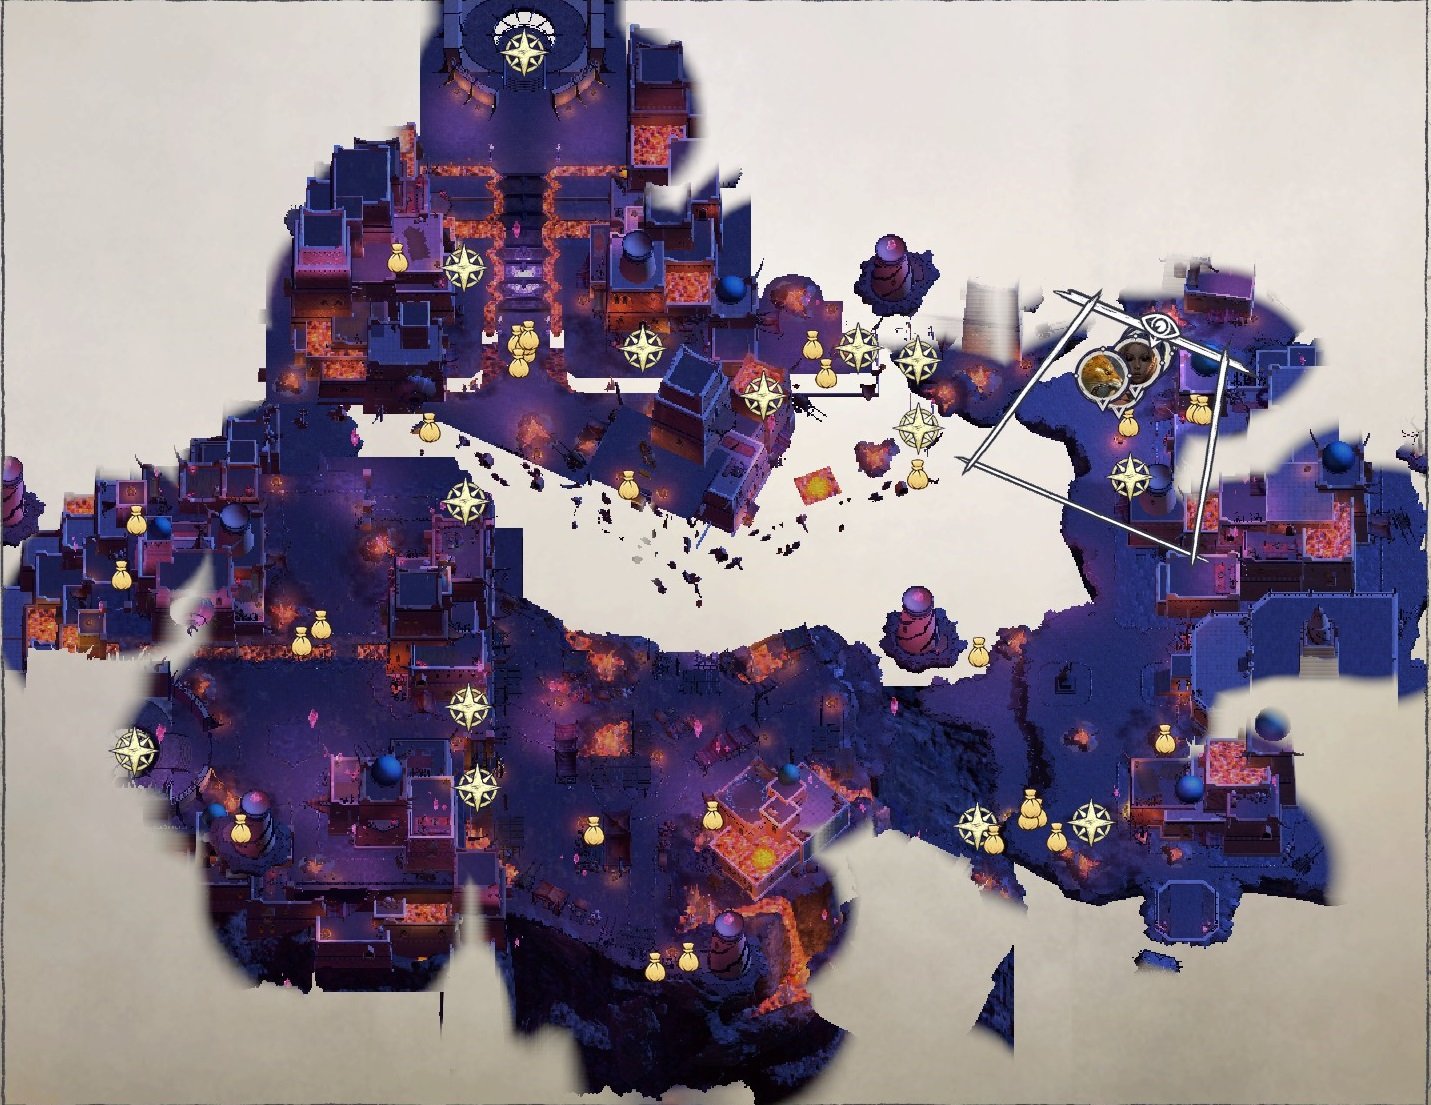
Talk to Shamira after quest Rapture of Rapture, she will task you to find out the secrets of Nahyndrian crystal. Travel to Lower City. Ask one of the beggars about Ziforian, then, go to the east part of the area (Where you found Chivarro, below the Rotten Guttery, near the path you enter the city for the first time), there's another beggar telling you need to find the leader of beggars to learn the info about Ziforian. The Beggar leader is not far north from him, to get the info you need to pass diplomacy, buff or trickery checks.
Or, if you pay 100,000 to the owner of Bad Luck Tavern, you will learn Ziforian is actually the beggar standing in front of Battlebliss Arena. Talk to Ziforian and get his key, you need to enter mage tower through the Upper City. (Near Willodus' mansion). If you have collected enough Elven Notes, you will realize that is the storyteller's tower. Be careful while exploring this area, there are tons of traps and 2 golems guarding it.
After you reached the second level of the tower, go outside and ignite two crystals to reveal the door to the top level. (you may need to rotate the camera angle to make it connect.) Search the tower, you will find some valuable loots. There is also a strange door on the top level, open it and it will teleport the storyteller to the tower. (If you want to romance Queen Galfrey, ask storyteller to send a letter for you.) Next, you need to find a Nahyndrian crystal. Go back to Nexus and search the cave, the storyteller's compass buzzes when the crystals are near. There's an invisible wall behind the bones of the giants, behind that: Go to the bottom right corner of the cave to find the crystal. Be careful once you get the crystals, several enemies will appear and attack your team so get ready.
Return to storyteller and give him the crystal. You will need to pass several will check and knowledge check to learn the full story behind the crystal. Back to Shamira, you can chose to reveal the secrets to her, or keep it to your self (3 will checks), either way the quest is completed. (If you keep the secret, Nocticula will reward you an amulet Aspect of the Asp)
Raputre of Rupture
Many talented and gifted individuals gained high status due to a wisely chosen patron. Finding a philanthropist who is capable to see future glory in a young and promising novice is a sophisticated art. And it is twice more complicated to find a patron who won't eventually start treating the protégé as his or her property, lay claims and consider his or her dependent a toy or a pet. Breaking up with such a patron can be a very nasty experience or even the end of a young talent's career.
Objectives
- Visit Vellexia's mansion
- Go on a date to the Battllebliss arena
- Meet with Vellexia in the Harem of Ardent Dreams
- Attend the reception at the Rapture of Rupture
Visit Vellexia's Mansion. Agree to attend the date at Battlebliss Arena, remember the chaotic responses pleases her. Next, travel to Harem of Ardent Dreams, whichis located on a floating isle to the east of fleshmarkets, you need to wait until it connects the market to reach there. 
The last encounter will take place in Rapture of Rapture. This time, if you fail to amuse her, you will have to fight her minions and herself. If you do succeed, she will reward you a amulet (+5 Natural AC, +2 ability score). If you tried chaotic approach before, this time you need to try different dialogue options.
Grudges to Settle
Everyone needs friends, especially in a place like Alushinyrra. Chivarro, the owner of the Ten Thousand Delights, could have made a valuable ally. Basically, all demons are driven by their desires, they are controlled by their whims, so the person who controls the source of satisfying every inclination must be really influential. However, it's most unlikely that her good attitude will come with no fee.
Objectives
- Punish the demons who abducted the succubi
- Make Chivarro Pay for her Lies
- Talk to Chivarro's successor
- Find the ousted Chivarro
In 10 thousand delights, the owner Chivarro asks you to punish the demons who abducted succubi. Travel to Rotten Guttery in lower City. However, you didn't find any demons here, but some mercenaries instead. Talk with them and you will learn that it's Chivarro hired them to ambush you here. After you cleared the mercenaries, go back to ten thousand delights and confront Chivarro.
You will learn that Chivarro is actually an ally of Minagho, she will escape the ten thousand delights afterwards. With the change of management of ten thousand delights, you can now buy equipment and from its new mistress, and use the portal here to go to Upper City. You now need to hunt down Chivarro, who is now hiding in Lower City. You can find her at east part of the area, below Rotten Guttery. Kill Chivarro and go back to Ten Thousand Delight to claim your rewards.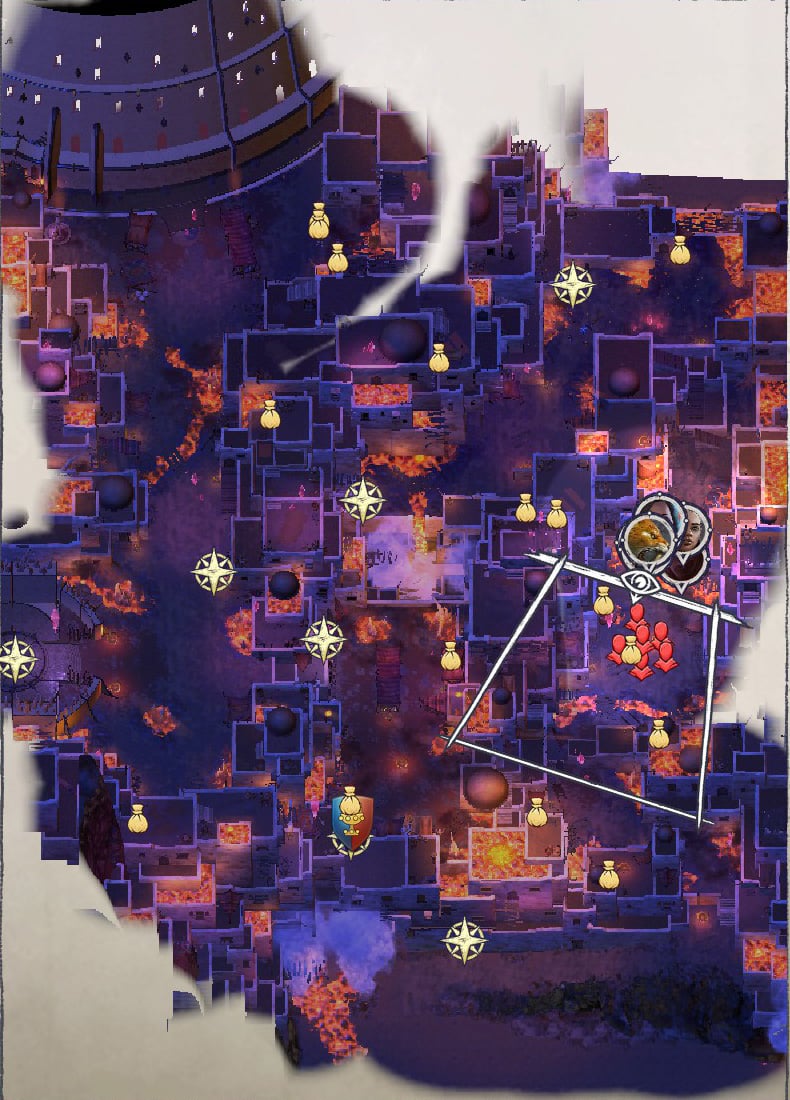
Trivia & Notes:
Trivia and notes go here
ACT 5
Empty Memories
One can find a way out of even the most hopeless situation. Sometimes the path is revealed unexpectedly. Isn't that right, character name?
General Details
- ACT V
- Location: Areelu's Lab
Relevant Characters
- ???
Bosses
- ???
Items
Consumables and Other Items
- ???
Equipment & Upgrades
- ???
Enemies
- ???
Empty Memories Walkthrough
Treading on Corpses Objectives
- Enter the portal in the laboratory
- Explore the mysterious place
This quest is easily missable, however, it's important to get the secret ending. After you get the secret keys from Iz. (quest Heart of the Fallen Land) Travel to Areelu's Lab, use the crystal "Key" on the projector to open a new portal.
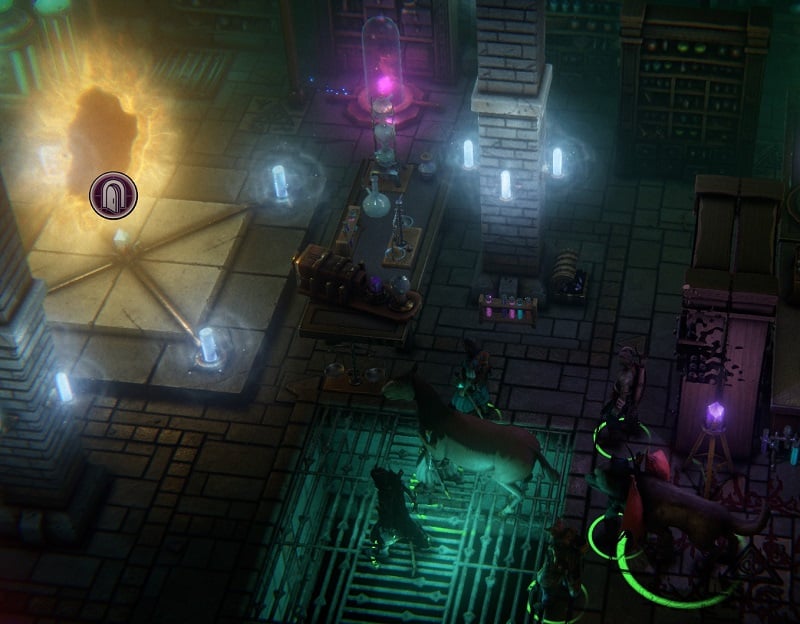
Explore the secret part of the lab to find more about Areelu's past.
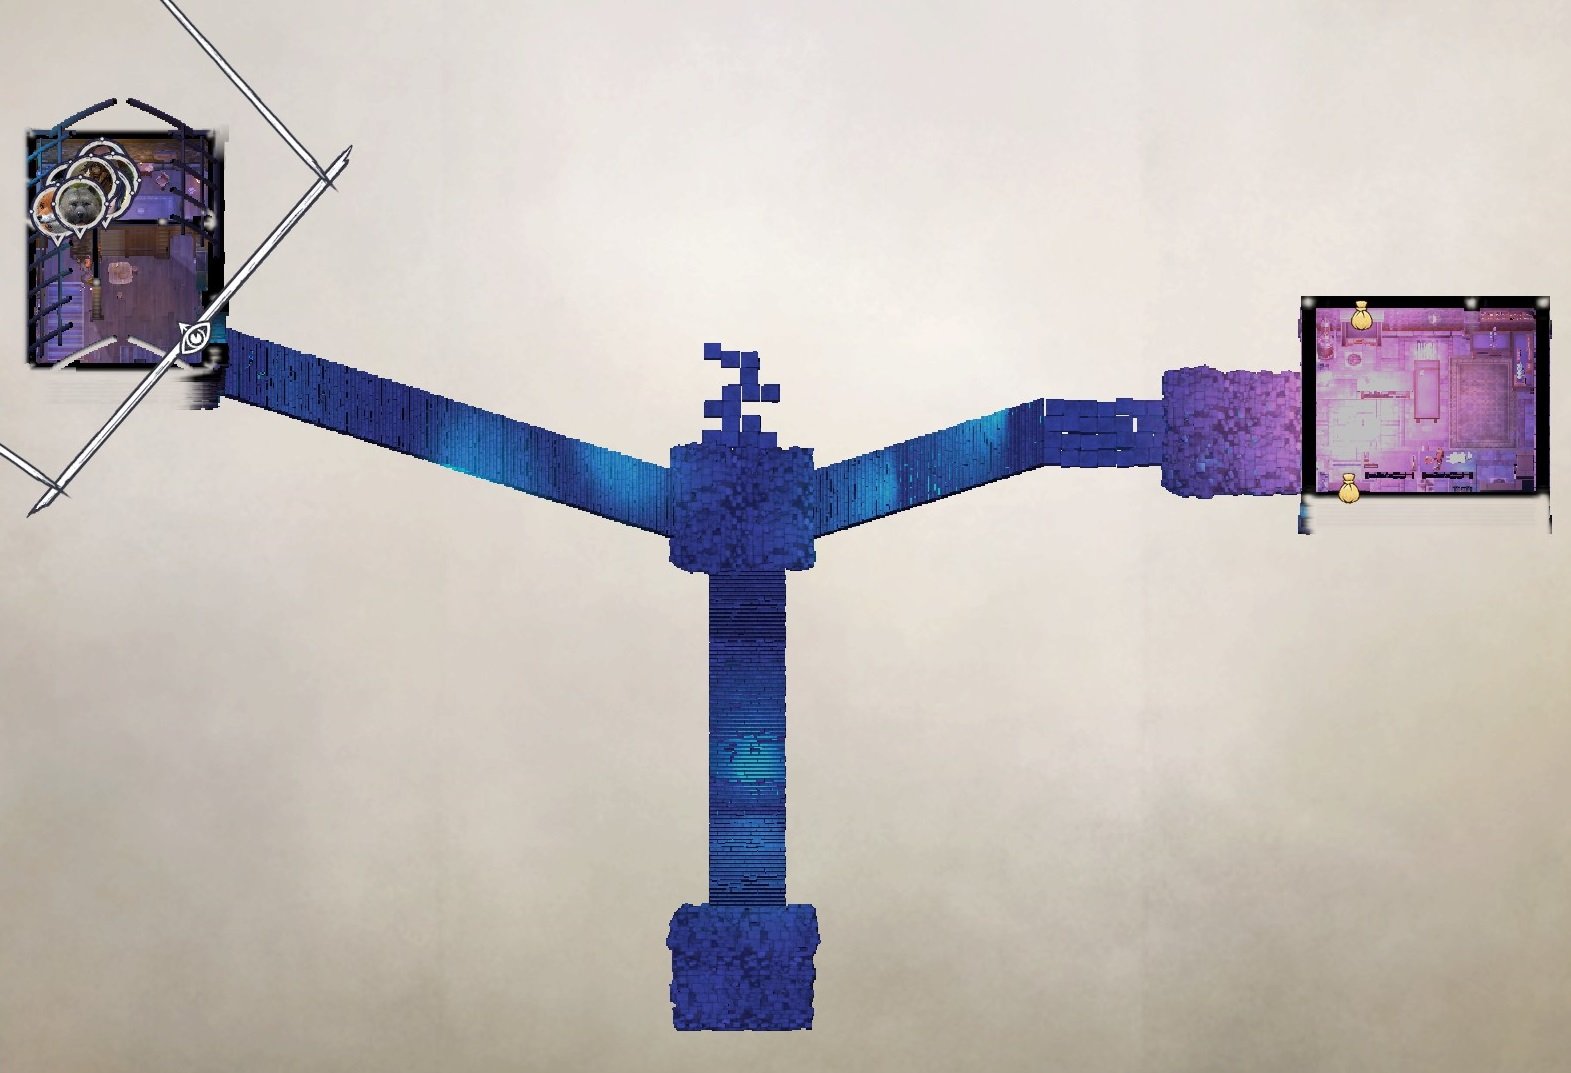
In the second scene, it's important to reach Areelu's lab, and acquire her note. (the door is at bottom right corner)
You need to research the note on Crusader project, this is critical to secret ending. Next, head into the third scene. Decide what to do with Areelu's captor and former friend. Then express your anger/sad, tell her this is an act of justice to earn 2 points of Areelu's approval.
Heart of the Fallen Land
Objectives
- Find Queen Galfrey
- Find the Sword of Valor
- Visit the Temple of Stone Manuscripts
Once you entered Iz, Areelu will show up, telling you this is a trap set Deskari, and queen Galfrey is in danger. However, if you go save the queen, you will lose the chance to find Areelu's old note and key. (the crystal can be found in a room on top, the glass key is in a hidden chamber near the entrance)
These keys are critical to the secret ending, after you defeated Deskari, you need to go back to Areelu's Lab and explore the secret Area. It's important to find the research Areelu's note, and gain her approval if you want to become a god.

If you go the the Temple of Stone Manuscript first, the queen will still survive, but Irabeth will be killed and you lose the opportunity to romance Galfrey. (If you gave the lexicon to the queen, she will use it to protect herself, and returned it to you afterwards.)
If Hulrun is alive and supportive, he will hold the camp and banner, even if you went to the library and queen first. Be careful, the battle with deskari will completely change the map of Iz, make sure you have explored the whole area before facing it. While fighting Deskari, use Midnight bolt to acquire another New Nahyndrian Crystal.
Your Bones will Join the Myriad Others
Objectives
- Learn the fate of the Hand of the Inheritor
- Find the entrance to the Ineluctable Prison
- Get into the Inluctable Prison
- Find the cell of the Hand of the Inheritor
- Find the key to the cell of the Hand of the Inheritor
- Find the Hand of the Inheritor
The puzzle near blood pool can be solved by following order: Circle, Triangle, Pentagon, Hexagon. This will reveal a hidden chest.
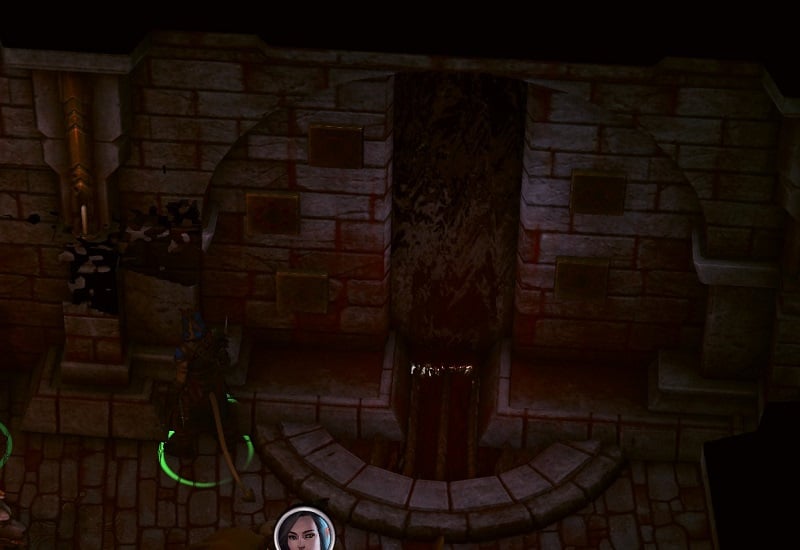
You can disable the AOE debuff by destorying the obelisks. The puzzle in a top left room can be solved by following order: Hexagon, Circle, Pentagon and square. Reveals a hidden chest with scrolls.
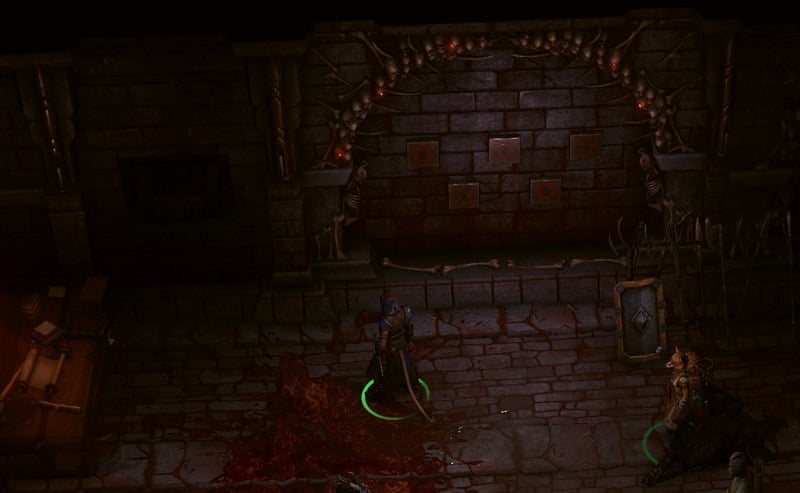
On topleft area outside the maze, you will need to pass some mobiliaty and athletics checks to reach an open field. Defeat a giant purple worm to gain some loots. The puzzle in a torture chamber can be solved by following order: Square, Triangle, Hexagon, Pentagon. The chest contain a mask for Nenio's quest (More than nothing)
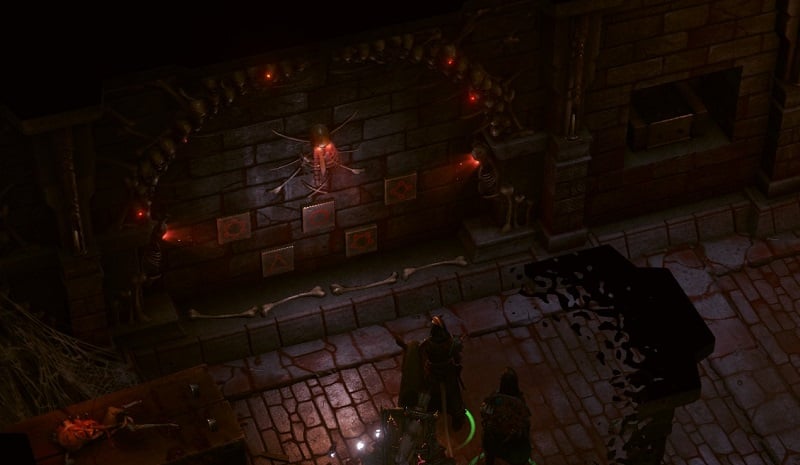
There's an errand in the prison, defeat the jailor and deliver Dawnflower to a ghost of prisoner on top right area for blessing. The angel's heart can be found on bottom area of the prison, you need to pass the corridor of rolling boulder to reach there.
An ancient lich, Alderpash, is also in bottomright area. He gives you a small errand Alderpash's Phylactery. (The Phylactery is hidden in the liquid pool in his cell. You can chose to free him or fight him.) Once you defeat the jailor and get her key, you can unlock the path to the centre of the prison. Defeat Baphomet's statues and reach him. You will have to fight the hand of inheritor there.
Trivia & Notes:
Trivia and notes go here
 Anonymous
Market square map is not fully explored. It is missing part with Mongrels (At least if you sided with Lann, I will get there tommorow with Wend). You need athletic skill check to get there, entrance is, on map, bellow thieflings.


There is no quest Weary Guardian from Act 3
0
+10
-1