Devoured by Darkness
|
|
|---|---|
| Location | Underground Caves of Kenabres |
| Reward | N/A |
| Previous Quest | Day of the City |
| Next Quest | The Burning City |
Devoured by Darkness is a Quest in Pathfinder: Wrath of the Righteous.
Information
The festival organized to raise the spirits of the city has ended in death and destruction. Those lucky enough to survive ended up in the ancient catacombs beneath Kenabres, catacombs in which, so the rumors say, live a brood of bloodthirsty humanoid creatures.
Objectives
Find other survivors
- One strike of the demon lord's titanic scythe and the merriment turned to terror, and toasts of celebration turned to moans of the dying. For those lucky enough to survive the calamity, it makes sense to seek out fellow travelers in this misfortune.
Find the way up
- Even at the best of times, the caves beneath Kenabres have always been considered a deadly trap, but now that earth tremors have collapsed many of the passages, it will take a miracle for those swallowed by the darkness to find their way back to the light.
Rest in the hut
- The mongrels say that the Shield Maze that leads to the surface holds many dangers. Before setting off, it would be wise to rest in a village hut as Chief Sull advised.
Storm the Shield Maze
- The mongrels are ready to storm the Shield Maze to get back their children. A laudable plan, but one which will likely require assistance if it is to succeed.
Find the way through the Shield Maze
- The time has come to leave the mongrels to deal with their own matters and focus on getting back to the city. The huntress Wenduag believes that the Shield Maze leads to the surface, but she cannot find the way out alone.
Slay Hosilla
- The cultist Hosilla has made herself quite at home in the Shield Maze. The only way out of this place is over her dead body.
Return to Kenabres
- There is no way left but up for those swallowed by the darkness. It is time to return to Kenabres.
Walkthrough
Underground Caves of Kenabres
After finishing Day of the City, you will fall into the hole created by Deskari. Once you wake up in the underground, you regain control. Go right and you will find Anevia and Seelah. Interact with them to earn 125 Experience. Seelah will ask for your help:
- Succeed in Athletics (12) or Knowledge (World) (12) checks to help Anevia get out of the rubble.
- You can also select the Diplomacy (12) option, earning 200g. Note that this is an Evil action.
- If you succeed, you earn 48 Experience - or a bit less, if you chosen the Evil option for the extra cash.
Anevia and Seelah will introduce themselves to you, and talk about the demon's invasion and the fall of Terendelev and will proceed to ask about you. Once introductions are in order, Seelah will join your party. She's a Paladin (See Builds if you are not sure how to develop her character)
Move forward, you will eventually find a chest containing the weapons Hulrun confiscated before the festival. You can find:
- Weapons based on your class
- x2 Everburning Torch
- x1 Flail
- x1 Cloak of Resistance +1
- x1 Longsword
- x1 Shortspear
Ahead of the chest is one of Terendelev's Scale. Continue moving forward, and you will meet Camellia who will join your party. When the conversation ends you earn 125 Experience and you can loot the dead body of Aravashnial next to Camellia, to obtain a Masterwork Dagger. If you turn right you will find Bracers of Armor +1
There are a number of enemies as you progress along the path:
- x3 Centipede
- x2 Giant Fly
- Giant Centipede and 2x Spitting Giant Centipede
- Monitor Lizard
Eventually, you will reach a broken archway with some collapsed columns and Lann and Wenduag. Lann will tell you that they are looking for a holy Angelic sword. Once the conversation ends, you will earn 300 Experience.
This area contains:
- A Statue of an Unknown Knight (Relgion 17)
- There are a number of hidden lootable objects in this area behind low level Perception checks. One of these will contain the the holy sword, touch the sword to trigger a book scene.
The book scene will provide a vision and reveal what happened to Lariel the owner of the Sword. The Scene will provide the below checks:
- "(Will 10) Be determined to fight the illusion" or "(Knowledge (Arcana) 10) Attemp to resist the malign influence"
- "...save and protect the innocent" or "..punish evildoers and traitors". The first one gives you "Protection From Evil", the second "Heroism"
This scene unlocks the Angel Mythic Path.
Lann and Wenduag will ask you about the whereabouts of the sword and will join your party.
Accessing the next area requires passing a Mobility (14) check.
The following path contains a number of enemies:
- 3x Giant Spiders
- 2x Giant Spider 3x Spitting Giant Centipede
- 3x Giant Spiders
There is a branching path requiring a Mobility (11) check containing:
- 3x Earth Elementals
- Wand of Cure Light Wounds
At the end of the path a cutscene will trigger. Wenduag will talk to you privately and ask you to not show the Light of Heaven to Chief Sull.
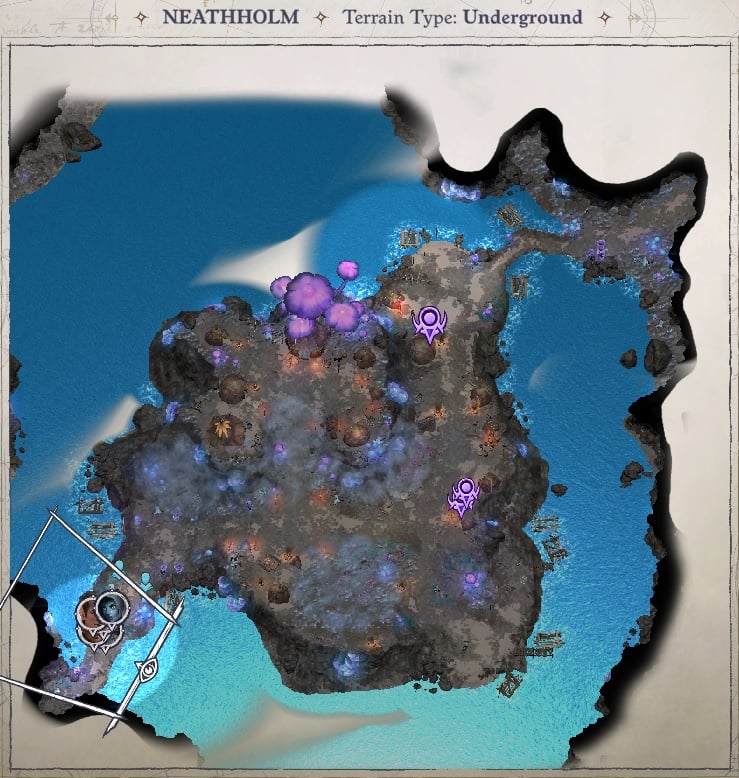
Neathholm
Leave the area, and you will reach the Mongrel Settlement. You will meet Chief Sull and gain 250 Experience.
Note: You will be presented with the choice of revealing the Light of Heaven or hiding it. This is a significant choice impacting the rest of the Prologue.
- (Lawful) [Requires Angel Mythic Path] [Reveal the Light of Heaven] "Lann speaks the Truth"
- (Chaotic) "Lann is mistaken. We didn't find the sword"
- Revelaing the light will have Lann join you for the rest of the Prologue.
- Concealing it will have Wenduag join you for the rest of the Prologue (Recommended for higher Difficulties as this will reduce the difficulty of the final fight)
Moving into the wider village will introduce you to Horgus Gwerm, one of the richest and most distinguished men in Kenabres.
- He will offer you 1000gp if you agree to lead him back to the Surface.
- Diplomacy (16) will increase this to 2000gp
- This will add the Quest: Gwerm Family Secrets
You will be able to rest in a hut in the North of the Village.
- Remember to Level Up and assign spells to Camellia before you rest.
- If you decided to show the Light of Heaven to Chief Sull, Wenduag will be gone the next day.
- If you concealed the Light of Heaven, Lann will be gone.
Merchant Drya - Suggested Purchase:
- Quiver of Cold Iron Ammunition (This will allow you to pierce a demon's Damage Reduction)
Head to the northeastern part of the map to leave to village.
Note: The route diverges slightly based on whether Lann or Wenduag is your companion, though the overall route remains the same.

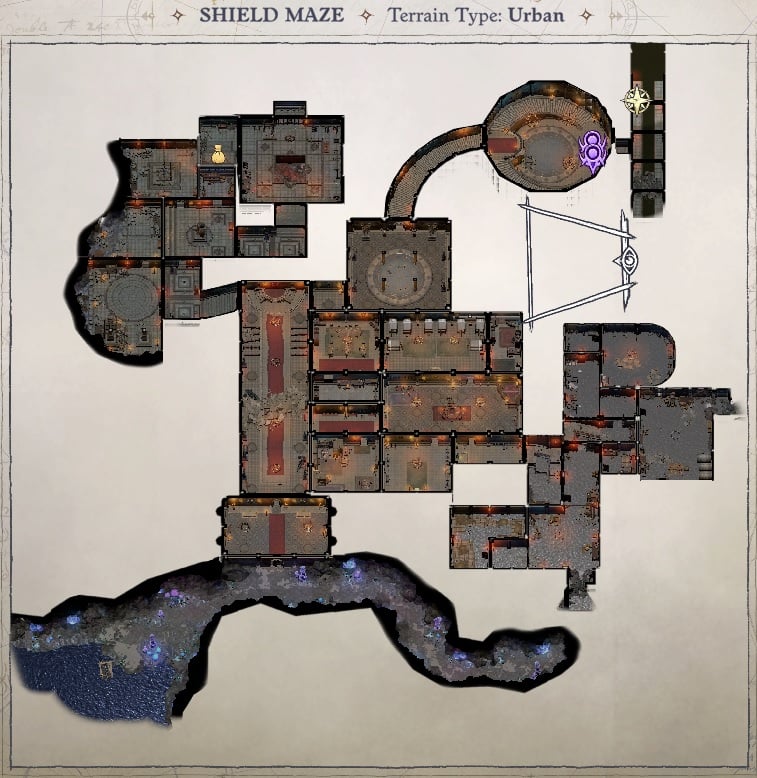
Shield Maze
Follow the path to the gate. When you are in the gate, move forward for a Lore (Religion) (5) check to notice a bas relief of Baphomet, a Demon Lord.
The Shield Maze contains a number of Enemies and Traps:
- 1x Baphomet Cultist, 2x Neophyte Wizard, 1x Neophyte Sharpshooter
- 1x Baphomet Cultist
- 3x Corrupted Mongrel
- 1x Cultist Champion
- 3x Corrupted Mongrel
- 1x Corrupted Mongrel Guard, 1x Corrupted Mongrel Ranger
- 1x Corrupted Mongrel Brute, 1x Corrupted Mongrel Ranger
- 1x Neophyte Fighter, 1x Neophyte Sharpshooter, 1x Hand of Hosilla
- 1x Corrupted Mongrel Guard, 1x Corrupted Mongrel Ranger, 1x Corrupted Mongrel Brute, 1x Corrupted Mongrel
- 2x Neophyte Fighter, 2x Neophyte Sharpshooter
- 1x Neophyte Wizard, 1x Cultist Champion
- 1x Hand of Hosilla, 2x Neophyte Cleric
- 2x Monitor Lizard, 1x Ferocious Monitor Lizard
- 1x Cambion Ranger, 3x Cambion
- 1x Cambion Ranger, 3x Cambion
- 2x Medium Earth Elemental
Notable Items:
- Tome of the Minotaur: Sermons from the Labyrinth
- Ring of Protection +1
- Hosilla's Orders
- Hosilla's Key
- Amulet of Natural Armor +1
- Potion of Haste
- Radiance (a Cold Iron Masterwork Longsword that can be upgraded later; for a Paladin, it will transform into a +1 Longsword)
- Flow of Water (magic ring)
- Crypt Raider's Armor

Puzzles:
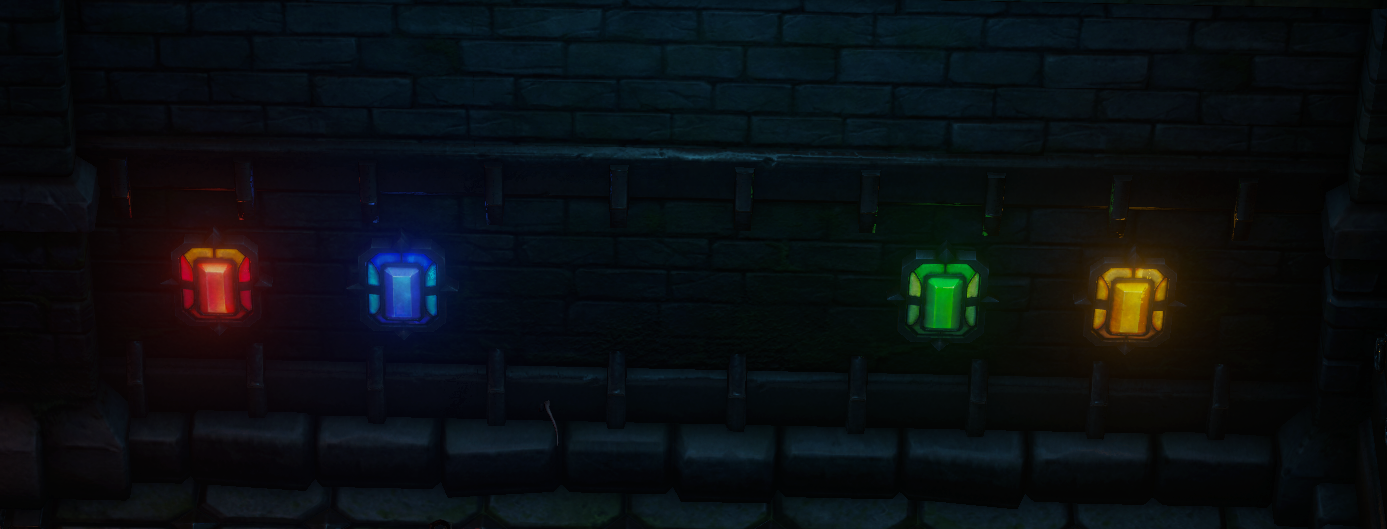
There is one puzzle within the Shield Maze. In the center of the map, there is a large room with paintings mounted on the walls, and each painting has a color associated with it. The solution to the puzzle is to select the gems in the same order as the paintings: Yellow, Blue, Red, Yellow.

Mini Boss:
Large Water Elemental
- Neutral Outsider
- Level 8 Outsider
- Hit Points: 68
- AC: 18
- Damage Reduction: 5/-
- Damage: 14 - 21
Strategies
The Water Elemental is a powerful enemy for new adventurers. It has the Greater Cleave ability (allowing it to hit multiple characters) and 5 Damage Reduction on all damage.
The following potions can be used to substantially decrease this combat's difficulty:
- Potion of Haste
- Potion of Resist Cold
- Potion of Protection from Cold
At the end of the Area you will meet a four-armed demon, Savamelekh, for the first time and Hosilla.
In response to their actions you will have the option to call on one of your Mythic Powers:
- [Requires Angel Mythic Path] [Sieze the light hidden within you]
- [Requires Demon Mythic Path] [Succumb to the rage]
This will have a minor impact on how subsequent characters respond to you.
When you enter the scene Savamelekh will flee, and you will have to face Hosilla.
- If you have sided with Lann previously, Wenduag will appear now and fight alongside Hosilla. (Wenduag will fight with you if you picked the Demonic path)
- If you sided with Wenduag, Lann will appear and fight with you regardless of your choice above.
- If you sided with Wenduag, about halfway through the fight Wenduag will kill Hosilla for you.
Boss:
Hosilla
Chaotic Evil (Human)
Level 6 Inquisitor
Hit Points: 69
AC: 19
Damage Reduction:
Damage: 2-11
Strategies
This fight is considerably easier with Wenduag joining the fight. Otherwise you will also be forced to fight Wenduag as well.
- Hosilla will buff herself, increasing her stats.
- As she is a Chaotic Evil enemy, Smite and Protection From Evil / Chaos potions substantially lower her ability to hit you.
- Once her health is sufficiently lowered she will summon two Quasit enemies.
- At this point, if you sided with Wenduag she will kill Hosilla.
- If Wenduag fight against you, you can easily take out her with a Sleep spell long enough to kill both Hosilla and the summoned Quasits before she could wake up.
Anevia and Chief Sull will appear and talk about the situation. You will receive Cultist's Dispatch and earn the Spies Amidst Our Ranks Quest.
Keep moving past the NPCs and turn left to go upstairs. Any remaining loot you may have forgotten to obtain from defeated Enemies will appear now. Upstairs you will find Irabeth and finish the Quest.
Important NPCs
Tips & Tricks
- ??
Triva
The dead body by Camellia belongs to Aravashnial, a more substantial companion in the Adventure Path.
 Anonymous
Followers of Abadar get a Dialogue option with Horgus that doubles (to 2K gold, instead of 1K) the amount you get from Horgus without any skill checks. I think that Followers of Erastil (not certain) get an option to try and do it without pay, but Horgus will then state Abadar teaches.... and insist on the 1K gold payment.
Followers of Abadar also get additional Dialogue with Dyra, and can persuade her to become a follower of Abadar herself.
 Anonymous
"Wenduag will appear and fight alongside Hosilla"
Apparently whoever wrote this piece of the walkthrough did not pick the Demonic path? I chose the Demonic path and Wenduag fought alongside me and together we all fought Hosilla. Everything else, though, seems to be correct.
 Anonymous
There's nothing in here about the optional Large Water Elemental fight and the (I think two) magic items you get from defeating it.

 Anonymous
Is is possible to enter the maze without resting so Lann stays in the party?

 Anonymous
You get the same options to fight off the illusion regardless of whether you heal the girl or not.


I do not know if this is a bug or a hidden feature or what, but something I have been able to consistently do across multiple play throughs on core difficulty (which that and higher is the only difficulties you would need to bother doing this), is that if you have a great sword and a glaive equipped on Seelah, switching from the glaive to the great sword gives you an attack of opportunity against whoever you are engaged with, and you can still perform another attack that round using the five feet of bonus movement to get in range. Then switch back to the glaive next round, attack, then swap next round to do it again, repeat. An extra attack every other round makes the Maze a lot less of a grind if you have an animal companion to tank instead of her.
0
+10
-1